Black Magic Cake

I made this as it was Halloween. Yes, this Halloween will be a bit more subdued, but hey any excuse for chocolate cake.

This is by all accounts a really old recipe that was originally developed by Hershey Chocolate, to highlight their cocoa powder.

I used supermarket own brand and it worked fine. Please don’t be tempted use powdered drinking chocolate, it will not taste good.

You’ll see there is coffee in this cake, don’t worry about this. I don’t like coffee flavoured desserts either. I promise you won’t taste the coffee, but it does bring out the flavour of the chocolate.

Yes this is very rich, but its not something that you’re going to eat everyday. You won’t be disappointed, this is definitely going in the pure filth file.

Deep, dark, and delicious

Ingredients

For the cake

230 Grams Plain flour

70 Grams Cocoa powder

400 Grams Sugar

2 Tsp Bicarbonate of soda

2 Tsp Baking powder

1 Tsp Salt

2 Eggs

250ml Buttermilk (if you don’t have buttermilk, a 1 Tbsp of lemon juice to ordinary milk and allow to sit for a few minutes)

250ml Strong black coffee (or 1 Tbsp of instant coffee dissolved in 250ml of hot water)

125ml Vegetable oil (Best to use a flavourless oil like sunflower oil)

1Tsp Vanilla extract

For the icing

200 Grams Dark chocolate

175ml Double cream

50 Grams Butter

Method

  1. This is a super easy cake to make. Pre-heat your oven to 180 degrees and grease and line 2 x 8 inch cake tins
  2. For the cake part, combine all the dry ingredients in a bowl
  3. Add the wet ingredients and mix for 90 seconds with an electric whisk
  4. Pour the mix evenly between the two prepared baking tins and bake for 35 minutes
  5. Remove the cakes from the oven and allow cool in their tins for 10 minutes before turning out onto a cooling wrack and allow to cool completely before adding the icing
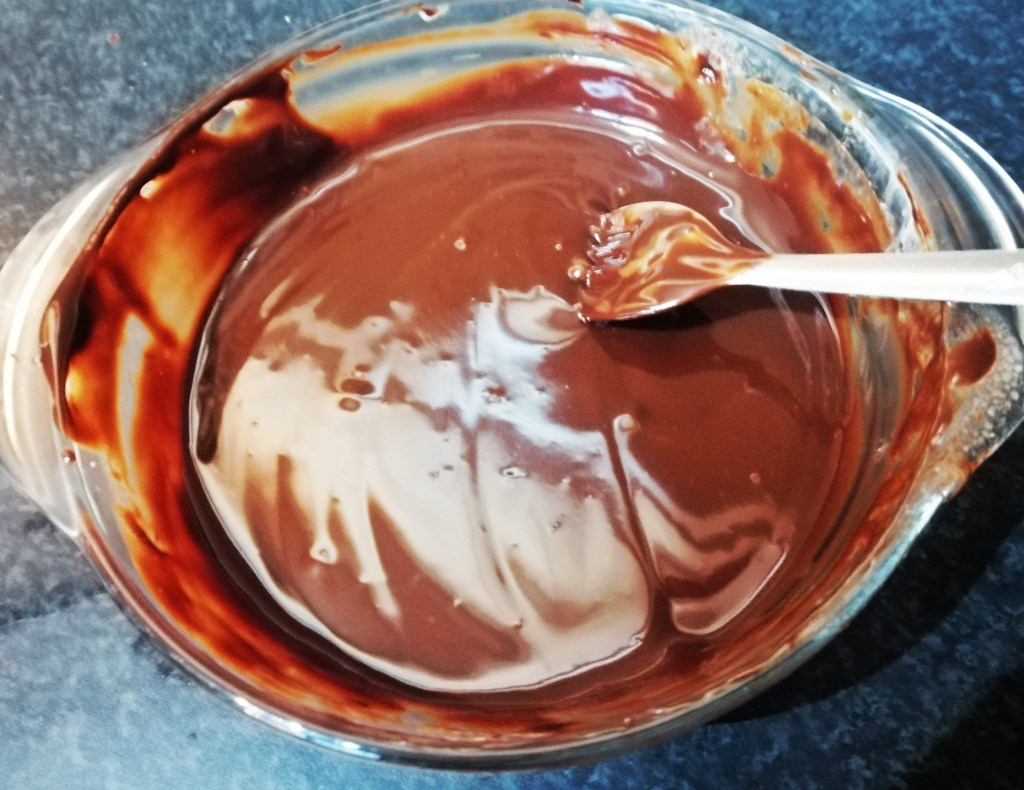
  6. For the ganache icing, break up the chocolate and add to a heat proof bowl.
  7. Heat the cream in a saucepan until just before boiling and pour on top of the chocolate, and whisk.
  8. Melt the butter and whisk into the cream and chocolate and you will soon have thick and glossy icing. Allow to cool to room temperature
  9. Place one of your cake layers on a plate or cake stand. Spread about one third of the icing on top of the cake and spread evenly with a palate knife
  10. Top with the second cake layer and pour one third of the icing on top, spreading evenly with a palate knife again. Spread the remaining icing around the sides, and add any other decoration you might want

Burrito Bowl Chicken

I love the flavours in a burrito bowl, and knocked this up one evening when I was craving some Tex Mex. You can adjust the chilli depending on how much heat you like.

This is full of great colours and flavours, and loads of protein. For vegetarians, this is also a super tasty meal without the chicken.

I topped this with some grated cheese, but it would also be fantastic topped with some avocado or sour cream (or all three if you’re straying into pure filth territory).

This is also a one pot dish, so less washing up is a win win.

Ingredients

Chicken thighs (8 small or 4 large)

1 Onion (sliced)

1 Red pepper (sliced)

400 Gram Tin of black beans

100 Gram Sweetcorn (I used frozen)

1 Tsp Smoked paprika

1 Tsp Chilli powder

1Tsp Cumin

1 Tsp Salt

2 Cloves of garlic (minced)

500ml Passata

300 Grams Rice (I like basmati)

Handful of chopped coriander (optional)

Method

  1. Heat a large flat bottomed pan (you will need one with a lid or that you can cover)
  2. Add the chicken thighs (skin side down first), cook until brown, turn and seal the other side
  3. Add the onion and peppers and cook for another 5-10 minutes
  4. Add the spices, garlic, corn and rice to the pan and stir well
  5. Add the passata and a little water, cover with a lid and simmer for 5-10 minutes
  6. Stir the mixture adding more water if it needs it (the rice should absorb all the liquid, so if the rice still isn’t cooked keep adding water (a little at a time, until its absorbed and the rice is cooked)
  7. Stir in the coriander if you’re using it (I know some people detest it, so please yourself). Serve in bowls with your favourite topping or just as it is

Blueberry and Walnut Soda Bread

Blueberry and Walnut Soda Bread

I love soda bread, it’s super adaptable and works well with sweet or savoury ingredients.

Just out of the oven, and delicious with butter

Like everyone else, I was glued to the Great British Bake Off when the contestants were making various types of soda bread. I hadn’t made soda bread since I made my version with dulse (dried seaweed), and I thought I’d try a sweet version.

Usually I would use dried fruit in a soda bread, but I didn’t have any. I had a look at what I did have, and this was how I came up with blueberry and walnut soda bread.

As before, if you don’t have buttermilk you can add lemon juice to ordinary milk and let it sit for a few minutes to achieve the same result. I also tossed the blueberries in the flour before mixing them in. Apparently this stops them sinking to the bottom.

This loaf will live quite happily in an airtight box for 2-3 days. If you still have any left, can I suggest toasting it, it’s amazing. I also toasted some and topped it with cheese and this was so delicious the I forgot to take photos.

Freshly toasted and slathered in butter, mmmmm

Ingredients

200 Grams Plain flour

200 Grams Wholemeal flour

25 Grams Butter

100 Grams Porridge oats

1 Tsp Bicarbonate of soda

100 Grams Fresh blueberries

50 Grams Walnuts

1 Tsp Salt

75 Grams Sugar

450ml Buttermilk

Method

  1. Rub butter into the porridge oats (you can use a food processor to do this, but really only takes a minute)
  2. Add your dry ingredients to the porridge oats (remember to dust the blueberries in the flour before adding them)
  3. Add the buttermilk to the bowl and mix lightly with a palette knife
  4. Turn your mix onto a floured surface and gently form it into a ball. Try not to handle it too much, it should be a fairly soft dough
  5. Transfer to a baking sheet lined with baking parchment. Cut a cross onto your loaf. You should cut down about one third of the depth of the dough
  6. Bake in an oven preheated to 180 degrees for 45-50 minutes (or until it sounds hollow when you tap it).

Spiced Plum Cake

Soft sweet plum topping with gentle spices.

Whenever possible I like to eat seasonally, it’s usually cheaper, and usually better for you, and better for the planet. Autumn has some great fruit and vegetables. One of my favourites are plums. Usually inexpensive and really versatile. I love this plum cake, no only because its relatively straight forward to make, but the cinnamon and cardamon add a whole other level of flavour. The addition of sour cream adds a tenderness to the sponge. This will also live quite happily in a cake tin for 3-4 days. I love it with whipped cream, but it’s also perfect comfort food served with custard.

Ingredients

300 Grams Plain flour

1, 1/2 Tsps Baking powder

1 Tsp Ground cinnamon

1/2 Tsp Ground cardamon

1 Tsp Salt

3 Eggs

100 Grams Butter

200 Grams Sugar

60 Grams Sour Cream

4-5 Plums

Ready for the oven

Methods

  1. Mix the flour, salt, spices and baking powder together
  2. In a separate bowl cream the eggs and sugar together with an electric whisk (hold back 2 tablespoons of sugar to top the plums with)
  3. Add the eggs and sour cream to the butter and sugar and whisk until light and fluffy
  4. Gradually whisk in the flour mixture until you have thick cake batter
  5. Grease a 9 inch spring firm cake tin, and pre-heat your oven to 180 degrees
  6. Transfer your cake batter to the cake tin and spread evenly.
  7. Cut the plums in half, remove the stone and cut each half into quarters
  8. Starting in the centre of the cake, arrange the slices of plum in a circle (or any type of pattern you like) and sprinkle with remaining sugar
  9. Bake for 35 mins, or until a skewer comes out clean when stuck in the cake

Foraging at Navan Fort and walking through history.

Even though I was raised in the city, one of the things my Dad loved to do was to take us on nature walks. During these he would point out trees and plants and let us pick wild blackberries and hazelnuts.

Elderberries, packed with vitamins and antioxidants

Foraging isn’t practical for everyone but when you get the chance I would recommend it. It helps ground you to where you live, and best of all it’s free. It’s also a fantastic activity to do with kids (just make sure to watch what they’re eating).

Celtic round house

Recently Navan Fort and Visitor Centre in Co. Armagh, ran an event which provided a guided foraging walk and demonstration of the food and cooking methods our Celtic ancestors would have ate. I’m a big history nerd, so this was right up my street.

Iron Age fire pit

The staff in full Celtic regalia complete with spears really brought history alive, showing not only what the Celts ate, but how they cooked and lived, complete with a genuine Iron Age round house.

Inside an Iron Age round house

The staff were brilliant at getting younger visitors involved and having banter with the participants. They’re also extremely engaging, knowledgeable , and were really interesting.

Tripod cooking
Celtic bread oven

We were then treated to the foraging element led by Fergal. It was great to be back in nature and learn the history and use of local plants.

Robert’s plant or herb Robert

I have to admit in being remiss at not taking more photos of the edible berries like haws, rosehips, and sloes (yes the things they make sloe gin with). One of the more interesting plants was Robert’s plant/herb Robert. Apparently this will be one of the most important cancer fighting drugs in the next decade. If you want to put it in a basin of warm water and soak your feet it also has great antioxidant properties.

I honestly couldn’t recommend the place highly enough. We were also treated to nettle soup (packed with iron and surprisingly tasty), pork and apple stew (we were in the orchard county after all), and a dessert of toasted oats and nuts, local honey, and berries and cream. The charming and entertaining Ita not only cooked all this but demonstrated how our ancestors would have made bread. The foraging events are coming to an end due to the time of year, but the place has different events all year round and is still well worth a visit at any time.