Vegetable (Vegan) Pot Sticker Dumplings

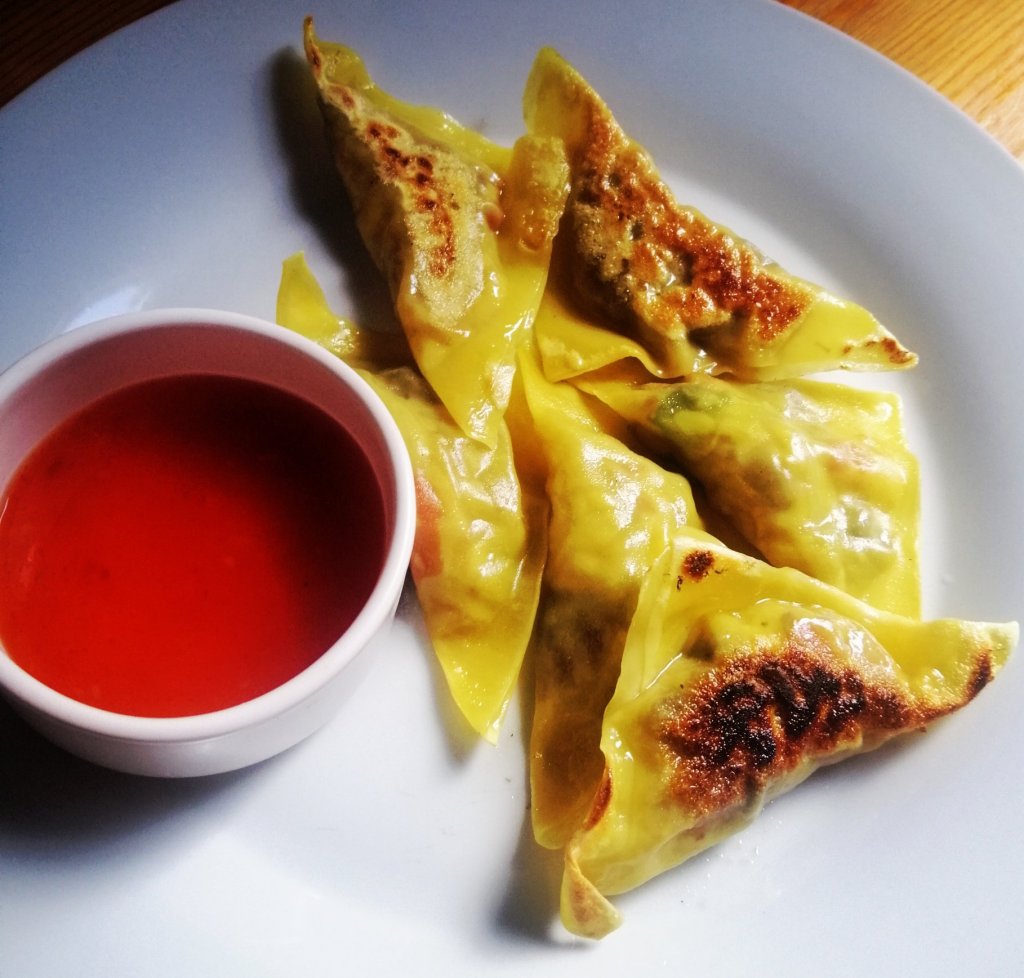
I love any type of dumpling, but have been over indulging lately, so needed something that tasted great but needed to be good for me. These are so delicious you won’t even like you’re being healthy.

I make a big batch of these and freeze them, as they make a really quick week night dinner, they’re also much nicer and cheaper that the frozen ones you can buy. You can use any dipping sauce you like (I just used a bottle of sweet chilli sauce I had in a cupboard).

Like most batch cooking if you can rope in friends or some child labour (kids love making these) it gives you a chance to kick back and give orders. Chop the vegetables fairly finely, as it will be easy to stuff the dumplings.

I came up with these mainly to use up vegetables that had been hanging about my fridge and a packet of wonton wrappers that had been in my freezer since my last visit to the Asian supper market. Traditional pot sticker dumplings are usually made with a dough, so these are a bit of a cheat, I think they work well and saves you time.

Ingredients

1/2 Small head of cabbage (finely chopped)

1 Red pepper (finely chopped)

200 Grams Mushrooms (finely chopped)

1 Onion (finely chopped)

3-4 Scallions/spring onions (finely chopped)

1 Tbsp Garlic (minced/crushed)

1 Tbsp Ginger (grated or finely chopped)

1 Tbsp Soy sauce

1 Tsp Chilli flakes, or 1 fresh chilli (finely chopped)

1 Tbsp Sesame oil

1 -2 Tbsp Sunflower oil (plus extra to fry the dumplings)

1 Pack Wonton wrappers

Method

  1. Heat 1 tablespoon of sunflower oil to a large frying pan and add the chopped vegetables, chilli garlic and ginger, cook for about 5 minutes, there should still be a bit of bite, but the onion should be cooked through.
  2. Add the soy sauce and sesame oil and allow to cool completely
  3. Set up a little work station for yourself, you should have your bowl of the dumpling filling, a small bowl of water to wet the edges of the dumplings and if you are making some to freeze you should have a tray lined with foil that has had a small about of oil rubbed across it so the dumpling don’t stick to it while they’re in the freezer
  4. Open your packet of wonton wrappers and wrap in a slightly damp tea towel to stop then drying out as you work
  5. Lift a wonton wrapper and put a teaspoon of the filling in the centre. Wet your finger and wet all the edges of the wrapper and take one corner to meet the opposite corner to make a triangle. Make sure that the edges of the dumpling is properly sealed. Set on your tray and move onto make the next dumpling, keep going until you have run out of filling or wrappers.
  6. If you’re freezing some of the dumplings, freeze them on a tray and then transfer into freezer bags
  7. When you’re ready to eat the dumplings, spray a small amount of oil in a non stick frying pan (you’ll need a lid or some way to cover the pan) and heat over a high heat. Boil the kettle.
  8. Place your dumplings in the pan (don’t try to squeeze too many in the pan at once). Cook for 2 minutes or until the bottoms have started to brown, then add a couple of tablespoons of boiling water (the pan shouldn’t be swimming in water), and cover with a lid and cook for a further 1-2 minutes until the water has been absorbed
  9. Serve with your favourite dipping sauce (they’re also amazing washed down with a cold beer)

Chicken Crackling Butter

This may be the most totally filthy thing (in a good way) that I have ever made.

My sister saw this on a food programme and asked me to make it. She couldn’t remember which programme or I would give credit where its due.

I cook with chicken thighs alot, and when I’m feeling healthy I’ll remove and discard the skin. I’ve now started making chicken crackling (super crispy chicken skin crisps).

This butter makes a delicious topping on top of steak, or even melted onto pasta. Under no circumstances should you be left alone with it and a loaf of French bread, unless you want your loved ones to find you covered with crumbs, glistening with butter and filled with shame. Feck it, it’s totally worth it.

You can make larger batches and freeze the butter (if you don’t trust yourself)

Flatten out the chicken skin before placing another baking tray on top.

Ingredients

75 Grams Butter (room temperature, and cut into cubes)

Skin from 3-4 chicken thighs

Salt

Method

  1. Preheat your oven to 200 degrees (Celsius)
  2. Place the chicken thighs on a chopping board, and run the back of a large kitchen knife a long the skin to flatten it out.
  3. Place on a baking sheet, sprinkle lightly with salt and then place another baking tray on top to keep the skin flat
  4. Bake in the oven for 15-20 minutes or until the chicken skin is a deep golden brown. Set to one side and all to cool completely
  5. When cold, whizz the chicken skin in a food processor until it looks like sand, you can leave it a little coarser if you prefer
  6. Add the butter to the food processor and pulse until everything is well combined. Check the seasoning and more salt if you think it needs it
  7. Transfer to a sheet of cling film and shape into a sausage shape and wrap before freezing or refrigerating

Sunnyside Supper Club – 10 September 2022

And the winner is….

Votes have been counted and the Italian menu has pipped the French menu to the post once again.

If you haven’t been to the Sunnyside Supper Club before, it’s a bit like the Little Paris Kitchen (only in Belfast, and I don’t look anything like the fabulous Rachel Khoo).

Everyone shares a communal table and eats the same menu. The aim is to enjoy some great food and enjoy a meal with new people. Guests are usually a mix of friends on mates dates, people who are new to Belfast and want to meet locals and couples who want to do something a bit different.

We only ever have a max 8-9 guests so book early to avoid disappointment.

We’ll great you with a welcome drink, and then it’s BYO (no corkage)

Italian Menu

Starter – Gnocchi with Hazelnut Pesto

Main – Chicken Marsala, chicken thighs cooked in a creamy mushroom and Marsala sauce, (vegetarian option-Aubergine Parmesan), Italian Salad, Homemade Italian Bread

Dessert – Tiramisu

10th September – Sunnyside Supper Club

Sunnyside Supper Club – 10th September 2022

£35.00

N.B. We have a 24 hour cancellation policy.

Sunnyside Supper Club – New Date, 10th September 2022

Apologies, but I have to change the date of the next Sunnyside Supper Club to 10th September.

My little Kitchen Elf and general dogs body (her term, not mine), has been surprised with a romantic weekend away on the original date planned, meaning we have to push things back by a week. Never let it be said that I got in the way of true romance!

In the mean time don’t forget to vote for your favourite menu.

French Menu

Starter – French Onion Soup with Gruyere Crouton

Main – Beef Bourguignon (vegetarian option – mushroom bourguignon), Dauphinoise Potatoes, Buttered Greens

Dessert – Tarte au Chocolat

Italian Menu

Starter – Gnocchi with Hazelnut Pesto

Main – Chicken Marsala, chicken thighs cooked in a creamy mushroom and Marsala sauce, (vegetarian option-Aubergine Parmesan), Italian Salad, Homemade Italian Bread

Dessert – Tiramisu

To book please complete the form below, or feel free to contact us if you have any questions.

10th September – Sunnyside Supper Club

Sunnyside Supper Club – 10th September 2022

£35.00

N.B. We have a 24 hour cancellation policy.

Chocolate Chip and Walnut Pie

Any type of chocolate dessert is normally a winner. This pie is similar to a Kentucky Derby pie, I have left out the bourbon, and reduced the sugar because I found the original version overly sweet. The finished result is still rich and delicious and feels really indulgent.

This is divine served with whipped cream or vanilla ice cream. If you’re short on time you can use shop bought pastry or even a pre-made pastry case.

Serves 8

(For the pastry case)

125 Grams Butter

200 Grams Plain flour

2 Tbsp Sugar

Pinch of salt

Cold water

For the filling

125 Grams Butter (melted, and allowed to cool)

125 ml Golden syrup

4 Eggs

200 Grams Brown sugar

50 Grams Plain flour

150 Grams Walnuts (roughly chopped)

125 Grams Dark chocolate (roughly chopped) or chocolate chips

1 Tsp Vanilla extract

Method

  1. For the pastry, add the butter, sugar and salt and flour to a food processor and pulse until it resembles breadcrumbs, (you can use the old fashioned rubbing in method if you don’t have a food processor). Gradually add cold water until the mix comes together as a dough. Form into a ball and wrap in cling film and then chill in the fridge for 30 mins
  2. Grease a 12 inch pie dish/tin, ideally one with removable base. Remove the pastry from the fridge and roll out on a floured surface or between two pieces of parchment paper until 1/2 cm thick (you can check the size by placing your tin the centre of the pastry and checking there is enough room to cover the depth of your tin)
  3. Carefully transfer the pastry to the pie dish and gently ease the pastry into the edges, place in the fridge and chill for another 30 mins. Trim any excess pastry that hangs over the edge of your pastry case
  4. Preheat your oven to 180 degree (Celsius), place a sheet of baking parchment in the prepared party case and add baking beans (I use old uncooked rice, rather than buying the fancy clay baking beans), Blind bake for 20 minutes and then remove the baking parchment and baking beans
  5. For the filling mix, whisk the melted butter (make sure its cool), eggs and add the sugar, vanilla extract and golden syrup and whisk until it lightens in colour and increases in volume (the sugar should have dissolved)
  6. Whisk in the flour, ensuring there are no lumps, and then fold in the chocolate and walnuts with a spatula
  7. Pour the filling mix into the pastry case and bake at 180 degrees for 45 minutes, until the centre of the pie is just starting to set (it will continue to cook as it cools)
  8. Cool for a couple of hours before serving with whipped cream or ice cream