Mini Egg Rocky Road Bars

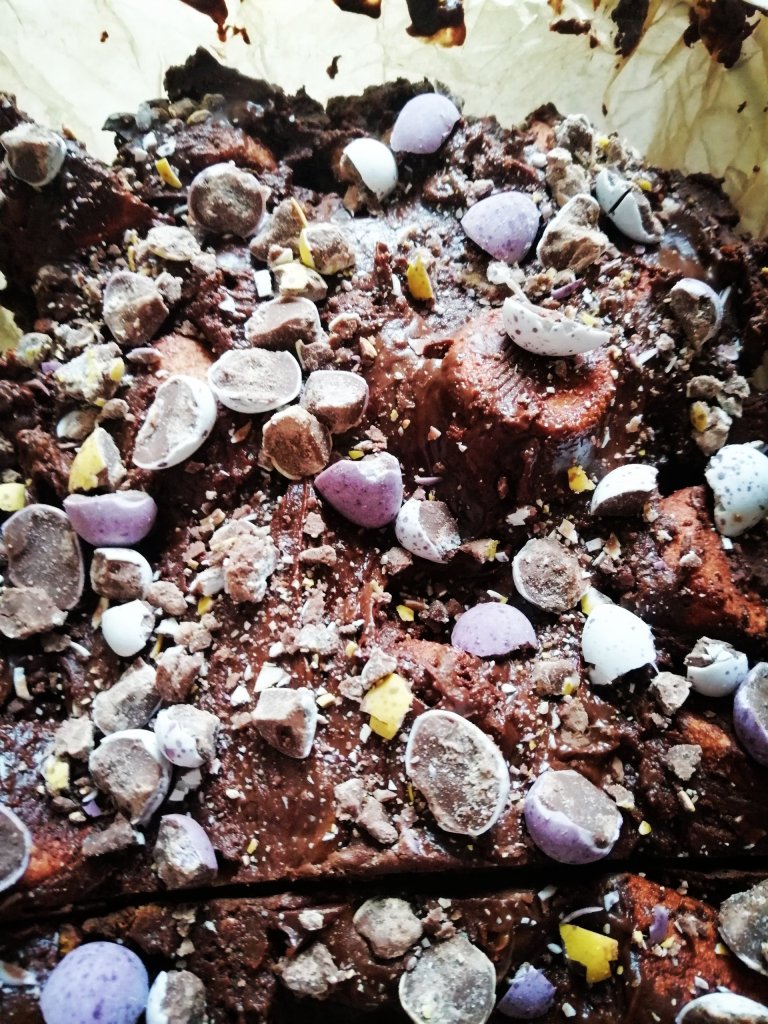
You can make an almost infinite variety of rocky road bars. The key thing is include lots of different textures.

I used mini eggs because they are basically my crack cocaine. My other more recent addiction is Bishoff biscuits. I’ve used these here, but you can use any type of crunchy biscuit or cookie you prefer.

Ingredients

400 Grams Chocolate (I used half milk and half dark chocolate, but use what you prefer)

125 Grams Bishoff biscuits

100 Grams Marshmallows

250 Grams Mini Eggs

3 Tbsp Golden Syrup

50 Grams Butter

Method

  1. Break the chocolate in to chunks, and add to a microwave proof bowl along with the butter and golden syrup. Microwave for 30 seconds at a time until the butter and chocolate have melted
  2. Place the biscuits in a freezer bag any bash with a rolling pin (if you don’t have one a tin can will do). The biscuits should be be broken into bits but not too small or all crumbs. Put the broken biscuits in a large bowl
  3. Add half the mini eggs to the freezer bag and bash these too. Add to the broken biscuits and add the Marshmallows
  4. Pour two thirds of the chocolate mix into the bowl and stir until combined. Line a 12cm X 18cm dish with baking paper and transfer the rock road mix into it. Spread evenly.
  5. Cover the rocky road mix with the chocolate you held back. I use a wet palate knife to smooth the top (an ordinary knife is fine if you don’t have one, as rocky roads are bumpy)
  6. Sprinkle the remaining half of the crushed mini eggs and refrigerate for a minimum 1-2 hours before cutting into slices

Hummingbird Cake

I’ve loved this cake ever since I tasted it in the States years ago. Not only does it have a cool name but your house will smell unbelievable.

This is also a good way to use up over ripe bananas if you can’t face banana bread (this is much nicer). Cinnamon can be swapped for ground ginger if you’re not a fan.

Ingredients

For the cake

130 Gram Tin of pineapple in natural juice (chop the pineapple finely, and keep the juice)

2 Ripe bananas (mashed)

280 Grams Caster sugar

210 Grams Self raising flour

2 Tsp Ground Cinnamon

60 ml Pineapple juice (from the tin of pineapple)

170 ml Oil

2 Eggs

For the frosting

60 Grams Butter

120 Grams Cream Cheese

180 Grams Icing sugar

75 Grams Pecan nuts (Chopped)

Grated zest of one lemon (optional)

Method

  1. Preheat your oven to 180 degrees. Lightly grease a 20 cm (8 inch) cake tin and line with baking paper
  2. Add the banana, chopped pineapple and sugar to a large bowl and mix until combined. Add the flour and cinnamon and mix well
  3. Whisk the oil, eggs and pineapple juice together before adding to the banana mixture. Stir until properly combined
  4. Transfer the cake mix to the baking tin and bake for 1 hour or until you can insert a skewer in the centre and it comes out clean. Allow to cool in the tin for another 15 minutes. Allow to cool completely before topping with icing
  5. To make the icing, whisk the butter and cream cheese together (I use an electric whisk). Gradually add the icing sugar and orange zest.
  6. Spread the icing evenly over the top of the cooled cake and sprinkle with pecans

Sichuan Pork and Green Beans

I have to give a shout out to my friend Nuala for turning me into this, and I love it.

If you haven’t used Sichuan pepper before you can by it ready ground in most big supermarkets. You can also buy packets of the whole peppercorns, and are reddish black in colour. While there is some heat, they are also really aromatic and work nicely in lots of other recipes.

This makes a great mid week dinner and is ideal for anyone following a low carb diet. If you’re not then enjoy this with rice or noodles. I used frozen greens to save time.

Ingredients

250 Grams Minced pork

500 Grams Green beans blanched on boiling water

Thumb sized piece of ginger (grated)

2 Cloves of garlic (finely chopped)

2 Scallions/spring onions (finely chopped)

1 Red chilli pepper (finely chopped)

2 Tbsp Soy sauce

1 Tbsp Sesame oil

1 Tsp Ground Sichuan pepper

Method

  1. Blanch the green beans in boiling water and drain
  2. Fry the minced pork in a large frying pan or wok until no longer pink
  3. Add the rest of the ingredients and cook for a further 5 minutes. If the mix starts to catch in the pan you can add a little water to stop this

Coconut and Jam Sponge

This is a real reminder of school dinners for me.

If you aren’t confident with desserts this is really easy. All the ingredients for the sponge are dumped in a bowl and whisked together before being baked. The topping is simply ready made jam and coconut.

The sponge also freezes really well, so if you’re super organised make a double batch of the mix. Bake two sponges, and when completely cool, wrap one one of the sponges in cling film and freeze, top with jam and coconut once thawed.

I’ve used margarine in this (Mary Berry claims it’s better for sponge cakes, and who am I to argue), it’s also cheaper. Feel free to use butter if you prefer

Serve with custard for the perfect comforting dessert.

Ingredients

For the sponge

225 Grams Self raising flour

225 Grams Sugar

225 Grams Margarine

4 Eggs

For the topping

200 Grams Jam

25 Grams Dessicated coconut

Method

  1. Add all the ingredients for the sponge in a bowl. Mix with an electric whisk for 5 minutes until light and fluffy
  2. Pre heat your oven to 180 degrees
  3. Line a 30cm x 18cm square cake tin with baking parchment. Transfer the sponge mix into the tin and spread evenly with a spatula
  4. Bake for 25 – 30 minutes, and allow to cool
  5. Stir the jam and if it’s too thick to spread add a table spoon of hot water and mix well
  6. Spread the jam evenly across the sponge and sprinkle with coconut

Cheese and Broccoli Soup

Serve with chunky croutons for some crunch

I don’t make soup that often (some soups are a little dull).

Anything with cheese in it gets my vote, and this is rich and satisfying.

Ideal for anyone following a low carb diet, this is also delicious with crusty bread.  I made this with vegetable stock so it’s suitable for vegetarians but you can use chicken stock if you prefer.

You’ll need cream cheese and a stronger flavoured cheese.  I used a mix of mature cheddar and parmigiana, blue cheese works really well too, but use what you have.

This rich creamy soup is even tastier topped with crunchy croutons, or crispy bacon (if you’re not vegetarian)

Ingredients

1 Large head of broccoli (roughly chopped)

1 Small onion, or 3-4 spring onions/scallions (chopped)

1 Tbsp Oil

750 ml Vegetable stock (I used a stock cube)

200 Grams Cream cheese

50 Grams Strong flavour cheese (grated)

Salt and pepper

Method

  1. Heat the oil in a large pot, and add the onion. Fry over a medium heat until soft but don’t brown
  2. Add the broccoli and vegetable stock. Cover with a lid and simmer for 10 minutes or until the broccoli is soft
  3. Add the cream cheese and stir until it has melted. Using a blender or hand held blender, blitz until the the soup it is smooth (how smooth you make it is up to you)
  4. Return the soup to the pot and add the stronger flavoured cheese. Heat for a further 5 minutes and stir well to make sure all the cheese has melted. Check the seasoning and add salt and pepper if needed