Vegetable Samosas

Light crispy pastry, with a soft well flavoured filling, I like these served with mango chutney.

I was doing another scan around my kitchen cupboards for something to make, and decided on samosas.

Potato and pea filling

I love a samosa, those delicious little Indian flavour bombs are usually deep fried, but these are baked to make them a little healthier. This recipe is vegan, but you can use spiced lamb as a filling. I’ve used potatoes and peas, but you swap out the peas for green beans or spinach.

Roll your divided dough into a circle and cut in half

The first couple of samosas will probably look a bit wonky until you get into the way of making them. Don’t panic these will still taste great, and if you don’t want to serve them then they will be the cook’s perk!

Wet the edges and press together to form a cone

Makes 16

For the pastry

225 Grams Plain Flour

2 Tbsp Oil or ghee

1 Tsp Onion (Nigella) seeds (optional)

Seal the edges to make a cone that you can filk

For the filling

3 Large potatoes (peeled and cut into small cubes)

1 Large onion (finely chopped)

2 Cloves of Garlic (finely chopped)

Thumb sized piece of ginger (grated)

2 Chillies, (finely chopped, you can add more or less depending on how much heat you like)

4 Tbsp Oil

100 Grams Peas (I use frozen, and let them thaw)

2 Tbsp Coriander (finely chopped)

1 Tsp Salt

Yummy hot or cold

Method

  1. Add the oil, onion seeds, and flour to a bowl and gradually add luke warm water until you have a dough. Knead for 5 minutes, and then wrap in cling film and rest in the fridge
  2. Add 2 tablespoons of oil to a large frying pan, and add the shopped onion. Fry over a medium heat for 5 minutes, and then add the garlic, ginger, and chillies
  3. Lower the heat and add the cubed potatoes, and a little water and simmer until potatoes are soft (you might need to add a little water as it cooks, but it should be a runny mix)
  4. Add the peas, salt and coriander and check the seasoning before allowing to cool
  5. Preheat your oven to 200 degrees, and line a baking sheet with parchment
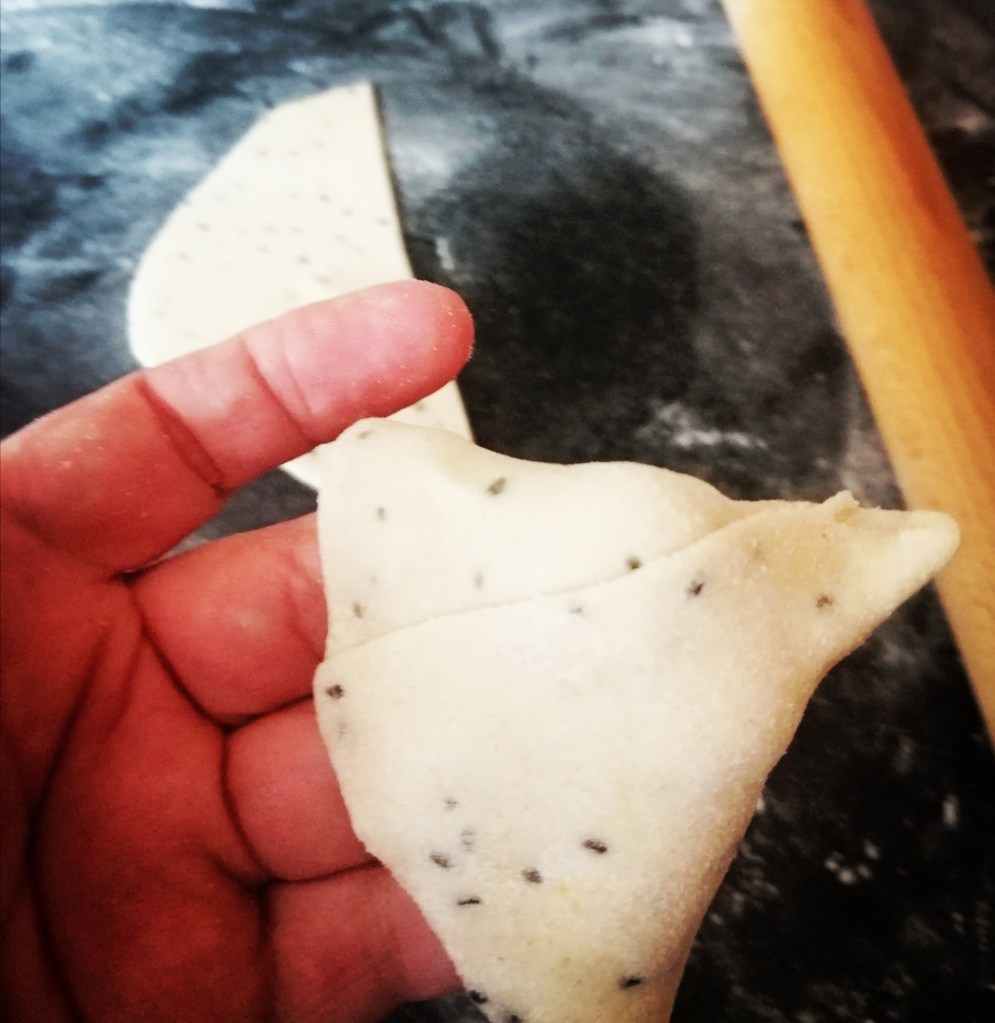
  6. Once the pastry has rested, divide it into 8 balls. On a lightly floured surface, roll out the ball into a thin circle. Cut the circle in half.
  7. Pick up the half moon shape and wet the edges with a little water. Make a cone by pressing the edges together and fill the cone with potato mixture. Press the remaining edges together to seal the samosa, ending up with a triangle shape
  8. Continue rolling out the pastry and filling the samosas until you are finished, placing the samosas on the baking sheet. Brush them with the remaining oil and bake for 20 minutes until golden and crispy

Paneer Masala

Serve with rice or flat breads

This might look like a lot of ingredients, but getting yourself a good spice cupboard opens up a world of food possibilities. Find a good Asian supermarket and you can do this much more cheaply than buying them from a big supermarkets.

My love for cheese that you can fry has been well documented on this blog. Add it to a fragrant and well spiced masala sauce and it’s a little slice of vegetarian heaven.

Ingredients

1 Onion (finely chopped)

1 Tsp Cinnamon

2 Cardamon pods

2 Cloves garlic (finely chopped)

1 Tsp Fennel seeds

3-4 cm Piece of ginger (grated)

4 Cloves

1 Tsp Tumeric

1 Tsp Chilli Powder

1 Tsp Ground coriander

1 Tbsp Tomato puree

2 Tbsp Chopped coriander

Knob of butter

250 Grams Paneer ( cut into 2cm cubes)

2 Tbsp oil

Taking time to set out your spices saves time while you’re cooking, and you can tidy as you go.

Method

  1. In a large frying pan add the butter and fry the onion, then add the cinnamon, cardamon pods, cloves and fennel seeds
  2. Cook for 5 minutes before adding the ginger and garlic, and cook for a further 5 minutes, stirring occasionally
  3. Add the turmeric, tomato puree and chilli and fry for another minute, and 250ml hot water
  4. Bring the sauce to just before the boil. Reduce the heat and simmer on a low heat for 20 minutes
  5. In a non stick frying pan, heat the oil and fry the paneer until browned on all sides
  6. Add the paneer to the sauce and cook for another 10 minutes, allowing it to absorb the flavour.
  7. Top with chopped coriander. Serve with rice or flat breads. This keeps well in the fridge for 3-4 days

Corned Beef, Potato and Onion Pie

Simple and delicious dinner.

I first had this as a teenager when a school friend’s Mum made this one night when I was at their house. It was a taste revelation to me. Up until then I had only had corned beef (chipped beef in the US) in sandwiches.

I had the idea to make this when looking in a cupboard I found the strange shaped tin with the stupid little key and strange opening mechanism. Honestly, after all these years, why does corned beef have to be stored in these weird shaped tins. And don’t even start me about the stupid key thing you need to open it, that you cut yourself on every single time. I mean it, if anyone knows why this still happens please tell me.

Cheap and simple ingredients make a really delicious filling

Anyway, rant over. You can make this with ready made pasty if you want this to be super quick. I have included details for anyone who prefers to make their own pastry. It’s a good way to use up left over potatoes, and makes an easy inexpensive meal.

Use a loose bottom pie tin to make it easier to remove the pie.

Ingredients

For the pastry

225 Grams Plain flour

100 Grams Butter (cut into cubes)

Cold water

For the filling

300 Grams Potatoes (cooked)

1 Onion (finely sliced)

340 Gram Tin of corned beef

Salt and pepper

Method

  1. My hand are always really warm, so I’m not best suited to make pastry, this is part of the reason I add the flour and butter to a food processor and pulse until I get a mix that looks like bread crumbs (you can also use the traditional rubbing in method, but generally I’m too lazy for this).
  2. When your mix looks like breadcrumbs, start by adding a little cold water at a time until the mix comes together to form a ball. Wrap in cling film and chill in the fridge for 30 mins. If you’re stuck for time or just can’t be bothered, it’s totally fine to use shop bought pastry
  3. Pre-heat your oven to 180 degrees and put a baking sheet in the oven to heat. Grease a 9 inch loose base cake/pie tin and set to one side, ready for your pastry
  4. Remove your pastry from the fridge and let it sit for 5-10 minutes so it isn’t too stiff to roll out. While you wait on this, chop your onion finely, and cube your cooked potatoes (which should be cold), after you have wrestled your corned beef out of the tin and tried really hard not to scream f*ck at it, you should cube this as well
  5. Mix the potatoes, corned beef, and onion together and season with salt and pepper
  6. Put the pastry on a floured surface and cut approx 1/3 off and set to one side (this will be the lid for your pie)
  7. Roll the remaining pastry out as thinly as possible, and make sure it’s big enough to fit your pie tin. Line the tin with the pastry, making sure that you have pushed into the edges
  8. Put your corned beef mix into the lined pie dish, and then roll out the remaining pastry to form a lid. brush the edges of the pastry lining the tin with beaten egg and then place the lid on top. I press down the edged with a fork to make sure it’s sealed
  9. Brush the pie with some more beaten egg (it will help it look pretty when it’s cooked) and add a couple holes to allow steam to escape. Place the completed pie on top of the baking sheet that has been heating in the oven (this help ensure the base if cooked).
  10. Bake for 30-40 minutes or until the pastry is a deep golden brown

Peanut Butter & Jelly Blondies

So good and so simple

I know, I’m becoming obsessed with blondies during the lock down, but they are so easy and so versatile.

The perfect tea time treat

I wanted something delicious and had run out of chocolate. After a quick scan though my cupboards and my favourite recipes, I settled on this recipe based on one from Cafe Sucre Farine. I like these with a cup of coffee, but they’re also great with a big glass of ice cold milk, or for dessert served with ice cream.

Simple blonde mix, just waiting on its topping.

I actually used lingonberry jam (usually served with meatballs at a large Swedish furniture store), because it was all I had, and it worked fine. You can use whatever flavour of jam/jelly you want or have at home. This is a pretty simple recipe so is probably ideal if you have little hands to keep busy, kids love dolloping on and swirling the pb & j.

Dollop spoonfuls of peanut butter and jam/jelly across the top of the blonde mix

For the blondies

120 Grams Butter

60 Grams Peanut butter

125 Grams Light brown sugar

1 egg

1/2 Tsp Baking powder

1/4 Tsp Salt

200 Grams Plain flour

For the topping

80 Grams Peanut butter

80 Grams Jelly/Jam

Swirl the PB & J with the back of a spoon to give a marbled effect.

Method

  1. Pre-heat your oven 180 degrees, and line a 8in x 8in baking tin with baking parchment
  2. Melt 60 Grams peanut butter and butter together in the microwave. I usually give it 30 seconds blasts so as not to burn it, and obviously use a microwave safe bowl
  3. When the peanut butter and butter have melted allow to cool a little add the sugar, salt and baking powder, stir in a beaten egg and then the flour.
  4. Mix until thoroughly combined, and transfer the mix to your lined baking tin
  5. For the topping in two separate bowls add the jam and peanut butter, and microwave each for 30 seconds to soften. Dollop spoonfuls of each across the top of the blonde mix. Then smear with the back of a spoon to give a marbled affect.
  6. Pop in the oven for 30 minutes, and allow to cool in the tin for 10 minutes
Straight from the oven, allow to cool in the tin for 10 minutes before cutting into squares.

Five Spice Pork Belly

Crispy and deeply delicious.

I love pork belly. If I go to a restaurant (remember those). I’m really predictable, if pork belly is on the menu that’s what I’m ordering.

If you haven’t tried it before, it’s pretty rich and can be fatty, but it’s also really tasty. I enjoy it, cooked long and slow, and then crisped up in the pan.

Pork belly lends itself particularly to Asian flavours. I like to marinade the pork, usually over night but at least for an hour.

This is really versatile, and freezes well. It’s great served with salad (if you’re following a keto or low carb diet), or sliced in sandwiches with coleslaw. Its also really good sliced and served with noodles. You can crisp it up on a barbecue instead of the pan for a delicious smokey flavour.

Marinade the pork for at least 1 hour

Ingredients

500 Grams Pork belly strips

2 Tbsp Soy sauce

1 Tbsp Sesame oil

2 Tsp Chinese five spice powder

1 Tsp White wine vinegar (or what ever vinegar you have, just not something really strong like malt vinegar)

1 Tbsp Sesame seeds (optional)

Method

  1. Cut the pork belly into 2-3cm thick strips
  2. Add the oil, soy sauce, vinegar, and five spice powder, to an oven proof dish and mix.
  3. Coat the pork strips with the marinade. Cover the dish and refrigerate overnight (or for an hour at least)
  4. Preheat your oven to 160 degrees, put the covered dish in to cook for 90 minutes,
  5. Remove from the oven. Heat a frying, and add the pork to pan.
  6. Crisp for a few minutes on each side, and then sprinkle with sesame seeds

BLT Salad with Homemade Ranch Dressing

Every bite is totally yum

This is the perfect salad for people who think they don’t like salads.

What makes it so good is the ranch dressing. I’m warning everyone in advance, this isn’t a salad for the diet conscious. Ranch dressing is rich and creamy and makes just about anything taste fantastic. It’s doubles as a dip, and is also fantastic in sandwiches with tortilla chips, chicken wings, or if you’re one of those people who like to dip their pizza, (FYI the Italians are horrified by this and have threatened to take pizza back if the rest of the world doesn’t behave itself. I won’t tell them if you don’t).

The salad hits all the bases, soft chicken, crispy salty bacon, sweet cherry tomatoes, and a rich creamy dressing. You can always use the shop bought ranch dressing if you don’t have time or the ingredients, but do yourself a favour and give it a try. This is great for anyone following low carb or gluten free diet.

Serves 2

Ingredients

For the salad

2 Cooked chicken breasts or chicken thighs (shredded or cut into cubes)

4 Rashers of streaky bacon (cooked until crispy and cut or crumbled into 2cm strips)

2-3 Scallions/spring onions (finely chopped)

Handful of cherry tomatoes (halved)

2 Handfuls of salad leaves

For the dressing

2 Tbsp Mayonaise (I use shop bought)

2 Tbsp Sour Cream

1/2 Tsp dried dill

1 Tsp Chopped parsley (or 1/2 tsp dried parsley)

1/2 Garlic powder

1 Tbsp Lemon juice/ or 1/2 Tbsp white wine vinegar

Salt and pepper to taste

Milk to loosen the dressing to the consistency you like (for people following a keto diet they can use cream)

  1. In a jar with a lid, add all the dressing ingredients except the milk/cream. Check the flavour and add salt and pepper if you think it needs it.
  2. When you are happy with the seasoning add a little milk/cream to loosen the mixture and shake the jar. Check the consistency, and add more milk/cream if you want a runnier dressing
  3. Combine all your salad ingredients and drizzle with the dressing before serving
  4. The dressing will keep quite happily in a sealed jar in your fridge for 4-5 days