Venison Casserole

Venison Casserole

I’m lucky enough to have a very kind friend Bronagh, who’s husband enjoys hunting.  She never arrives empty handed and on a recent visit brought me some delicious venison.

Venison is one of the healthiest meats you can eat.  This recipe uses meat that requires long slow cooking.  Other cuts of venison like the loin need to be served rare or else they’ll become tough.

The meat should be tossed in seasoned flour

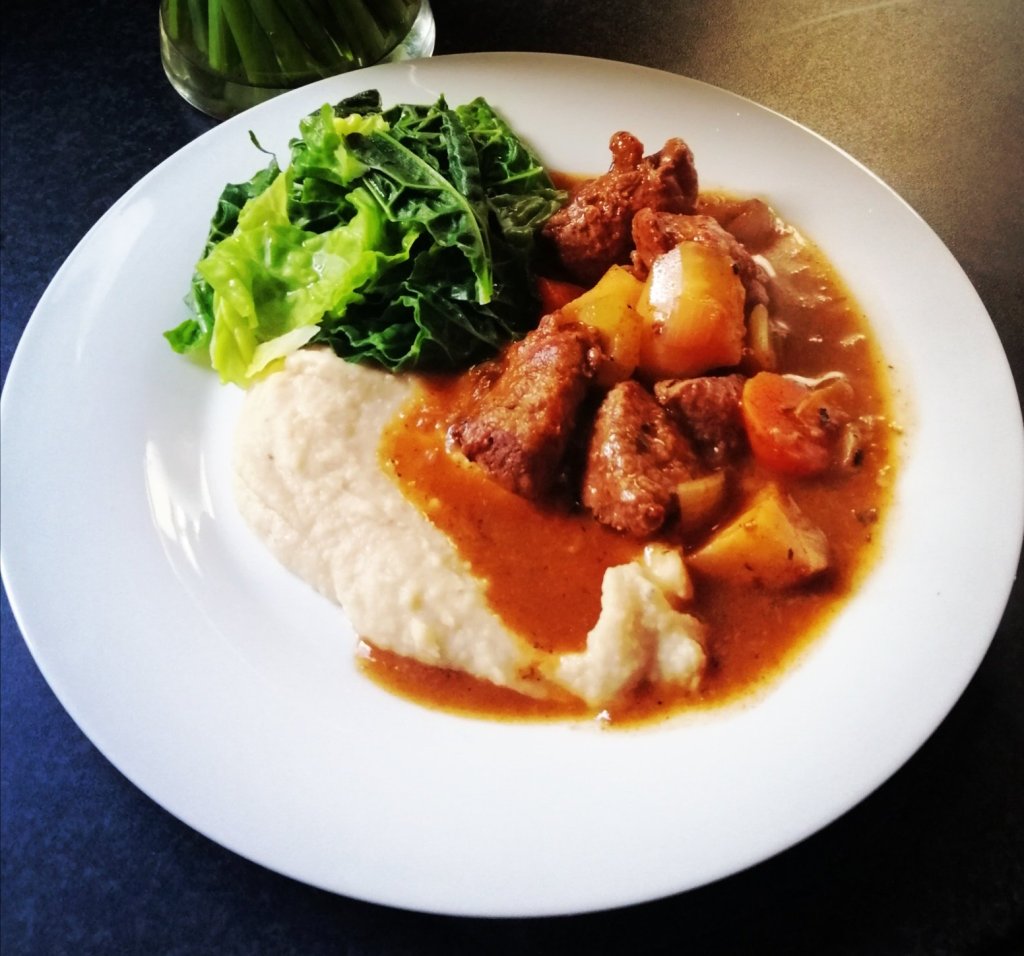
When you have a really great ingredient like venison you don’t need to do a lot to it.  About 10 minutes prep at the start and the oven does all the work for you.   I love this served with greens, and velvety butter bean mash.    It’s also fantastic with mashed potatoes or crusty bread to mop up all the delicious gravy.

Seal the flour coated meat to add flavour and colour, the flour will also help thicken the sauce

1kg Venison (cut into 3-4cm chunks)

1 Large Onion (peeled and roughly chopped)

2 Carrots (peeled and roughly chopped)

2 Parsnips (peeled and roughly chopped)

2 Stalks of celery (cut into chunks)

250ml Red wine (optional, but replace with the same amount of stock if not using wine)

750ml Beef stock

3 Tbsps Plain flour

25 Grams Butter

1 Tbsp Olive Oil

1 Tbsp Tomato purée

1 Tbsp Dried thyme

Salt and pepper

Cook vegetables and tomato puree before adding red wine

Method

  1. Add the flour, salt and pepper to a plate and mix. Toss the chunks of venison in the seasoned flour
  2. In an oven proof dish heat the oil and butter. Cook small batches of the venison chunks being careful not to overcrowd the pan so that the are sealed
  3. Remove the venison and set to one side. Add all the vegetables (I like to keep them chunky) and tomato puree for 5 minutes stirring occasionally
  4. Add the wine and cook for a further 5 minutes to allow the alcohol to burn off. Stir well to deglaze the pan, then add the thyme and beef stock cover with a lid and move to oven (this can be cook stove top, but I think then gives a more even heat)
  5. Preheat your oven to 180 degrees, and cook for one and a half to two hours until the meat and vegetables are tender

Sweet Arancini, (Deep Fried Rice Pudding Balls)

I tried these out these because I misjudged the amount of rice pudding I was making (in my never ending quest to use up things that have hanging around my cupboards). 

The up shot is that I had a big load of rice pudding that I didn’t want to throw away so I came up with these as a way of using it up.  Turns out pretty much any type of fried carb is delicious.  These also make a lovely dessert for anyone who needs a gluten free option. Yes, they might be a bit of work but you can make the rice pudding ahead of time. I would class this as weekend cooking.

Getting ready to coat the rice balls, cornflour, then egg, then rice crispies.

Just like making the savoury version, the rice needs to be cold.   I tried a couple of different versions with different centres. If you’re a chocolate lover, I tried one’s with a chocolate button in the middle which were really good.  However, for my favourite ones I added a teaspoon of jam for the centre, but feel free to experiment with other fillings.

Ingredients

For the rice pudding

200 Grams Pudding Rice

500ml Milk

300ml Condensed milk

For the coating

2-3 Tbsps Corn flour

1-2 Eggs (beaten)

150 Grams Rice crispies or puffed rice (put in a plastic bag and scrunch up to crush the cereal into finer pieces, but not dust)

Oil for frying.

Method

  1. Add the rice, milk and condensed milk to a pot with a lid. Bring up to just before boiling point, then reduce the heat to a gentle simmer. Stir regularly to prevent sticking, cook until soft (the rice I used took just over an hour, but other brands of rice may not take that long. Depending on the rice you use you may need to add more milk/water, but the pudding should be pretty thick
  2. When your rice is cooked, you can enjoy some rice pudding right away. The rest of it should be allowed to cool before transferring to an air tight container and refrigerate (ideally overnight, but at least for a couple of hours)
  3. Take a large tablespoon of chilled rice pudding and flatten in the palm of your hand. Add whatever filling you are using to the centre of the mix and form the rice around it until you make a ball (wetting your hands stops the rice sticking to them)
  4. When you have finished making all the balls, place on a plate and refrigerate for an hour to allow them to set
  5. To prepare the balls, first of all heat your oil (I don’t know the exact temperature to tell you, but my go way to check the temperature is to drop in a cube of bread if it start frying right away you’re probably good to go. Be careful the oil doesn’t get too hot or else the centre of the rice ball will be cold)
  6. In separate dishes, lay out the cornflour, egg and crushed rice crispies
  7. Roll each ball in first the cornflour, then the egg and finally in the rice crispies.
  8. Add to the oil in batches and fry until golden brown (don’t be tempted to cook too many at one time). These are gorgeous served with vanilla ice cream.

Pear and Almond Tart

Some ingredients are just made to go together and pears and almonds are two of the them. 

I have a bit of a love/hate relationship with pears.  When they are perfect they’re hard to beat.  The only issue is that they are like granite and inedible, and then turn to mush within about 20 minutes.  They are the ultimate passive aggressive fruit!

Frangipane filling

This recipe is great for using pears that are too hard to eat if you can’t be bothered with the game of chicken involved in waiting for pears to ripen.

This is a pretty rich recipe, but isn’t meant to be eaten every day and looks really impressive if you’re cooking for friends. 

It’s important to blind bake the pastry case first

You can make the pastry case and the frangipane filling in advance, which means you can have more time with your guests. You could even use shop bought pastry if you don’t have time (home made is better though). This is really good on it’s own but a little fresh cream or ice cream also doesn’t hurt if you want to be properly indulgent.

Yummy with ice cream

Ingredients

For the pastry case

200 Grams Plain flour

100 Grams Butter (chilled and cut into small cubes)

1 Tbsp Caster sugar

1 Egg yolk

For the frangipane filling

115 Grams Butter (at room temperature)

115 Grams Caster sugar

115 Grams Ground almonds

1 Tsp Vanilla extract (optional)

2 Eggs

2 Large pears

Method

  1. In a food processor add the flour, sugar, and butter. Whizz until the mixture looks like coarse breadcrumbs (you can run the butter and flour in together by hand if you prefer)
  2. Add the egg yolk and a small amount of cold water and whizz again until the mix starts to come together. Start to press the mix together to form a dough, adding a small amount of cold water if necessary. Form into a ball, wrap in cling film and refrigerate for 30 minutes
  3. Grease a 9in x 9 in loose bottemed flan tin. When the pastry has chilled, place on a floured surface, and roll out in a circle approximately 1/2 cm thick.
  4. Lay into you prepare flan tin making sure that it’s pressed into the edges. Place a sheet of baking paper on top and baking beans (I use old dried rice) to weigh down the pastry and blind bake in an oven pre heated to 180 degrees. Bake for 15 minutes before taking the case out if the oven, carefully lift the the baking paper by the 4 corners taking care not to spill any of the baking beans/rice onto the pastry case.
  5. Return the pastry case to the oven and bake for a further 10 minutes before removing from the oven and allowing to cool
  6. To make the filling, add the butter and sugar to a bowl and mix with an electric whisk until light and creamy. Add the vanilla, almonds and eggs and beat in until combined
  7. Peel, core and quarter the pears, before cutting into slices about 1cm thick
  8. Spread the almond mixture into the pastry case. Arrange quarter of the pear so the narrow part is towards the centre of the tin and wider part is towards the outside work as quickly as you can to prevent the pear discolouring
  9. Once you have arranged the pears, return the flan tin to 180 degree oven and bake for 25-30 minutes until the centre is just starting to set (it will continue to cook as it cools). Allow to cool in the tin for another 15 minutes before attempting to cut.

Lockdown Chilli

Yep, we’re in bloody lockdown again and we’re all trying to limit how much we go out.

With this in mind, like last time I decided to have a look and use up food I already had at home. I first made this type of chilli years ago when I was a flat broke student. My Mum would sometimes send me home with a bag of tinned food. I came up with this version of chilli and it’s surprisingly flavoursome.

I know most people wouldn’t use corned beef in a chilli, but it works well. If you don’t want to use baked beans you can use whichever beans you like, just maybe add some vegetable stock to loosen up the mix. This is also a good dish to use up any vegetables that have been hanging around your fridge or freezer for a while.

It’s cold and miserable outside and while I’ll admit it’s not fine dining it’s quick, cheap and proper comfort food. This goes well with rice, or pasta, in a baked potato or with garlic bread.

Ingredients

340 Gram Tin of corned beef (cut into cubes)

500 Gram Carton of passata (or a tin of chopped tomatoes)

410 Gram Tin of baked beans

1 Tbsp Oil

1 Tbsp Tomato purée

1 Onion (chopped fairly finely)

1 Carrot (grated)

1 Red pepper (cut into 1 cm chunks)

1 Tsp salt

1 Tsp Ground cumin

1 Tsp Chilli powder

1 Tsp Ground coriander

3 cloves of garlic

Method

  1. Heat your oil in a large flat bottom pan. Fry the carrot, pepper, and onion over a medium heat until the the onion becomes translucent
  2. Add the garlic, spices, tomato puree and corned beef, and stir through the vegetables and cook for 5 minutes until the corned beef starts to break down.
  3. Stir in the passata, and baked beans, mixing well. Cook over a medium heat for a further 15 minutes. Stir occasionally to prevent sticking
  4. Serve with your favourite carbs. This keeps in the fridge for 3-4 days

Apple Crumble Muffins

This is another recipe scalped from one of the Great British Bake Off cook books.

I have included the original recipe, but you can change it up.  I’ve tried using different fruit like pears or raspberries and it was delicious.  You can also add some nuts to the topping for some added crunch, or a teaspoon of cinnamon in the base mix for an extra kick of flavour.

These keep for 3-4 days in an airtight tin

Ingredients

For the topping

50 Grams Porridge oats

50 Grams Caster sugar

50 Grams Plain flour

50 Grams Butter (cut into small cubes)

For the base

250 Grams Plain flour

25 Grams Porridge oats

175 Grams Caster sugar

2 Tsp Baking powder

Zest of 1 Lemon (finely grated)

150 Grams Butter

2 Eggs

100 ml Milk

1 Large eating Apple (peeled, cored and cut into 1.5 cm chunks)

Method

  1. Preheat your oven to 190 degrees, and line a muffin tin with paper muffin cases
  2. In a bowl, add all the crumble ingredients, rubbing in the butter until all the ingredients are combined. Set to one side
  3. In a separate bowl, add the flour, oats, baking powder and lemon zest and mix to combine (dry mix)
  4. Gently melt the butter (either in a pot or the microwave), and allow to cool slightly. In a small bowl beat the eggs and milk together and then add the melted butter (wet mix)
  5. Add the wet mix to the dry mix and stir gently until just combined
  6. Spoon the base mix equally into the muffin cases. Top the muffins with the cubes of apple, and then add the crumble topping (try make sure there is an equal amount of apple and crumble mix on each muffin
  7. Bake for 30-35 minutes and allow to cool on a wire wrack (although these taste fantastic when they’re still warm)