Cherry Clafoutis

This is one of the quintessential French desserts and it’s actually quite easy to make.  It’s basically a baked custard/batter with fruit.

Cherries are a traditional, but you can use other fruit like blueberries or apricots.

Straight from the oven, dust with a little icing sugar before serving.

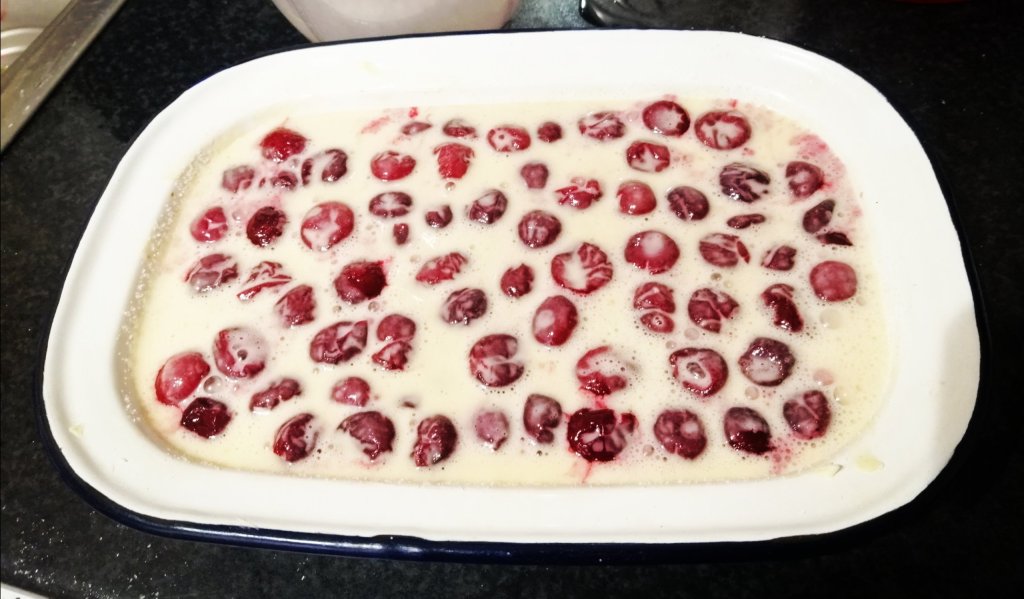
I use frozen cherries that I allowed to thaw. This is mainly because fresh cherries here in Ireland are really expensive, and because the frozen type usually have the stones removed. Purists argue that the cherry stones add an almond flavour, but I think this is nonsense.

Ready for the oven.

If you have a blender you can make the batter in this or just use a bowl and whisk if you don’t. This should normally be cooked in a round pie dish and served in wedges. I didn’t have one, so my clafoutis is was probably a little deeper than the regular type. It also looks prettier cooked in a round dish but ho hum, you use what you have.

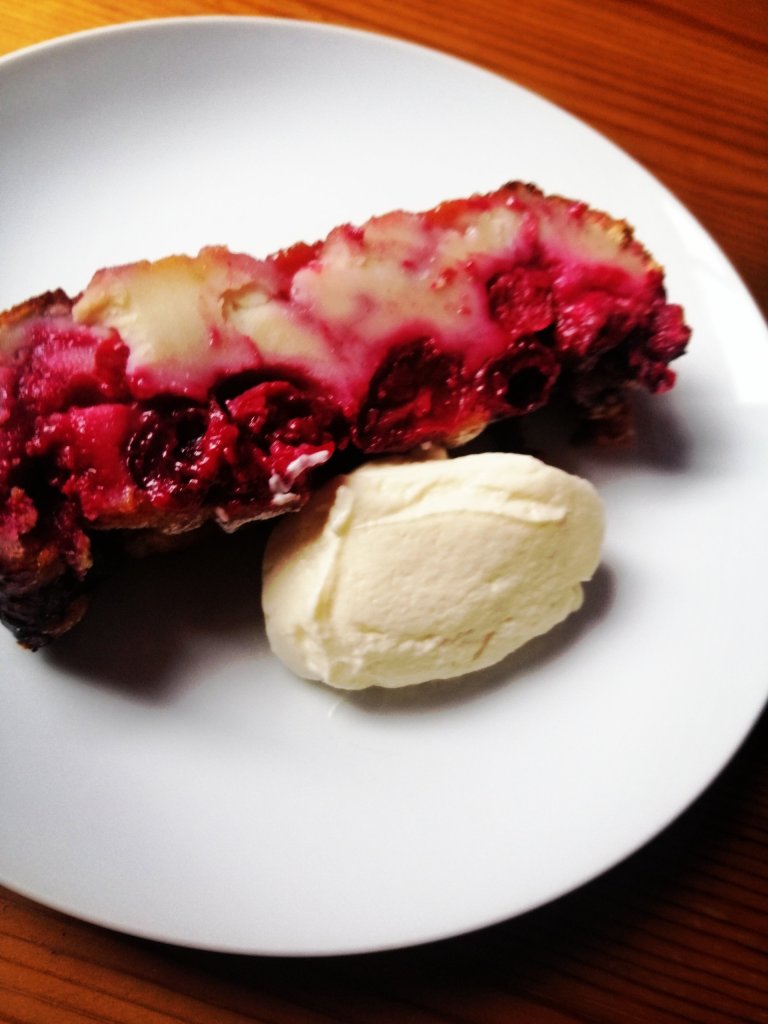
It’s usually served just warm or at room temperature. It’s traditionally served with whipped cream, but ice cream is also delicious.

Ingredients

For the fruit

450 Grams Cherries (fresh or frozen)

3 Tbsp Caster sugar

For the batter

100 Grams Caster sugar (plus a little extra to coat the baking dish)

4 Eggs

1/2 Tsp Salt

1 Tsp Vanilla extract

200 Mil Milk

150 Grams Plain flour

30 Grams Butter (melted and allowed to cool slightly, plus extra for greasing the dish)

Method

  1. Cover the cherries with 3 Tbsp of sugar and allow to macerate for an hour
  2. Pre-heat your oven to 180 degrees (Celsius)
  3. Add the milk, salt, vanilla extract, and eggs to a blender and give a quick blitz
  4. Add the flour to the blender and whizz for 1 minute, before adding the cooled melted butter. Whiz for another 30 seconds
  5. Rub a knob of butter along the inside of your baking dish, and a couple of tablespoons of sugar to the dish and shake this around the dish so that it sticks to the butter. Discard any sugar that hasn’t stuck to the butter
  6. Spread your fruit across the base of the dish, and then gently pour over the custard
  7. Place in the oven and bake for 45 minutes. To check if the clafoutis is cooked, stick a knife in the centre of the dish and if it comes out clean the clafoutis is cooked. If it doesn’t give it another 5 minutes and check again

Spiced Plum Cake

Soft sweet plum topping with gentle spices.

Whenever possible I like to eat seasonally, it’s usually cheaper, and usually better for you, and better for the planet. Autumn has some great fruit and vegetables. One of my favourites are plums. Usually inexpensive and really versatile. I love this plum cake, no only because its relatively straight forward to make, but the cinnamon and cardamon add a whole other level of flavour. The addition of sour cream adds a tenderness to the sponge. This will also live quite happily in a cake tin for 3-4 days. I love it with whipped cream, but it’s also perfect comfort food served with custard.

Ingredients

300 Grams Plain flour

1, 1/2 Tsps Baking powder

1 Tsp Ground cinnamon

1/2 Tsp Ground cardamon

1 Tsp Salt

3 Eggs

100 Grams Butter

200 Grams Sugar

60 Grams Sour Cream

4-5 Plums

Ready for the oven

Methods

  1. Mix the flour, salt, spices and baking powder together
  2. In a separate bowl cream the eggs and sugar together with an electric whisk (hold back 2 tablespoons of sugar to top the plums with)
  3. Add the eggs and sour cream to the butter and sugar and whisk until light and fluffy
  4. Gradually whisk in the flour mixture until you have thick cake batter
  5. Grease a 9 inch spring firm cake tin, and pre-heat your oven to 180 degrees
  6. Transfer your cake batter to the cake tin and spread evenly.
  7. Cut the plums in half, remove the stone and cut each half into quarters
  8. Starting in the centre of the cake, arrange the slices of plum in a circle (or any type of pattern you like) and sprinkle with remaining sugar
  9. Bake for 35 mins, or until a skewer comes out clean when stuck in the cake

Lemon Tiramisu

Before tiramisu purists start, I know this is not strictly speaking a tiramisu. I’m a card carrying coffee fiend, but I’m not a fan of coffee flavour in sweet things.

Delicious slice of tangy tiramisu

What I do love is lemon flavoured desserts. This recipe gives you the creamy unctuous texture of a tiramisu, with the refreshing tang of lemon that stops this being sickly sweet.

The coffee flavour is replaced with lemon and ginger tea, and a shot limoncello gives an extra zing of flavour. This is a good recipe if you’re entertaining, you can make it the day before and it’s easy to plate up.

(N. B. This recipe contains raw eggs and is probably best not served to potentially vulnerable groups like pregnant women, the elderly and very young children)

Ingredients

500 Grams Marscapone cheese

250 Grams Sponge fingers (lady fingers)

2 Eggs

125 Grams Caster sugar

1 Lemon and ginger teabag (you can use other fruit teas if you prefer, but I think this works well)

1 Lemon (juice and zest)

1 Shot of limoncello liquor (optional)

250ml Boiling water

200 Grams Lemon curd

Method

  1. Soak the teabag in the boiling water for 5-10 minutes before removing the teabag. Allow the tea to cool and add the limoncello to the tea
  2. Separate the eggs. Add the caster sugar, lemon juice and zest to the egg yolks and whisk with an electric whisk until light and fluffy. Add the marscapone and whisk again until the ingredients are combined
  3. In a separate bowl whisk the egg whites until they reach firm peaks. Fold the egg whites into the egg yolk mixture with a metal spoon, making sure its thoroughly combined
  4. Briefly dip half the sponge fingers in the lemon tea mixture and line a layer in a 9 x 12 inch dish. When you have a layer of dipped sponge fingers, spread this layer with one third of the lemon curd
  5. Top this layer with half of the marscapone mix
  6. Dip the remaining sponge fingers in the lemon tea mixture and lay on top. Spread this layer again with one third of the lemon curd
  7. Top with the remaining marscapone mix, dot the top with the remaining lemon curd and then drag a knife through it to create a marbled effect
  8. Cover with cling film and leave to chill in the fridge for 3-4 hours, or ideally overnight

No Churn Toasted Marshmallow Ice Cream

This is inspired by a recipe I saw from Katie’s Cucina, and I knew I had to try. I’ve tweaked the proportions of her recipe but it’s pretty straight forward. The hardest thing about it will be not going back and forth to the freezer to “check it’s OK”.

Spread the marshmallows evenly on a tray before placing under the grill

It has only 3 ingredients, and doesn’t need all the faff most ice creams recipes involve, like needing stir it constantly or having to have an ice cream maker.

Remember to keep an eye on these so they don’t burn

This tastes spectacular as it is, but teams really with anything chocolate related. Really the taste of toasted marshmallows is something else. This is definately a pure filth recipe. But there is always room for a little filth in your life.

Ingredients

200 Grams Mini marshmallows

250 ml Condensed milk

125 ml Double cream

Method

  1. Line an oven proof tray with tin foil and rub this with a thin film of oil
  2. Turn on your grill to high, spread the marshmallows evenly across the tray
  3. Put the tray under the grill and watch closely. You’re looking for toasted but not burnt, and this can happen in a matter of seconds if you don’t watch out
  4. In a bowl with the cream and condensed milk together with an electric whisk until it thickens. You can use a stand mixer if you have one
  5. Add the toasted marshmallows gradually (they’ll want clog up the whisk otherwise) and whisk at a medium speed until thoroughly mixed. You’ll see little flecks of brown from the toasted parts of the marshmallow but this where the flavour is.
  6. Freeze for 8 hours (and do your best not to eat it all yourself)

Tropical Rice Pudding

Scrumptious served with ripe mango or pineapple

I’ve mentioned before that when I was a kid, my Mum wasn’t a great cook (I love you Mo, but we both know the truth). Dessert in my house was usually shop bought, and when I was really young one of favourites was tinned creamed rice with a big spoonful of jam.

Fast forward God knows how many years, and I taught myself how to cook. I was also lucky enough to go out into the world and try some amazing flavours. So I decided to try and experiment with some of my favourites. Coconut, ginger and lemon grass gives a new twist on this traditional dessert.

I like this chilled and served with mango or pineapple, but it’s also really good warm, and you can enjoy it with whatever fruit you prefer.

I used milk in this recipe, but you can substitute some of this with cream if want to make a really indulgent dessert. If you want to make a vegan version, swap cow’s milk for almond milk. I’ve tried both versions and they’re both delicious.

Coconut and spices bring a new twist to an old classic

Ingredients

400 ml Can Coconut milk

250 Grams Pudding rice

40 Grams Sugar

500 ml Milk

1 Large stalk of lemon grass (kept whole but bruised)

1 Thumb sized piece of ginger

Method

  1. Cut your piece of ginger in half length ways, then smack your lemon grass with the back of a knife (or pot if you want get some frustration out). Bruising the lemongrass helps release the flavour. The ginger and lemon grass are kept big to make it easier to fish out when the rice pudding is cooked
  2. Put all the ingredients in a pot with a lid and heat until just before the boil. Reduce the heat and simmer over a low heat stirring regularly. Each type of rice is different, so cook until the rice is soft. (mine took about 30 minutes). Different rices will absorb different amounts of liquid so if you think the mix is looking too dry add a little milk/water
  3. When the rice is cooked you can scoop out the ginger and lemon grass. The rice pudding can be served hot or cold. I like it served with fruit

Frozen Banana Pops

These were inspired by the great minds at Thug Kitchen,  these food writers like myself, try to stay healthy and are prone to saying f*ck quite a lot.  You can also use vegan dark chocolate if that’s your thing.

Gorgeous on a hot day, or my own guilty pleasure is to have them while sitting on the sofa with a cup of coffee.  But f*ck it, eat them how you like.

Makes 6

Ingredients

6 Lollipop sticks

100 grams Dark chocolate (you can use vegan chocolate if that’s your thing)

3 Bananas

1 Tsp. Coconut Oil

50 grams chopped almonds (peanuts, or hazelnuts also work really well)

Method

  1. Line a baking sheet or plate with grease proof paper.
  2. Toast the nuts in a dry pan, and set to one side. (It’s worth taking the time to do this, as it really improves the flavour).
  3. Chop the chocolate and put in a bowl over a pot of barely simmering water, and allow it to melt.  You can also try melting this in the microwave, by give it blasts of 30 seconds at a time.  Once the chocolate has melted, stir in the teaspoon of coconut oil.
  4. While the chocolate is melting, peel the bananas and cut width ways. Stick the lollipop stick up the middle of the banana from the flat end.
  5. When the chocolate is melted dip the banana in it, using a spoon to cover any bits that aren’t covered.
  6. Sprinkle the chocolate covered bananas with the nuts, place on the grease proof paper and put in the freezer for 2 hours.
  7. When frozen if you aren’t going to eat these immediately, but them in freezer bag.