Pear and Almond Tart

Some ingredients are just made to go together and pears and almonds are two of the them. 

I have a bit of a love/hate relationship with pears.  When they are perfect they’re hard to beat.  The only issue is that they are like granite and inedible, and then turn to mush within about 20 minutes.  They are the ultimate passive aggressive fruit!

Frangipane filling

This recipe is great for using pears that are too hard to eat if you can’t be bothered with the game of chicken involved in waiting for pears to ripen.

This is a pretty rich recipe, but isn’t meant to be eaten every day and looks really impressive if you’re cooking for friends. 

It’s important to blind bake the pastry case first

You can make the pastry case and the frangipane filling in advance, which means you can have more time with your guests. You could even use shop bought pastry if you don’t have time (home made is better though). This is really good on it’s own but a little fresh cream or ice cream also doesn’t hurt if you want to be properly indulgent.

Yummy with ice cream

Ingredients

For the pastry case

200 Grams Plain flour

100 Grams Butter (chilled and cut into small cubes)

1 Tbsp Caster sugar

1 Egg yolk

For the frangipane filling

115 Grams Butter (at room temperature)

115 Grams Caster sugar

115 Grams Ground almonds

1 Tsp Vanilla extract (optional)

2 Eggs

2 Large pears

Method

  1. In a food processor add the flour, sugar, and butter. Whizz until the mixture looks like coarse breadcrumbs (you can run the butter and flour in together by hand if you prefer)
  2. Add the egg yolk and a small amount of cold water and whizz again until the mix starts to come together. Start to press the mix together to form a dough, adding a small amount of cold water if necessary. Form into a ball, wrap in cling film and refrigerate for 30 minutes
  3. Grease a 9in x 9 in loose bottemed flan tin. When the pastry has chilled, place on a floured surface, and roll out in a circle approximately 1/2 cm thick.
  4. Lay into you prepare flan tin making sure that it’s pressed into the edges. Place a sheet of baking paper on top and baking beans (I use old dried rice) to weigh down the pastry and blind bake in an oven pre heated to 180 degrees. Bake for 15 minutes before taking the case out if the oven, carefully lift the the baking paper by the 4 corners taking care not to spill any of the baking beans/rice onto the pastry case.
  5. Return the pastry case to the oven and bake for a further 10 minutes before removing from the oven and allowing to cool
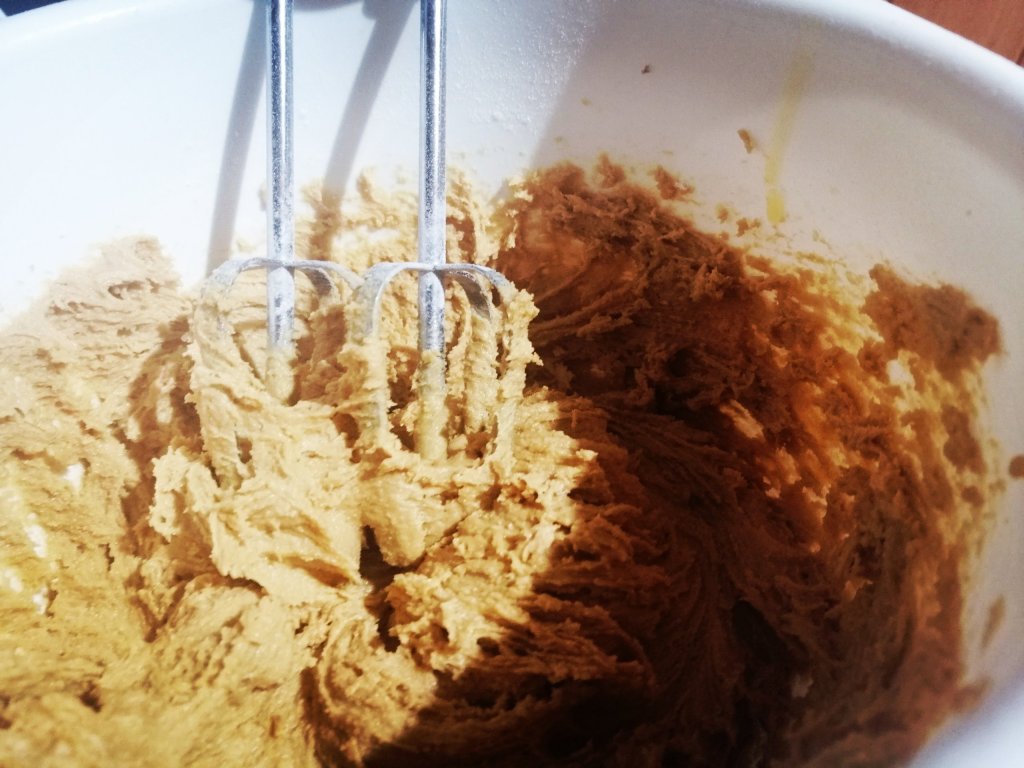
  6. To make the filling, add the butter and sugar to a bowl and mix with an electric whisk until light and creamy. Add the vanilla, almonds and eggs and beat in until combined
  7. Peel, core and quarter the pears, before cutting into slices about 1cm thick
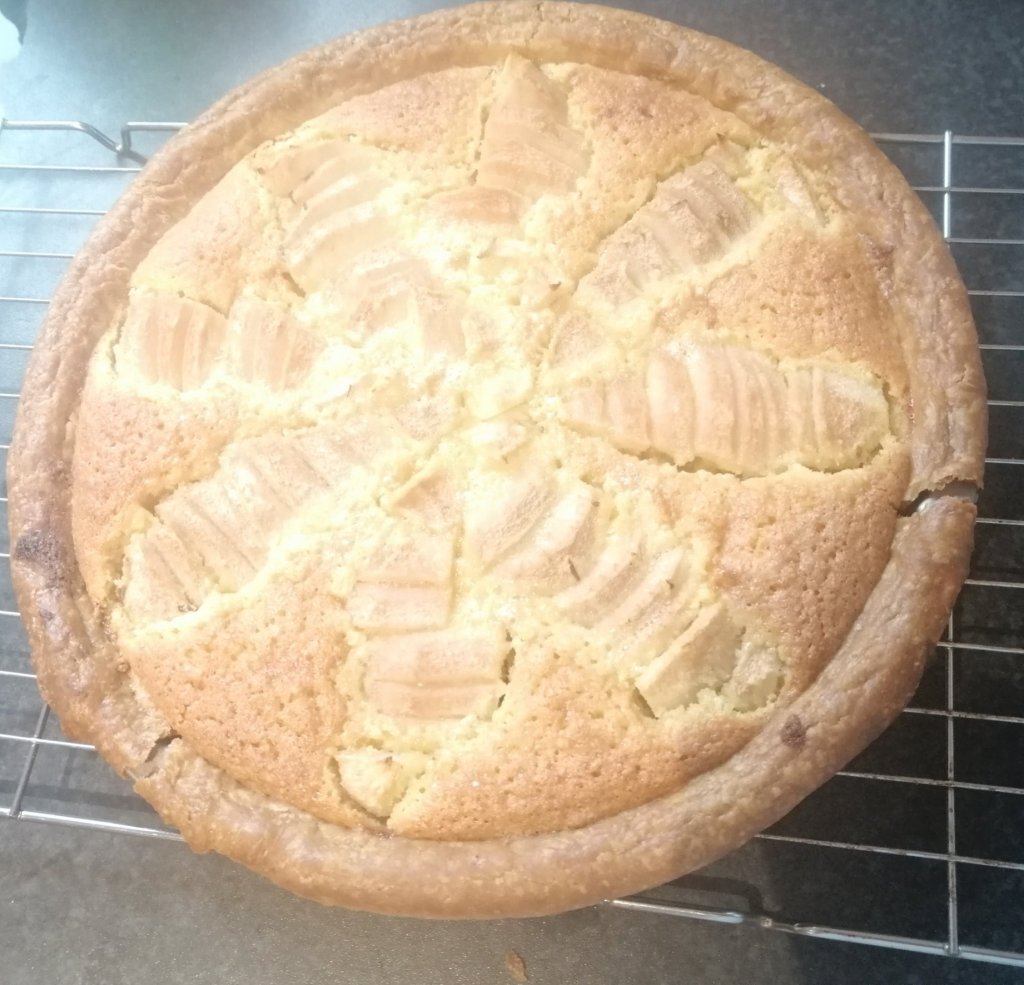
  8. Spread the almond mixture into the pastry case. Arrange quarter of the pear so the narrow part is towards the centre of the tin and wider part is towards the outside work as quickly as you can to prevent the pear discolouring
  9. Once you have arranged the pears, return the flan tin to 180 degree oven and bake for 25-30 minutes until the centre is just starting to set (it will continue to cook as it cools). Allow to cool in the tin for another 15 minutes before attempting to cut.

Apple Crumble Muffins

This is another recipe scalped from one of the Great British Bake Off cook books.

I have included the original recipe, but you can change it up.  I’ve tried using different fruit like pears or raspberries and it was delicious.  You can also add some nuts to the topping for some added crunch, or a teaspoon of cinnamon in the base mix for an extra kick of flavour.

These keep for 3-4 days in an airtight tin

Ingredients

For the topping

50 Grams Porridge oats

50 Grams Caster sugar

50 Grams Plain flour

50 Grams Butter (cut into small cubes)

For the base

250 Grams Plain flour

25 Grams Porridge oats

175 Grams Caster sugar

2 Tsp Baking powder

Zest of 1 Lemon (finely grated)

150 Grams Butter

2 Eggs

100 ml Milk

1 Large eating Apple (peeled, cored and cut into 1.5 cm chunks)

Method

  1. Preheat your oven to 190 degrees, and line a muffin tin with paper muffin cases
  2. In a bowl, add all the crumble ingredients, rubbing in the butter until all the ingredients are combined. Set to one side
  3. In a separate bowl, add the flour, oats, baking powder and lemon zest and mix to combine (dry mix)
  4. Gently melt the butter (either in a pot or the microwave), and allow to cool slightly. In a small bowl beat the eggs and milk together and then add the melted butter (wet mix)
  5. Add the wet mix to the dry mix and stir gently until just combined
  6. Spoon the base mix equally into the muffin cases. Top the muffins with the cubes of apple, and then add the crumble topping (try make sure there is an equal amount of apple and crumble mix on each muffin
  7. Bake for 30-35 minutes and allow to cool on a wire wrack (although these taste fantastic when they’re still warm)

Pecan and White Chocolate Blondies

Pecan and White Chocolate Blondies

I really enjoy coming up with my own recipes. But, sometimes I just want to make something that I know will turn out well and taste delicious.

For these Blondies I’ve used a recipe featured one of the Great British Bake Off cook books. I don’t know who the contestant was who came up with these beauties, but they taste fantastic.

Ingredients

175 Grams White chocolate

150 Grams Pecans

115 Grams Butter

100 Grams Caster Sugar

2 Eggs

1/2 Tsp Vanilla extract

125 Grams Plain flour

1/2 Tsp Baking powder

Method

  1. Preheat the oven to 180 degrees, and line a 9in x 9in brownie tin with grease proof paper
  2. Cut the butter and chocolate into chunks and add to a heat proof bowl. Put the bowl over a pot of warm water and stir until melted
  3. Add the sugar, (it might look curdled but don’t panic). Allow to cool.
  4. While the chocolate mix is cooling, put the eggs and vanilla in a separate bowl and beat with a fork until frothy, and stir in to the cooled chocolate mix
  5. Sift the flour and baking powder together and mix into the chocolate mix along with 100 grams on the pecans
  6. Transfer the mix to your baking tin and top with the remaining pecans
  7. Bake for 25 minutes, allow to cool in the tin
  8. These should stay fresh for 3-4 days in an airtight tin

Cinnamon and Apple Blondies

It’s cold, dark, and miserable outside, I’m having a “big” birthday and there is nowhere open to go out and celebrate.

Combine the cake mix thoroughly before adding the apples.

To try and stave off the impending dispair this will bring, for the mean time I’m all about the comfort food.

Toss the apples in a little flour before adding to the mix.
Apple should be folded into the mix with a metal spoon.

I’ve made blondies before and they have a similar texture to brownies but as they don’t use chocolate, they have more of a caramely flavour. This works really well with apple and cinnamon. This time of year these are the flavours I love.

Yummy with ice cream

These are great with a cup of tea or coffee, but they’re also fantastic with custard or ice cream as a dessert. These freeze well, and will last 2-3 days in an air tight tin.

Ingredients

2 Apples (peeled, cored and cut into 1cm cubes)

1/2 Tsp Baking powder

100 Grams Soft brown sugar

100 Grams Caster sugar

1 Tsp Cinnamon

275 Grams Plain flour

1/2 Tsp Salt

1 Egg

100 Grams Butter (melted)

Method

  1. Preheat your oven to 180 degrees, and line a 8 in x 8 in baking tin
  2. Add the eggs and sugar to a bowl and mix with an electric whisk until light and fluffy
  3. Gradually whisk in the melted butter (allow to cool a little before adding)
  4. Hold back 2 tablespoons of flour, but gradually add the rest of the flour, baking powder and cinnamon and fold into the sugar and eggs mix with a metal spoon
  5. Once you have peeled and chopped the apples toss the pieces in the 2 tablespoons of flour
  6. Fold the chunks of apple into the batter until evenly distributed
  7. Transfer the mix to the baking tin, and bake for 50 minutes. Check . Allow to cool in the tin for 15 minutes before cooling on a wire wrack

Black Magic Cake

I made this as it was Halloween. Yes, this Halloween will be a bit more subdued, but hey any excuse for chocolate cake.

This is by all accounts a really old recipe that was originally developed by Hershey Chocolate, to highlight their cocoa powder.

I used supermarket own brand and it worked fine. Please don’t be tempted use powdered drinking chocolate, it will not taste good.

You’ll see there is coffee in this cake, don’t worry about this. I don’t like coffee flavoured desserts either. I promise you won’t taste the coffee, but it does bring out the flavour of the chocolate.

Yes this is very rich, but its not something that you’re going to eat everyday. You won’t be disappointed, this is definitely going in the pure filth file.

Deep, dark, and delicious

Ingredients

For the cake

230 Grams Plain flour

70 Grams Cocoa powder

400 Grams Sugar

2 Tsp Bicarbonate of soda

2 Tsp Baking powder

1 Tsp Salt

2 Eggs

250ml Buttermilk (if you don’t have buttermilk, a 1 Tbsp of lemon juice to ordinary milk and allow to sit for a few minutes)

250ml Strong black coffee (or 1 Tbsp of instant coffee dissolved in 250ml of hot water)

125ml Vegetable oil (Best to use a flavourless oil like sunflower oil)

1Tsp Vanilla extract

For the icing

200 Grams Dark chocolate

175ml Double cream

50 Grams Butter

Method

  1. This is a super easy cake to make. Pre-heat your oven to 180 degrees and grease and line 2 x 8 inch cake tins
  2. For the cake part, combine all the dry ingredients in a bowl
  3. Add the wet ingredients and mix for 90 seconds with an electric whisk
  4. Pour the mix evenly between the two prepared baking tins and bake for 35 minutes
  5. Remove the cakes from the oven and allow cool in their tins for 10 minutes before turning out onto a cooling wrack and allow to cool completely before adding the icing
  6. For the ganache icing, break up the chocolate and add to a heat proof bowl.
  7. Heat the cream in a saucepan until just before boiling and pour on top of the chocolate, and whisk.
  8. Melt the butter and whisk into the cream and chocolate and you will soon have thick and glossy icing. Allow to cool to room temperature
  9. Place one of your cake layers on a plate or cake stand. Spread about one third of the icing on top of the cake and spread evenly with a palate knife
  10. Top with the second cake layer and pour one third of the icing on top, spreading evenly with a palate knife again. Spread the remaining icing around the sides, and add any other decoration you might want

Spiced Plum Cake

Soft sweet plum topping with gentle spices.

Whenever possible I like to eat seasonally, it’s usually cheaper, and usually better for you, and better for the planet. Autumn has some great fruit and vegetables. One of my favourites are plums. Usually inexpensive and really versatile. I love this plum cake, no only because its relatively straight forward to make, but the cinnamon and cardamon add a whole other level of flavour. The addition of sour cream adds a tenderness to the sponge. This will also live quite happily in a cake tin for 3-4 days. I love it with whipped cream, but it’s also perfect comfort food served with custard.

Ingredients

300 Grams Plain flour

1, 1/2 Tsps Baking powder

1 Tsp Ground cinnamon

1/2 Tsp Ground cardamon

1 Tsp Salt

3 Eggs

100 Grams Butter

200 Grams Sugar

60 Grams Sour Cream

4-5 Plums

Ready for the oven

Methods

  1. Mix the flour, salt, spices and baking powder together
  2. In a separate bowl cream the eggs and sugar together with an electric whisk (hold back 2 tablespoons of sugar to top the plums with)
  3. Add the eggs and sour cream to the butter and sugar and whisk until light and fluffy
  4. Gradually whisk in the flour mixture until you have thick cake batter
  5. Grease a 9 inch spring firm cake tin, and pre-heat your oven to 180 degrees
  6. Transfer your cake batter to the cake tin and spread evenly.
  7. Cut the plums in half, remove the stone and cut each half into quarters
  8. Starting in the centre of the cake, arrange the slices of plum in a circle (or any type of pattern you like) and sprinkle with remaining sugar
  9. Bake for 35 mins, or until a skewer comes out clean when stuck in the cake

Red Pepper and Chorizo Gnocchi

The Summer has pretty much been a wash out, (when I made this I was watching torrential rain battering my window). So comfort food was the order of the day. Chorizo makes anything taste good, add some gnocchi and cream and you have a little bowl of heaven.

Bursting with flavour

Ingredients

500 Grams Gnocchi (I use shop bought)

75 Grams Chorizo (finely sliced)

1 Onion (thinly sliced)

1 Large red pepper (cut into 2cm cubes)

50 Grams Sun dried tomatoes (finely chopped)

2 Tbsp Olive oil (I sometimes like to use the oil that the sun dried tomatoes comes in, as it has loads of flavour)

1 Tbsp Tomato puree

125 ml Double cream

Salt and pepper

Method

  1. Heat 1 table spoon of oil in a large pan, and fry the chorizo, red pepper and onion until soft, remove from the pan and set to one side
  2. Add the rest of the oil to the pan to heat, add then and the gnocchi, and brown gently all over.
  3. Stir in the tomato puree and cook for another 1-2 minutes, add the sun dried tomatoes and the chorizo and peppers and onion you removed from the pan earlier
  4. Add the cream and stir well ensuring everything is well coated, check if you think it needs salt or pepper. Cook for another 2-3 minutes to reduce the cream if necessary

Lemon Tiramisu

Before tiramisu purists start, I know this is not strictly speaking a tiramisu. I’m a card carrying coffee fiend, but I’m not a fan of coffee flavour in sweet things.

Delicious slice of tangy tiramisu

What I do love is lemon flavoured desserts. This recipe gives you the creamy unctuous texture of a tiramisu, with the refreshing tang of lemon that stops this being sickly sweet.

The coffee flavour is replaced with lemon and ginger tea, and a shot limoncello gives an extra zing of flavour. This is a good recipe if you’re entertaining, you can make it the day before and it’s easy to plate up.

(N. B. This recipe contains raw eggs and is probably best not served to potentially vulnerable groups like pregnant women, the elderly and very young children)

Ingredients

500 Grams Marscapone cheese

250 Grams Sponge fingers (lady fingers)

2 Eggs

125 Grams Caster sugar

1 Lemon and ginger teabag (you can use other fruit teas if you prefer, but I think this works well)

1 Lemon (juice and zest)

1 Shot of limoncello liquor (optional)

250ml Boiling water

200 Grams Lemon curd

Method

  1. Soak the teabag in the boiling water for 5-10 minutes before removing the teabag. Allow the tea to cool and add the limoncello to the tea
  2. Separate the eggs. Add the caster sugar, lemon juice and zest to the egg yolks and whisk with an electric whisk until light and fluffy. Add the marscapone and whisk again until the ingredients are combined
  3. In a separate bowl whisk the egg whites until they reach firm peaks. Fold the egg whites into the egg yolk mixture with a metal spoon, making sure its thoroughly combined
  4. Briefly dip half the sponge fingers in the lemon tea mixture and line a layer in a 9 x 12 inch dish. When you have a layer of dipped sponge fingers, spread this layer with one third of the lemon curd
  5. Top this layer with half of the marscapone mix
  6. Dip the remaining sponge fingers in the lemon tea mixture and lay on top. Spread this layer again with one third of the lemon curd
  7. Top with the remaining marscapone mix, dot the top with the remaining lemon curd and then drag a knife through it to create a marbled effect
  8. Cover with cling film and leave to chill in the fridge for 3-4 hours, or ideally overnight

Champ

Buttery champ, the ultimate comfort food.

Northern Ireland has many unique dishes like potato bread, soda farls, fifteens etc. The place has world class scenery and is luscious and green, but that’s mainly because it rains pretty much every day. We have numerous types of rain that range from soft pillowy drizzle, to sideways stingy rain that feels like someone is pinging your face with rubber bands.

Because of our unique weather system, we love carb heavy comfort food. The king of comfort foods is champ. Champ is basically mashed potatoes with milk made smooth and velvety by milk infused with with scallions (spring onions). Traditionally it’s served in a big mound with a well in the middle where you melt a knob of butter. I’ve heard of a few tweaks, like beating a raw egg into the potatoes and most families will make it how their Mum taught them. This is how my Mum made it. I love this just on its own, but champ and sausage is a really popular family dinner. There is basically nothing this doesn’t go with. In a lot of recipes fancy chefs tell people not to use the green part of the scallion. Champ is peasant food, so nothing is wasted. The green part of the onion is what gives the champ the distinctive green flecks.

Allow the milk to infuse with the taste of the scallions.

Ingredients

1Kg Potatoes (pick a floury variety rather than waxy potatoes)

1 Bunch of scallions (spring onions)

250 ml milk

Salt and pepper

Butter

Method

  1. Peel the potatoes and cut into equal sized chunks
  2. Put in a large pot of cold water and salt. Bring to the boil and simmer until the potatoes are soft
  3. Trim the tops and ends of the scallions, cut into 1cm slices and add to a pot along with the milk. Heat on a low heat for 5- 10 minutes (do not allow to boil)
  4. Mash the cooked potatoes. Gradually stir in the milk and scallions until you get a consistency you’re happy with
  5. Check the seasoning and add salt and pepper if it needs it. Spoon a mound of the champ onto a plate and make well in the centre and add a knob of butter which will then melt into a gorgeous pool of golden deliciousness

Mock Crab

It may not be pretty, but OMG it’s tasty.

I have no idea why this is called mock crab, as it isn’t remotely fishy. But, what it is, is a really quick and tasty filling for sandwiches, toasties, and maybe controversially baked potatoes.

My Mum made this mix of corned (chipped) beef, tomatoes and onion for slightly fancier lunches. I love her, but she wasn’t especially adventurous, this was one of the things she knew we all loved.

Someone told me that this was devised during World War II, because people had to rely on tinned food as there could be shortages of fresh food. However it came about, it’s really delicious.

Ingredients

340 Gram Tin of corned beef

1/2 Small onion (finely chopped)

2 Small tomatoes

2 Tbsps Mayonnaise (you can increase this if you want a creamier texture)

Method

  1. Remove the corned beef from the tin and either chop finely or mash with a fork
  2. Finely chop the onion, and chop the tomatoes into 1 cm chunks (you can makes the mix a bit chunkier if you prefer)
  3. Add the mayonnaise and mix well, before filling sandwiches or baked potatoes