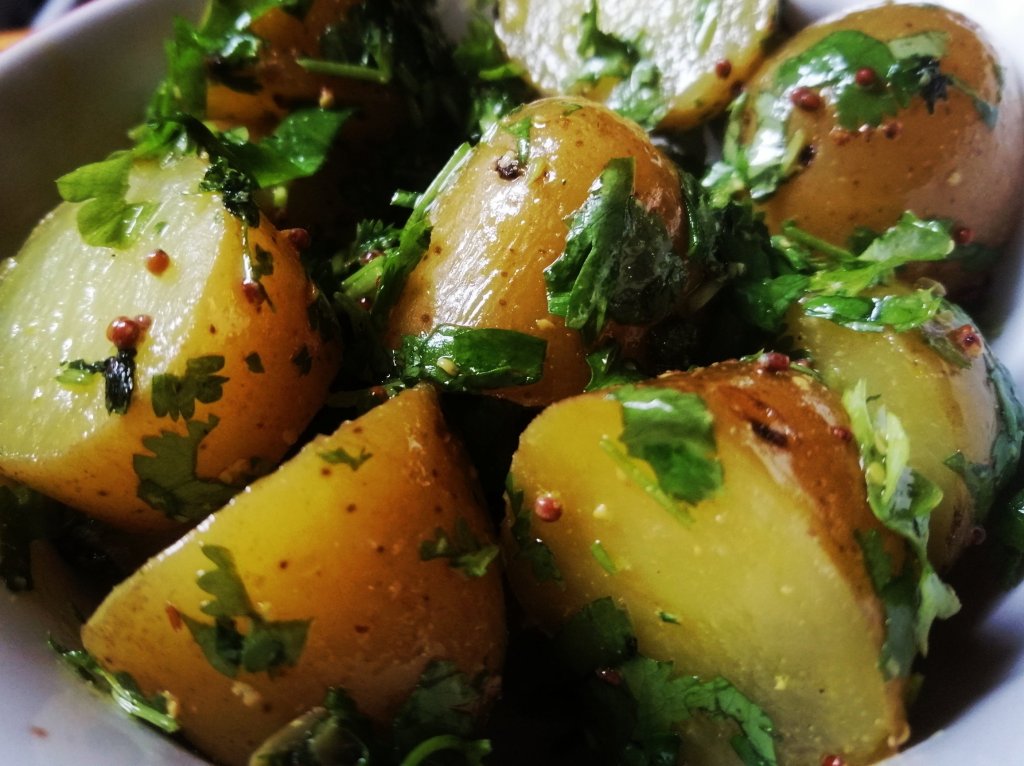
Potato salad is lovely summer dish, but not everyone is a fan of mayonnaise.
Herby dressing, just waiting for the spuds
This version is a little bit lighter and can be enjoyed by vegans too.
Waxy potatoes are probably best, but either is fine. This is such a great side dish, it goes with virtually everything.
Ingredients
750 Grams Potatoes (cut into 4-5cm chunks, I like to leave the skins on but peel them if you prefer)
1 Tsp Salt
1/4 Red onion (finely sliced)
2 Tbsp Olive oil
1 Tbsp White wine/cider vinegar
1 Tsp Mustard (I like to use grain mustard but Dijon mustard is fine too)
4 Tbsp Chopped herbs (I used coriander and parsley because it was what I had, but dill or mint or a mixture will also work)
Salt and pepper
Method
Add the potatoes and salt to a pot and add enough cold water to cover the potatoes. Bring to the boil and then reduce to a simmer. Cook until the potatoes are soft, and drain the cooking water (Hold back 2 Tbsp of the cooking water)
In a large bowl add the onion and sprinkle with the vinegar and let sit for 5 minutes (this will help stop that harsh raw onion flavour). Add the oil, mustard, herbs, and cooking water you held back from the potatoes and stir
Add the potatoes while they are still slightly warm to the bowl and mix well to ensure they are coated with the dressing, this will allow them to help soak up the flavour
Do you ever get a bit over zealous when shopping and have stuff hanging about the fridge that you forget about. I do this more often than I should. I recently found a tub of cherry tomatoes that I had forgotten about and were starting to go a bit soft. I decided to cook these long and slow and they tasted fantastic.
I used these as a side dish, but they would be fantastic stirred into some freshly cooked pasta, or served cold in salads or on some crusty bread with some soft cheese. These are every bit as tasty as sun-dried tomatoes. I made quite a small batch of these (because it was a small tub of tomatoes), but I’m definitely going to make bigger batches next time. These can live in your fridge for 3- 4 days in an air tight jar.
All the ingredients combined together and ready for the oven
Ingredients
250 Grams Cherry tomatoes (halved)
1 Tbsp Olive oil
1/2 Tsp salt
2 Cloves of garlic (roughly chopped)
3-4 Sprigs of thyme or 1/2 Tsp dried thyme
Method
Preheat your oven to 180 degrees
Place all the ingredients on a baking sheet and mix well to ensure the tomatoes are coated in the oil. Bake for 20 minutes
Reduce the heat to 140 degrees and cook for a further 30-40 minutes, until the tomatoes start to look wizened up and starting to char
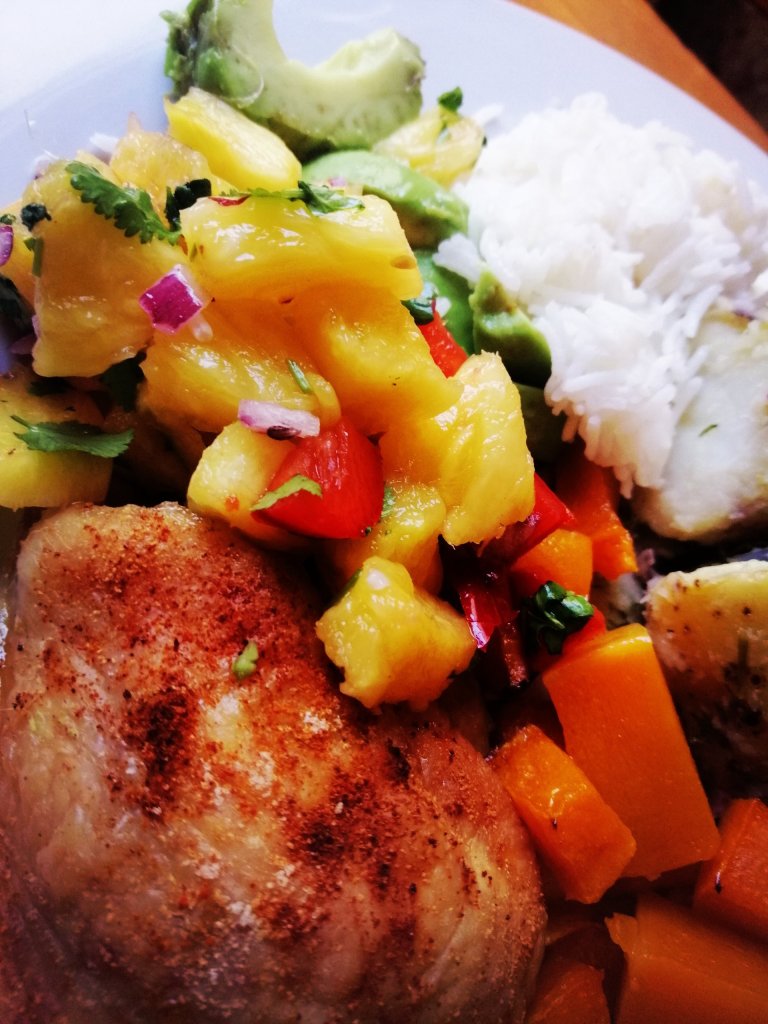
It’s barbeque season and although I do love meat, the side dishes can take your barbeque to a whole other level.
I first had this years ago in a restaurant with barbecued pork and I fell in love. It’s one of those Summery side dishes that goes with pretty much every thing. I use it in wraps, in salad and rice bowls and could eat a bowl of it on its own.
I use fresh pineapple in this recipe, but if you can’t find it, canned pineapple will also work. This takes 5 minutes to make, but I like to leave it in the fridge for 30 minutes to allow the acid in the pineapple to help soften the raw onion flavour which works well. You can leave the out or increase the chilli depending on your taste.
Ingredients
500 Grams Pineapple (cut into 2cm chunks)
1/2 Red pepper (cut into 2 cm chunks)
1 Red chilli pepper (seeds removed and finely sliced)
1/4 Red onion, or 2-3 scallions/spring onions (finely sliced)
2 Tbsp Coriander (mint also works well)
Juice of 1/2 Lime
Method
In a bowl combine all the ingredients and stir well. Chill for 30 mins before serving.
This will keep in a sealed container in the fridge for 3-4 days
Crepes are super easy to make and really versatile. One of my favourite ways to eat them is with a savoury filling and baked with a cheesy topping.
Piping hot out of the oven with some slow roast tomatoes
There are a couple of different steps in this recipe, so maybe better as a weekend recipe, but I sometimes make it in advance and then bake it during the week. This is proper comfort food and is meaty enough for please carnivores you may be feeding too.
Add the filling to the centre of the crepe before folding in the edges
Don’t be shocked if it looks like you have a lot of mushrooms or spinach, both will cook down and shrink as you cook them.
Crepe, ready to flip, just look out for the little holes.
Ingredients
For the crepes
1 Egg
175 Grams Plain Flour
300 ml Milk
1 Tsp Oil
For the Filling
750 Gram Mushrooms Sliced
200 Gram Fresh Spinach (you can use frozen spinach, but make sure to squeeze all the excess liquid out before adding to the mushrooms)
2-3 Cloves of garlic
1 Tbsp Oil
50 Grams Butter
100 Grams Flour
750 ml Milk
200 Grams Grated Cheese (I used cheddar)
Salt and pepper
Method
To make the crepes, add the flour to a bowl first and then whisk in the egg and milk until you have a smooth batter
Heat oil in a 10cm -12 cm frying pan over a medium heat (if you use a bigger pan you’ll have fewer crepes but that’s OK too). Add just enough batter to the coat the pan (crepes are meant to be pretty thin). You’ll start to see little bubbles appear and this is when you should turn the crepe and brown on the other side, remove from the pan and set aside. Keep on making crepes until you have around 10-12 and set to one side while you make the filling
Heat oil in a large frying pan/wok, add the mushrooms and allow to cook for 3-4 minutes without stirring (the secret to cooking mushrooms well is not to move them about too much). The next time you stir the mushrooms, add the garlic and allow to cook for another couple of minutes before adding the spinach. Cover if you have a lid and cook until the spinach has wilted
In a saucepan over a medium heat, melt the butter and then add the flour to make a roux, or soft paste. Gradually stir in the milk until you have a smooth liquid (whisk if you have to, to remove any lumps). Stir in half the grated cheese and cook for a further 10 mins stirring regularly until the sauce starts to thicken and no longer states “floury”.
Stir the sauce in to the cooked mushrooms and spinach and season with salt and pepper to your own taste
Preheat your oven to 200 degrees. To assemble the dish take each crepe and place a couple of spoonful’s of the mix in the centre and roll up tucking in the end (a bit like a skinny burrito), before laying in an oven proof dish.
Repeat this until you have have used up all the crepes, which should be laid side by side in the oven proof dish, Cover the crepes with any left over filling and sprinkle with the remaining cheese. Bake for 30-40 mins or until the top is brown and bubbly
This is another recipe scalped from one of the Great British Bake Off cook books.
I have included the original recipe, but you can change it up. I’ve tried using different fruit like pears or raspberries and it was delicious. You can also add some nuts to the topping for some added crunch, or a teaspoon of cinnamon in the base mix for an extra kick of flavour.
These keep for 3-4 days in an airtight tin
Ingredients
For the topping
50 Grams Porridge oats
50 Grams Caster sugar
50 Grams Plain flour
50 Grams Butter (cut into small cubes)
For the base
250 Grams Plain flour
25 Grams Porridge oats
175 Grams Caster sugar
2 Tsp Baking powder
Zest of 1 Lemon (finely grated)
150 Grams Butter
2 Eggs
100 ml Milk
1 Large eating Apple (peeled, cored and cut into 1.5 cm chunks)
Method
Preheat your oven to 190 degrees, and line a muffin tin with paper muffin cases
In a bowl, add all the crumble ingredients, rubbing in the butter until all the ingredients are combined. Set to one side
In a separate bowl, add the flour, oats, baking powder and lemon zest and mix to combine (dry mix)
Gently melt the butter (either in a pot or the microwave), and allow to cool slightly. In a small bowl beat the eggs and milk together and then add the melted butter (wet mix)
Add the wet mix to the dry mix and stir gently until just combined
Spoon the base mix equally into the muffin cases. Top the muffins with the cubes of apple, and then add the crumble topping (try make sure there is an equal amount of apple and crumble mix on each muffin
Bake for 30-35 minutes and allow to cool on a wire wrack (although these taste fantastic when they’re still warm)
I really enjoy coming up with my own recipes. But, sometimes I just want to make something that I know will turn out well and taste delicious.
For these Blondies I’ve used a recipe featured one of the Great British Bake Off cook books. I don’t know who the contestant was who came up with these beauties, but they taste fantastic.
Ingredients
175 Grams White chocolate
150 Grams Pecans
115 Grams Butter
100 Grams Caster Sugar
2 Eggs
1/2 Tsp Vanilla extract
125 Grams Plain flour
1/2 Tsp Baking powder
Method
Preheat the oven to 180 degrees, and line a 9in x 9in brownie tin with grease proof paper
Cut the butter and chocolate into chunks and add to a heat proof bowl. Put the bowl over a pot of warm water and stir until melted
Add the sugar, (it might look curdled but don’t panic). Allow to cool.
While the chocolate mix is cooling, put the eggs and vanilla in a separate bowl and beat with a fork until frothy, and stir in to the cooled chocolate mix
Sift the flour and baking powder together and mix into the chocolate mix along with 100 grams on the pecans
Transfer the mix to your baking tin and top with the remaining pecans
Bake for 25 minutes, allow to cool in the tin
These should stay fresh for 3-4 days in an airtight tin
I think we’ve established I love a galette. What’s better than a galette, a galette with my two other great loves cheese and mushrooms.
This is definately a pure filth recipe, yes it’s rich but it’s not the type of thing you’re going to make every day.
Don’t be tempted to fry too many mushrooms at once, and don’t move them about too much
When cooking for vegetarians I often feel bad that the main course can look a bit lacklustre. This looks good when you bring it to the table and tastes amazing.
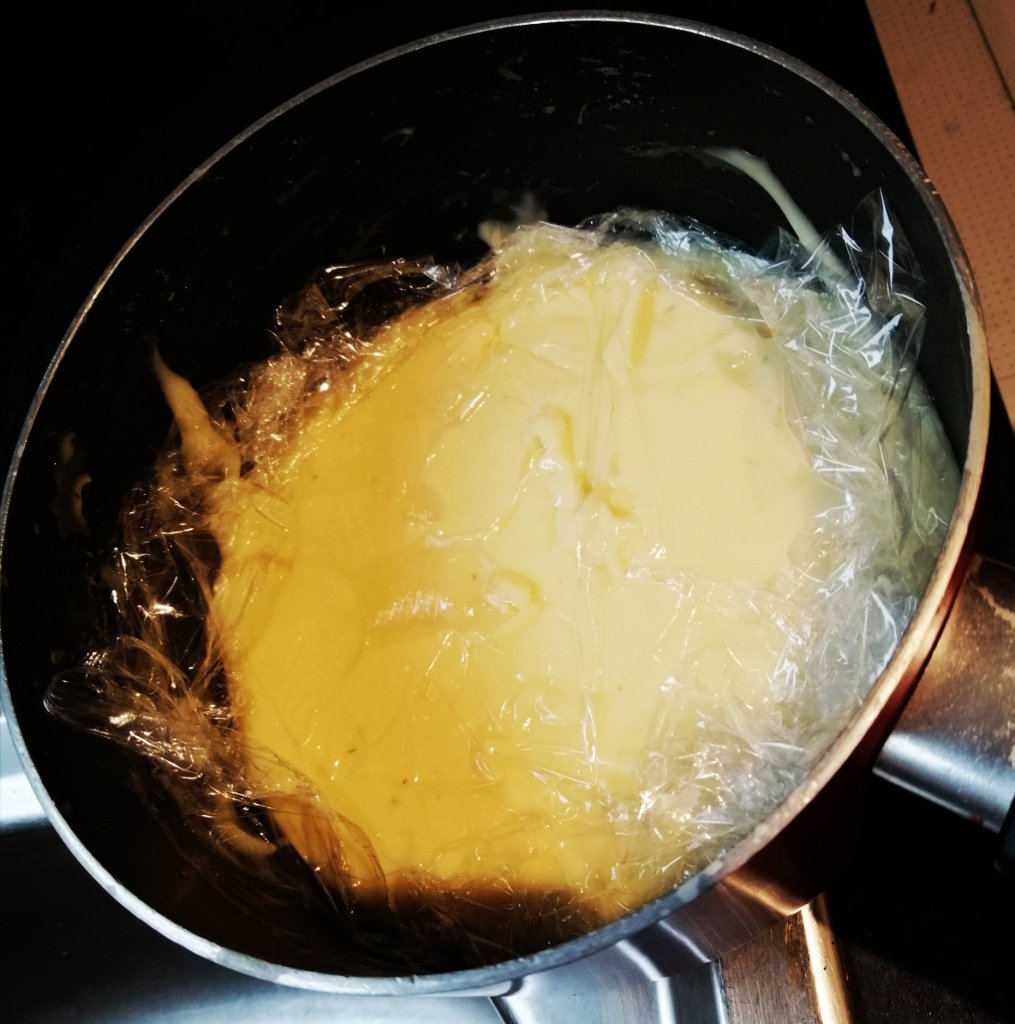
Cover the top of your cheese sauce with cling film so it does not form a skin
If you are making this, it’s really important that the filling is totally cold before you assemble the galette (otherwise you’ll end up with pastry that will melt and be impossible to handle).
Add the cold cheese sauce and mushrooms to the centre of the pastry, leaving a 3-4 cm border
The good thing is that if you are making this for a special occasion you can prepare all the elements in advance and assemble the elements just before baking.
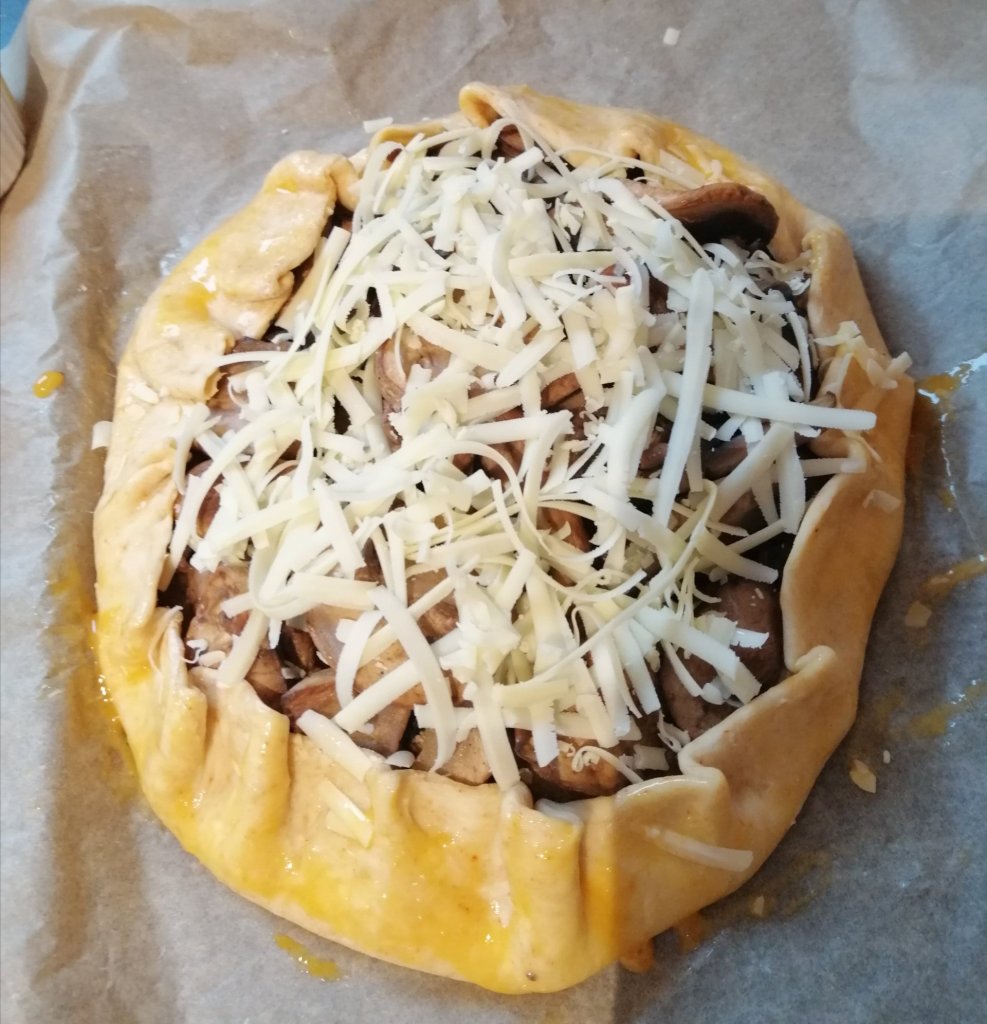
Brush the pastry with egg yolk, and sprinkle grated cheese over the mushrooms
Ingredients
For the pastry
200 Grams Plain flour
100 Grams Butter
1 Egg yolk
1/2 Tsp Salt
1/2 Tsp Cayenne pepper (optional)
Additional egg yolk to brush the galette with before baking
For the filling
500 Grams Mushrooms (sliced)
25 Grams Butter
1 Tbsp Olive oil
Salt and pepper
25 Grams Grated cheese
Cheese Sauce
25 Grams Butter
25 Grams Plain flour
250ml Milk
25 Grams Grated cheese (I used Cheddar but you can use other cheeses)
Method
To make the pastry, and the flour, butter, salt, egg yolk and Cayenne to a food processor and whizz until the mix resembles breadcrumbs
Gradually add some small amounts of very cold water until the mix starts to come together
Turn the mix onto a floured surface and form into a ball before wrapping in cling film and chilling for at least 30 minutes
For the cheese filling, melt the butter over an even heat and stir in the flour to create a soft paste
Add the milk and stir continuously until the paste in combined and the sauce starts to thicken.
Cook over a low heat stirring regularly for another 10 minutes until the sauce no longer tastes floury. Stir in the cheese, once it has melted remove from the heat and place a sheet of cling film on the surface to stop a skin forming
In a large frying pan’ heat the oil and butter together, and half the mushrooms (if you add all the mushrooms in one go they steam not fry). One of the best pieces of advice I ever received from a chef is not to stir mushrooms too often, as it makes them release water which makes them soggy. So fry for 5 minutes each side without stirring too much, set to one side and allow to cool
Roll out the pastry on a floured surface in a circle that is about 1cm thick. Transfer to a sheet of baking paper and place on a baking sheet
Spread the thick cheese sauce in the centre of the pastry leaving a 3-4cm border around the edge of the pastry
Place the fried mushrooms on top of the cheese sauce. Brush edges of the pastry with the remaining egg yolk and pleating the edges inward
Brush the outside of the galette with egg yolk and sprinkle grated cheese over the top of the mushrooms
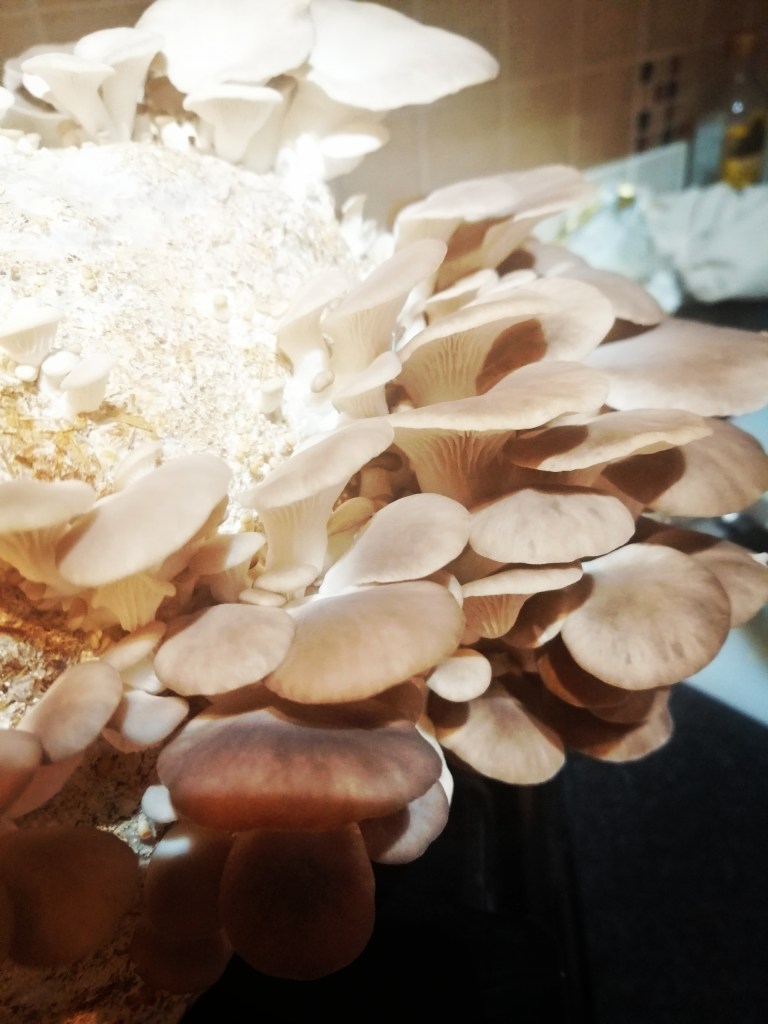
I love love love mushrooms of any kind. I usually stick to regular field mushrooms, as the fancy ones are usually pretty expensive. Mushrooms are a fantastic source of vitamin D, are low in fat and carbohydrates and provide texture and a great savoury kick for vegan dishes.
Due to the recent lockdown I was able to buy a mushroom block from a grower who normally supplies restaurants.
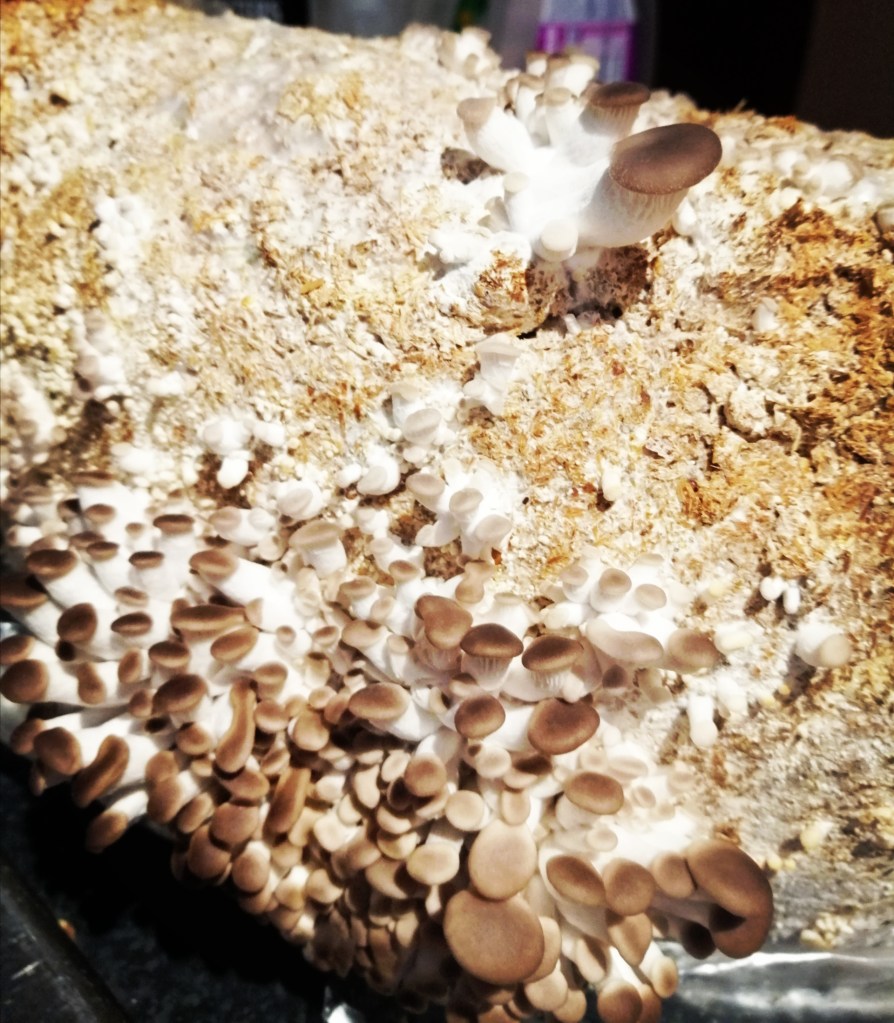
Baby oyster mushrooms just starting to grow
Two days after I ordered it a large lump of compressed saw dust wrapped in plastic arrived. I was a bit sceptical, but my love of oyster mushrooms spurred me on. I hate gardening and pretty much kill every plant I come in contact with. But these were super simple, basically it’s a stump of pressed sawdust impregnated with fungi spores and it just needs sprayed with water once or twice a day.
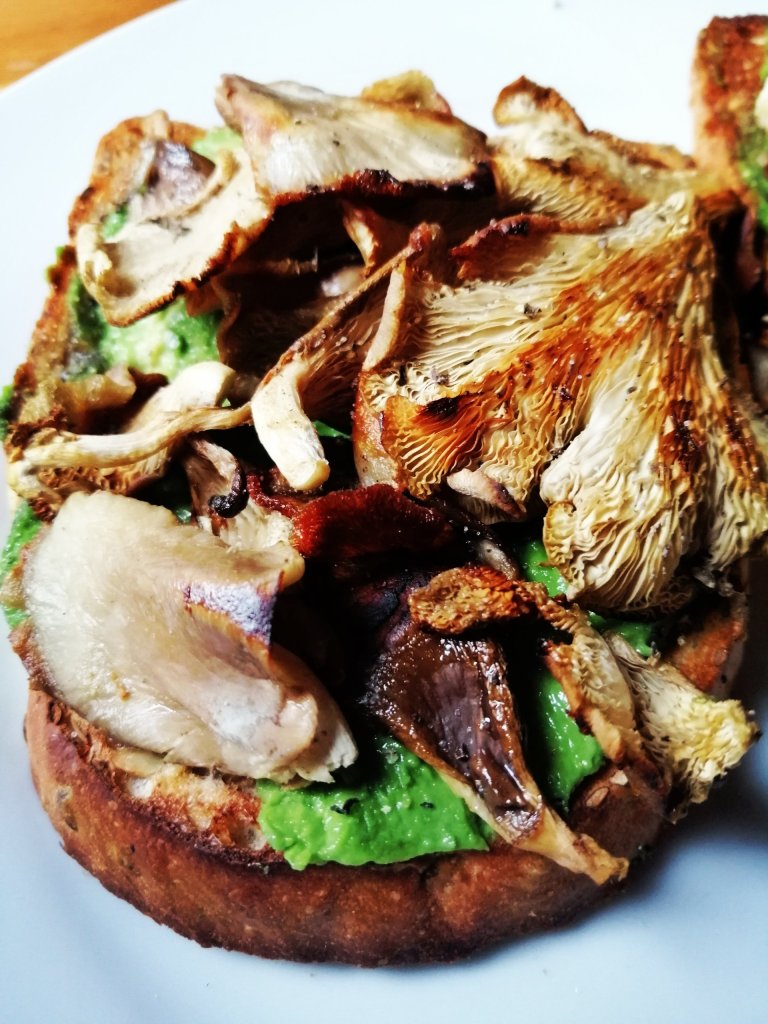
In less than a week later I had my first crop, and it’s still going. Like most mushrooms these can be added to pretty much anything. My favourite way to eat them is just fried in a little butter.
Delicious
If you love mushrooms and want to give your loved ones a gift idea I would definitely recommend trying this. It’ll bring out your inner nerd and you will love it. It’s also a great project with kids and helps them understand where food comes from.
Fried in a little olive oil and top some avocado and toast for a quick and simple lunch.
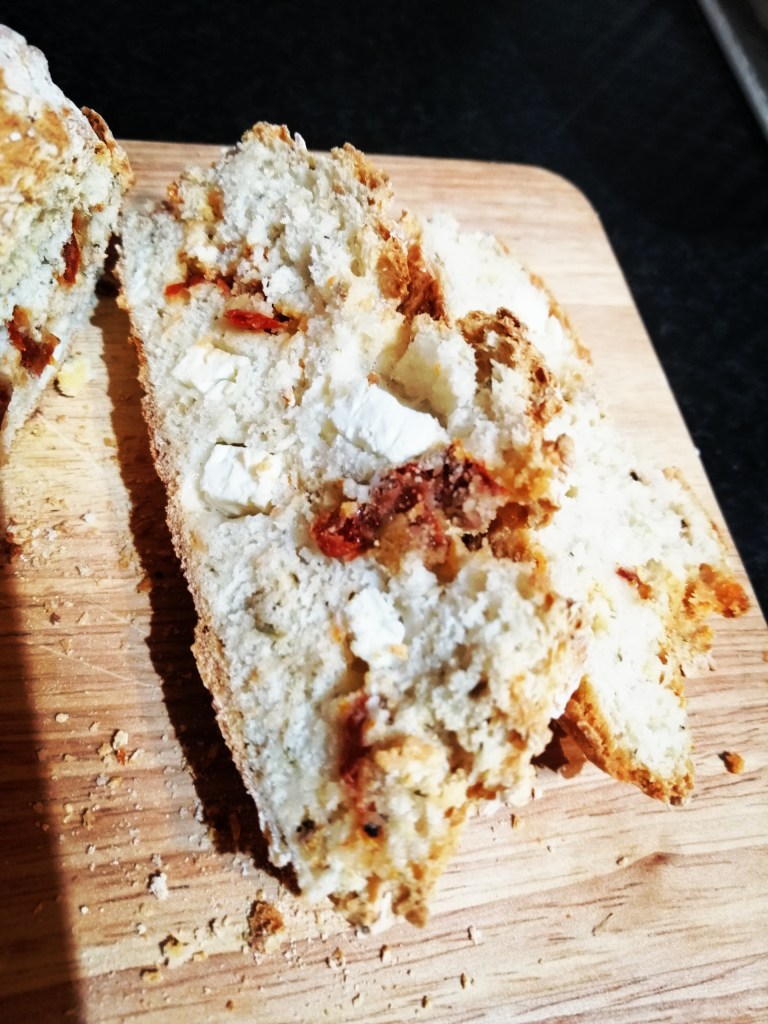
I think I’ve developed an obsession with soda bread. It’s hard not to, it’s quick and easy, and it’s amazingly versatile.
You can usually rustle up a version with stuff you have in the fridge or cupboard. This version has a Mediterranean slant and is great with cheese or prosciutto.
Delicious served along side soup
I like it with soup, and like any good soda bread its delicious with butter. This takes 5 minutes to prepare and if you’re having friends over they’ll be really impressed that you made your own bread (your place will also smell fantastic).
Ready for the oven
Ingredients
350 Grams Plain flour
1 Tsp Bicarbonate of soda
1 Tsp Oregano
1/2 Tsp Black pepper
100 Grams Feta cheese (chopped)
75 Grams Sun dried tomatoes (chopped)
275 ml Buttermilk (if you don’t have buttermilk, you can add lemon juice to ordinary milk and let it sit for a couple of minutes. It will do same job)
Method
Measure out your flour, oregano, black pepper and bicarbonate of soda into a large bowl
Add the Feta cheese and toss in the flour, then add sun dried tomatoes and toss on the flour as well (this will prevent them sticking together in clumps)
Add the buttermilk to the mix and stir well. Form into a ball
Line a baking sheet with baking paper and pre heat your oven to 180 degrees
Transfer your dough onto the baking paper and cut a cross into the ball of dough (about one third of the depth of the ball of dough)
Bake for 40 minutes or until the base sounds hollow when tapped
Autumn sometimes sees a glut of great vegetables as growing season comes to end.
I love to roast these vegetables up to bring out their sweetness. Then it’s time to decide if I’m making a soup with them or a side dish like this.
If like me you like roast big batches of vegetables this can be even quicker to make as you’ll have these made already. This is really versatile, you can swap out different vegetables as they come in season.
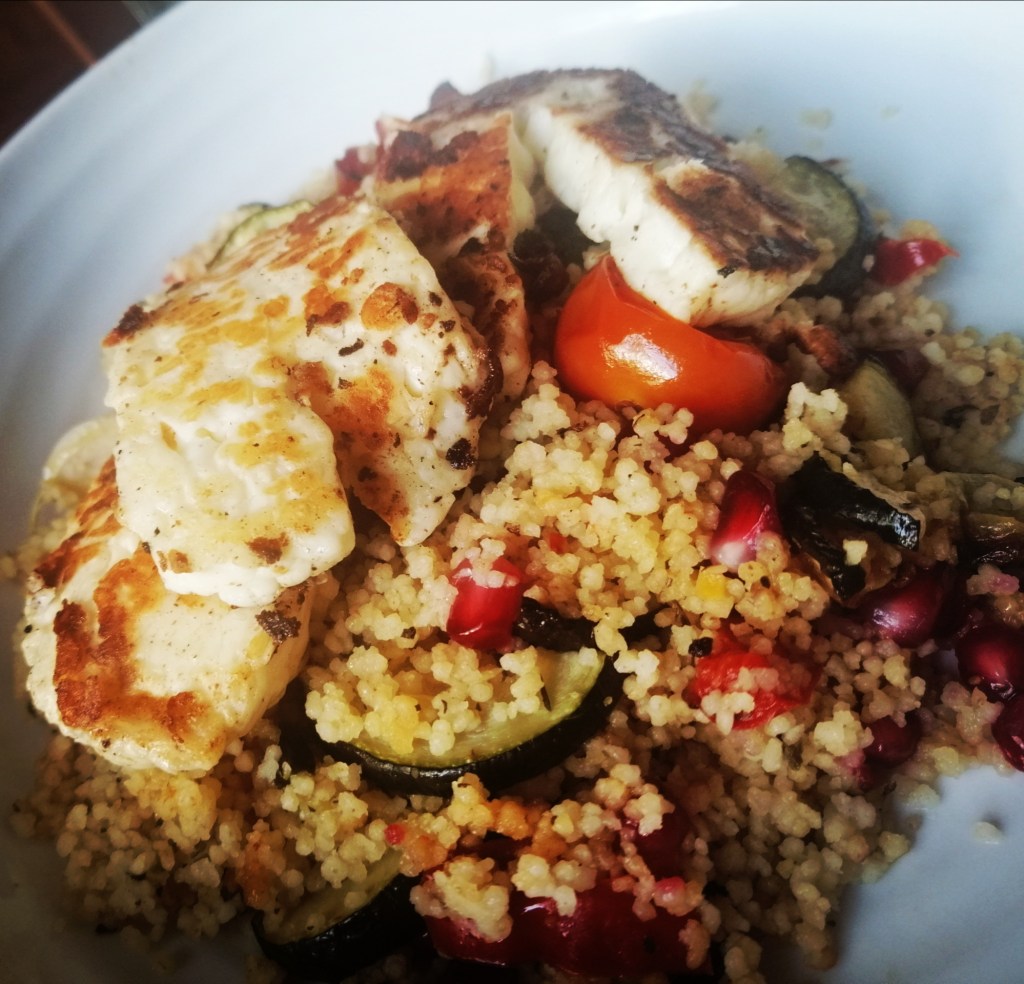
If you’re vegan, you can enjoy this along with roasted chickpeas. I like it with griddled halloumi, or roast chicken and Greek yoghurt. It can be served hot or cold, and it’s ideal for lunch boxes.
Halloumi with roast vegetable couscous
Ingredients
200 Grams Couscous
Vegetable stock
1 Large courgette (Sliced)
100 Grams Cherry tomatoes
1 Red pepper (Sliced)
2 Tbsps Olive oil
3-4 Cloves of garlic
1 Tbsp Red wine vinegar or lemon juice
1/2 Tsp Cumin
1 Tsp Dried mint, or 2 Tsps fresh mint (chopped)
50 Grams Pomegranate seeds
Salt and pepper
Method
Add the oil, sliced courgette and pepper to an oven proof dish, mix to make sure they are coated and bake in an oven pre-heated to 200 degrees. Include the garlic gloves (left whole with their skins on)
After 20 mins remove from the oven. Stir and add the cherry tomatoes and sprinkle over the vinegar. Bake for another 15 mins (or until the edges of the peppers starts catch)
In a heat proof bowl add the couscous cumin and mint. I recommend checking the instructions on the packet about how much liquid to add. (Then add the corresponding amount of vegetable stock)
Once you have removed the vegetables from the oven, take the roasted garlic and squeeze out the soft centre and stir into the couscous