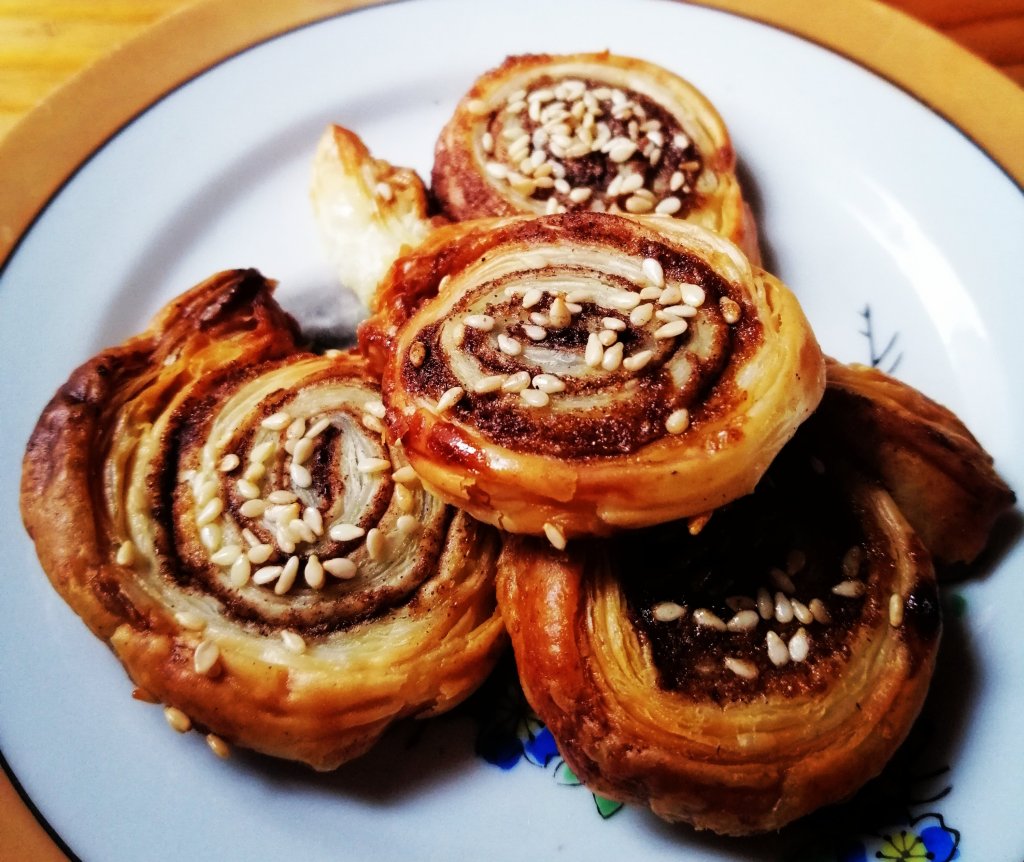
One of the good things about being the cook is that you get access to the best bits.
I was making a savoury pie, using shop bought puff pastry, and had some left over. I hate food waste, so rather than throw it out, I dusted it with some brown sugar and cinnamon to make a version of bite sized Danishes. I also sprinkled with sesame seeds just to be fancy, but they’re without these.
With only 3 ingredients these are delicious little perks of being the cook.
Ingredients
Ready made puff pastry
Brown sugar
Cinnamon
Method
I had a 5-6 centimetre wide piece of puff pastry. Dust with brown sugar and cinnamon and roll up in a coil.
Cut into 1-2cm slices, place on a baking sheet (sprinkle with sesame seeds if you want to), and bake for 15 minutes at 200 degrees (Celsius) until gold brown.
This may be the most totally filthy thing (in a good way) that I have ever made.
My sister saw this on a food programme and asked me to make it. She couldn’t remember which programme or I would give credit where its due.
I cook with chicken thighs alot, and when I’m feeling healthy I’ll remove and discard the skin. I’ve now started making chicken crackling (super crispy chicken skin crisps).
This butter makes a delicious topping on top of steak, or even melted onto pasta. Under no circumstances should you be left alone with it and a loaf of French bread, unless you want your loved ones to find you covered with crumbs, glistening with butter and filled with shame. Feck it, it’s totally worth it.
You can make larger batches and freeze the butter (if you don’t trust yourself)
Flatten out the chicken skin before placing another baking tray on top.
Ingredients
75 Grams Butter (room temperature, and cut into cubes)
Skin from 3-4 chicken thighs
Salt
Method
Preheat your oven to 200 degrees (Celsius)
Place the chicken thighs on a chopping board, and run the back of a large kitchen knife a long the skin to flatten it out.
Place on a baking sheet, sprinkle lightly with salt and then place another baking tray on top to keep the skin flat
Bake in the oven for 15-20 minutes or until the chicken skin is a deep golden brown. Set to one side and all to cool completely
When cold, whizz the chicken skin in a food processor until it looks like sand, you can leave it a little coarser if you prefer
Add the butter to the food processor and pulse until everything is well combined. Check the seasoning and more salt if you think it needs it
Transfer to a sheet of cling film and shape into a sausage shape and wrap before freezing or refrigerating
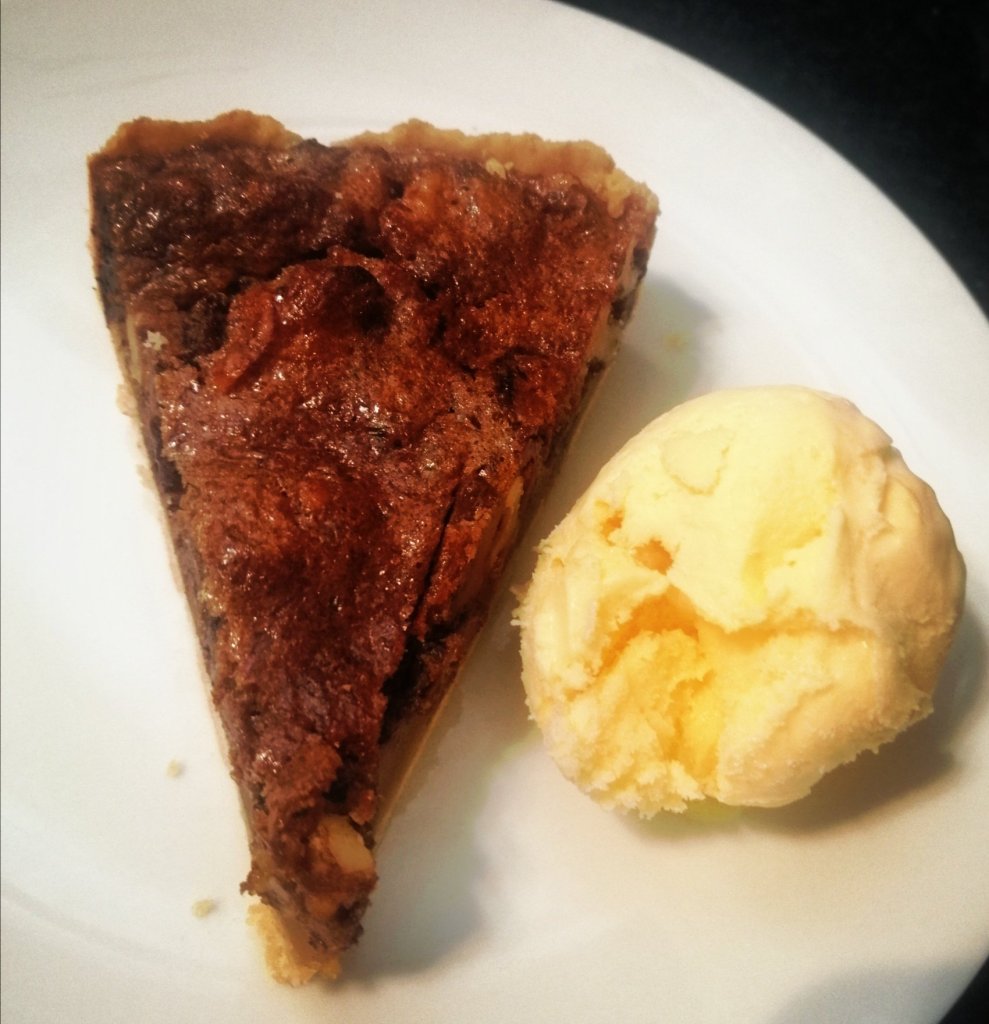
Any type of chocolate dessert is normally a winner. This pie is similar to a Kentucky Derby pie, I have left out the bourbon, and reduced the sugar because I found the original version overly sweet. The finished result is still rich and delicious and feels really indulgent.
This is divine served with whipped cream or vanilla ice cream. If you’re short on time you can use shop bought pastry or even a pre-made pastry case.
Serves 8
(For the pastry case)
125 Grams Butter
200 Grams Plain flour
2 Tbsp Sugar
Pinch of salt
Cold water
For the filling
125 Grams Butter (melted, and allowed to cool)
125 ml Golden syrup
4 Eggs
200 Grams Brown sugar
50 Grams Plain flour
150 Grams Walnuts (roughly chopped)
125 Grams Dark chocolate (roughly chopped) or chocolate chips
1 Tsp Vanilla extract
Method
For the pastry, add the butter, sugar and salt and flour to a food processor and pulse until it resembles breadcrumbs, (you can use the old fashioned rubbing in method if you don’t have a food processor). Gradually add cold water until the mix comes together as a dough. Form into a ball and wrap in cling film and then chill in the fridge for 30 mins
Grease a 12 inch pie dish/tin, ideally one with removable base. Remove the pastry from the fridge and roll out on a floured surface or between two pieces of parchment paper until 1/2 cm thick (you can check the size by placing your tin the centre of the pastry and checking there is enough room to cover the depth of your tin)
Carefully transfer the pastry to the pie dish and gently ease the pastry into the edges, place in the fridge and chill for another 30 mins. Trim any excess pastry that hangs over the edge of your pastry case
Preheat your oven to 180 degree (Celsius), place a sheet of baking parchment in the prepared party case and add baking beans (I use old uncooked rice, rather than buying the fancy clay baking beans), Blind bake for 20 minutes and then remove the baking parchment and baking beans
For the filling mix, whisk the melted butter (make sure its cool), eggs and add the sugar, vanilla extract and golden syrup and whisk until it lightens in colour and increases in volume (the sugar should have dissolved)
Whisk in the flour, ensuring there are no lumps, and then fold in the chocolate and walnuts with a spatula
Pour the filling mix into the pastry case and bake at 180 degrees for 45 minutes, until the centre of the pie is just starting to set (it will continue to cook as it cools)
Cool for a couple of hours before serving with whipped cream or ice cream
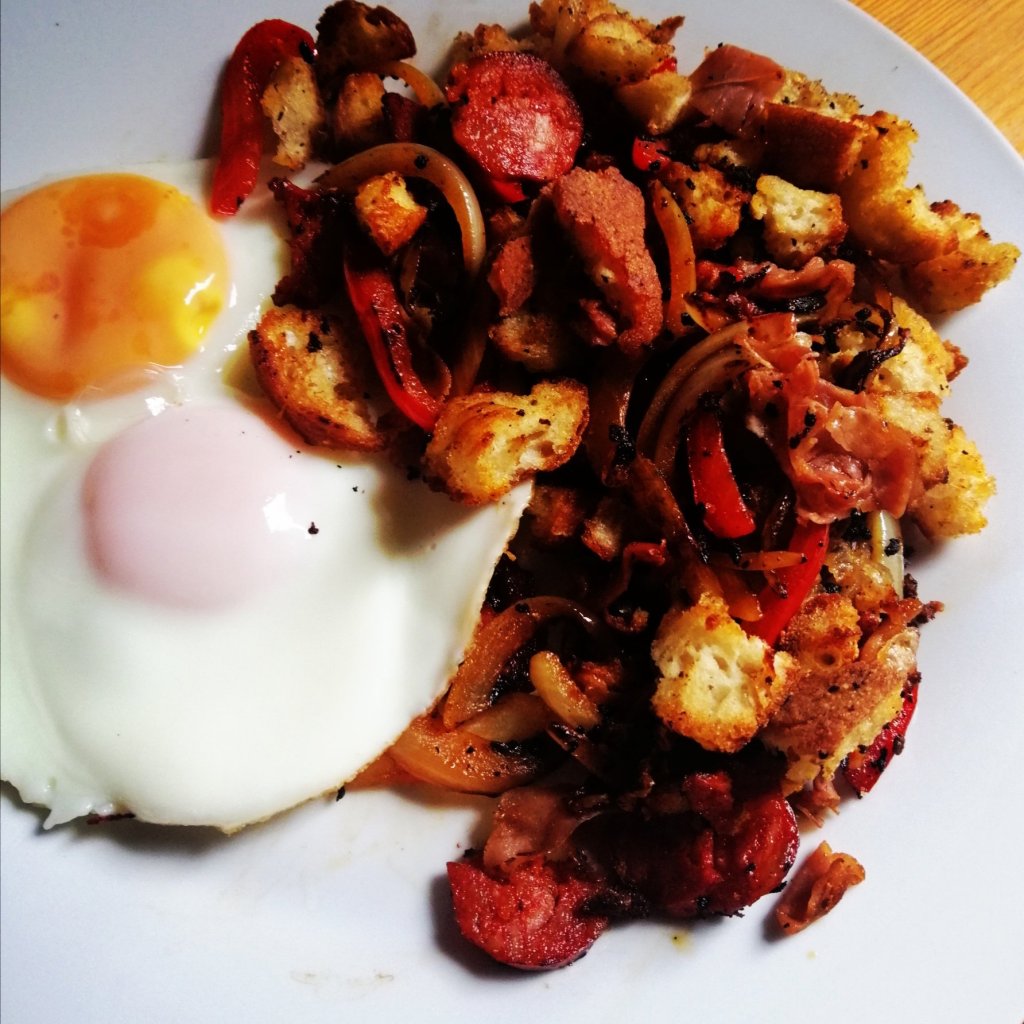
If you always end up with left over bread this is a really tasty way to use it up.
This dish apparently started with poor shepherds in Spain and Portugal. I like recipes that allow you to use up what’s available and this is perfect for using up scraps of streaky bacon, ham or other smokey meats or cold cuts
This dish does use a lot of oil, which is why I’ve included it amongst the poor filth recipes. It’s quick, easy to make and tastes great. I like for breakfast/brunch with fried eggs. It also makes a fantastic hangover cure.
Ingredients
500 Grams Stale bread (broken into chunks of various size, but not as small as breadcrumbs)
1 Onion (cut into fine slices)
2-3 Cloves of garlic
50 Grams Chorizo (peeled and sliced)
1 Red pepper (cut into 1cm strips)
50 Grams Streaky bacon or other left over meat or cold cuts (cut into 2cm slices)
1 Tsp Smoked paprika
2-3 Tbsp Olive oil
Method
Serves 4
Heat a large high sided pan and add the chorizo, and streaky bacon until it starts to crisp up. Remove from the pan and set to one side
Add the onion, garlic, red pepper and paprika to the pan and cook in the juices released from the chorizo and bacon until the onion becomes translucent
Add some oil to the pan and then add the stale bread chunks. Fry until the bread starts to brown, stirring regularly so it doesn’t burn
These are not mojitos in the true sense (I’m not really a fan of rum). But they are incrediblely refreshing, and a great Summer drink.
I make individual ones in a cocktail shaker (a great addition to your Amazon wish list if you don’t already have one). You can also increase the ingredients and make a big jug of these if you have friends round.
I have included the recipe for a simple syrup, but if you’re short on time you can buy this pre made. Make sure to have plenty of ice.
Ingredients
Simple syrup
250 Grams Sugar
250 ml water
For the cocktail
1 Shot Simple syrup
1 Shot Gin
Cucumber
Mint leaves
Lime
Soda or tonic water
Method
To make the simple syrup, add the sugar and water to a pot and heat until the sugar was dissolved, set to one side and allow to cool
With a potato peeler shave ribbons of cucumber and add to a tall glass and top up with crushed ice.
Roughly chop a tablespoon of cucumber and add to a cocktail shaker along with 5 mint leaves and a wedge of lime. Muddle these in the shaker (this a fancy term for giving them a bit of a bash to release their flavour, I do this with butt of a wooden spoon, but use what you have)
Add a shot of gin and a shot of simple syrup to the shaker, along with a couple of ice cubes and shake for all you’re worth. If you are making a jug of these, then make sure to stir thoroughly
Pour into your prepared glass and top off with some tonic or soda water and a sprig of mint and wedge of lime if you’re feeling especially fancy
It’s cold, wet and sh*tty outside. No wonder your body is craving carbs and needs comfort food.
You can add some patterns to fancy these up. But they’ll taste delicious regardless
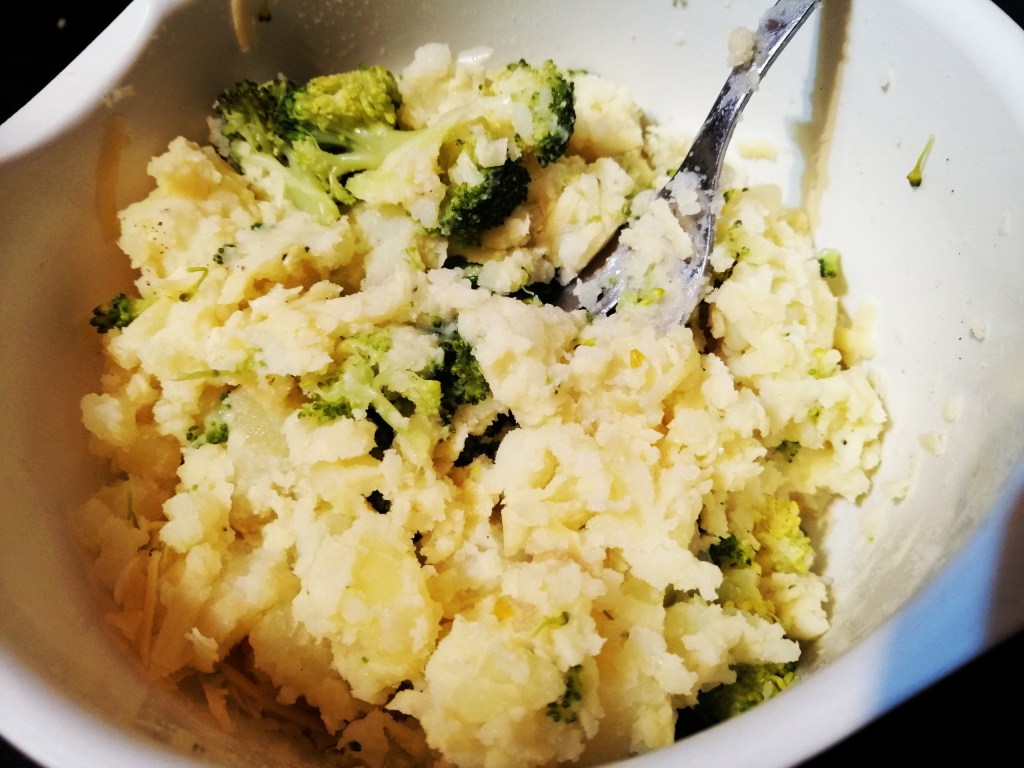
I hate food waste. So when I have bits and pieces hanging around in the fridge I try to come up with a recipe to use them. Left over potatoes and broccoli from previous meals are delicious when well seasoned and combined with cheese. This recipe isn’t dainty or sophisticated, but it does taste really good.
Makes 4 good sized pasties
Ingredients
375 Gram pack of pre-rolled puff pastry
250 Grams Cooked potatoes
150 Grams Cooked broccoli
100 Grams Mature Cheddar (grated)
1 Egg
1/2 Tsp Garlic powder
Salt and pepper
Potato, broccoli and cheese filling
Method
In a bowl break up the cooked potato and broccoli with a fork.
Add the grated cheese, garlic powder and salt and pepper (the mix needs a good amount of seasoning, to don’t forget to taste the filling)
Unroll your sheet of pastry and cut into four smaller sheets
Add the filling to one half of each sheet
Brush the edges of the pastry with beaten egg, and fold the pastry over, crimping the edges of the pastry with a fork.
Lightly brush the top with beaten egg, and bake in an oven, pre – heated to 200 degrees. Bake for 20 minutes until golden brown
I love any form of lemon dessert and these are the ideal tea time treat. There’s a rich buttery shortbread base and a zingy lemon topping.
OMG I love these so much, I have to distribute these among friends and family or else I could easily eat these entirely by myself. If you have better self discipline than I do, these will keep in an airtight box for 2-3 days.
Use a food processor if you have one to make them even easier to make. There’s no need to roll out the shortbread base, just press it into the dish.
Makes 18
Ingredients
For the base
120 Grams Butter
130 Grams Plain flour
30 Grams Icing sugar
For the topping
Juice and finely grated zest of 3 lemons
190 Grams Sugar
3 Eggs
65 Grams Plain flour
Extra icing sugar for dusting the finished bars
Method
Preheat your oven to 180 degrees (Celsius) and line a 9 in x 12 in baking tin with parchment paper
To make the base, add the flour, butter, and sugar to a food processor and pulse until it looks like breaks crumbs. If you don’t have a food processor you can use the rubbing in method to combine the butter and flour
Transfer the crumb mix to the baking sheet and press it down. Put in the oven and bake for 15 minutes until light golden brown
Allow the base to cool slightly before making the topping
Using your food processor again, add all the topping ingredients to the bowl and whizz until light and fluffy
Pour the topping on top of the cooled base and bake for 25 minutes (or until the centre doesn’t jiggle
Allow to cool completely before dusting with icing sugar and cutting into bars
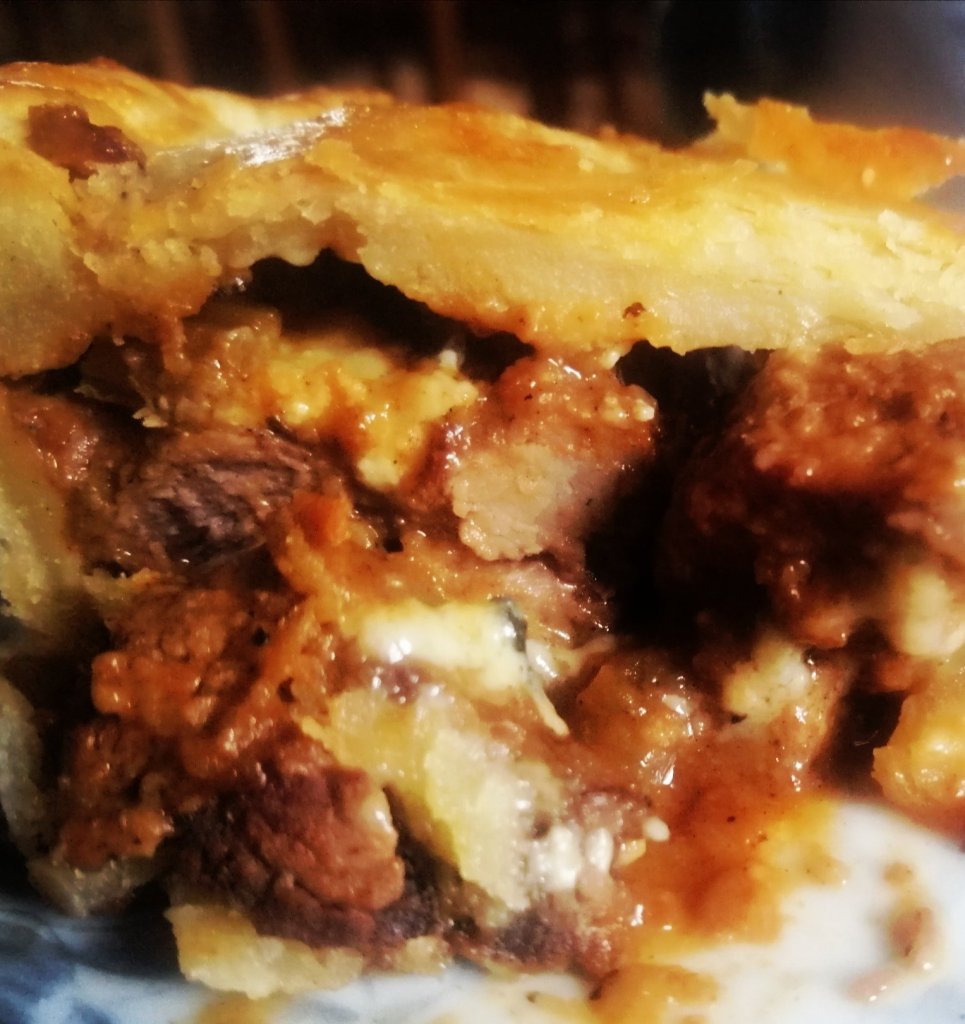
This is national pie week, so it inspired me to make my version of a steak and blue cheese pie. Yes, there is a bit of work involved but I guarantee it will taste 100 times better than anything you’ll buy in a supermarket.
Rich buttery pastry with really deep unctuous filling mmm.
Before you blue cheese haters turn your nose up at this. I have served this to people who detest blue cheese and they loved it (admittedly I didn’t tell them there was blue cheese in it until they had finished). So be brave and give it a try, you can try a really mild blue cheese if you’re not sure.
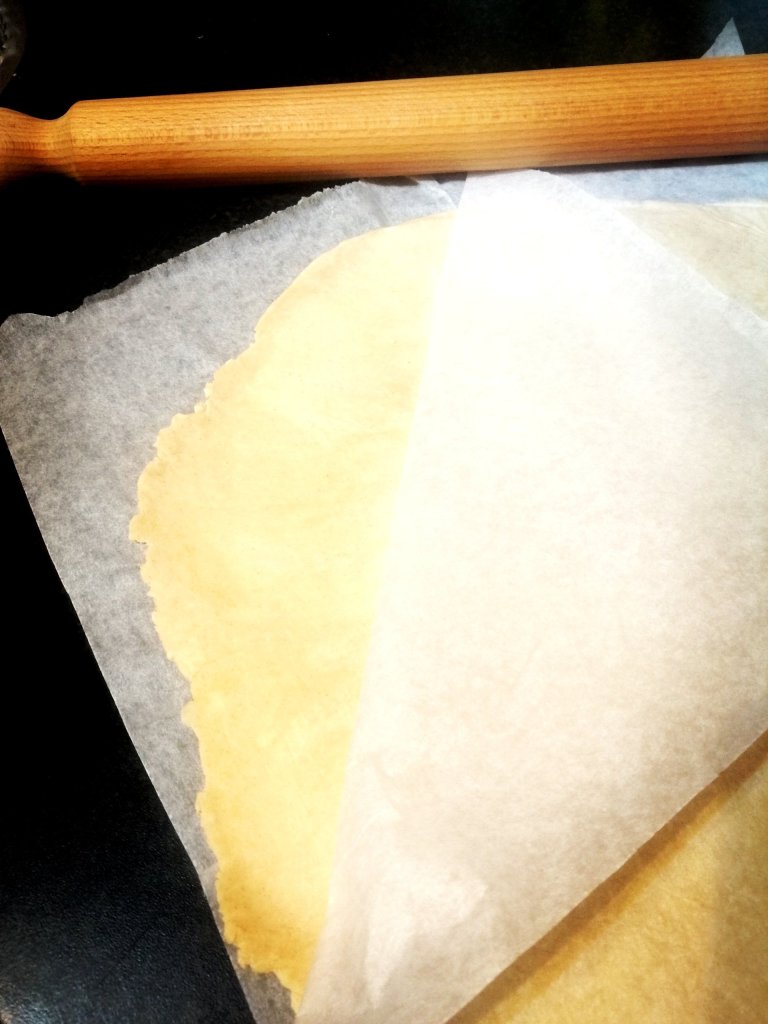
Roll the pastry between two sheets of baking parchment. To make it easier to move to the baking tin.
If cheese just isn’t your thing, just leave it out, this recipe will still give you a really tasty steak pie.
Crumble the Stilton across the steak filling before adding the pastry lid.
I used homemade pastry but you can use shop bought short crust pastry if you’re short on time. I usually make the meat filling and pastry the day before (you can also freeze it if you’re organised enough to make a double batch) .
For the pastry
400 Grams Plain flour
200 Grams Butter (cut into cubes)
1 Tbsp Mustard powder (optional)
1 Egg
Plus 1 Egg yolk (for glazing the pastry before it goes in the oven)
For the filling
800 Grams Stewing steak (cut into 4-5cm chunks)
50 Grams Plain flour
1 Tsp Mustard powder (optional)
1 Onion (finely chopped)
2 Stalks of celery (finely chopped)
1 Tbsp Tomato puree
2-3 Tbsp Oil
100 Grams Stilton or other blue cheese
500-750 ml Beef stock
Salt and Pepper to taste
Method
To make the filling, add a pinch of salt and pepper to flour as well as the mustard power and mix. Coat the cubes of meat in the flour
Add a tablespoon of oil to a large heavy bottomed pan, add the meat in small batches and seal on each side before removing and setting to one side. Continue doing this until all the meat has been sealed, add more oil to the pan if you need to
When all the meat has been sealed add another tablespoon of oil to the pan and gently fry the onion, tomato puree and celery for 5 minutes. Return the meat to the pan and the beef stock. Cover and simmer gently for 60 minutes. Uncover and simmer for a further 30 minutes until the gravy has reduced by at least a third (it should be quite a thick gravy). When the meat is tender remove from the heat and allow to cool completely
I use a food precessor to make pastry, but you can also use the traditional “rubbing in” method if you prefer. Add the butter, mustard powder and flour to the food processor and pulse until it looks like bread crumbs.
Add an egg and pulse, gradually add small amounts of cold water while pulsing until the pastry starts to come together
Turn out on a floured surface and form into a ball. Wrap in cling film and refrigerate for at least 30 minutes
While the pastry is chilling, grease a 9in x 9in loose bottom baking tin
Remove the chilled pastry from the fridge. Cut one third of the pastry and set to one side.
I like to roll out pastry between two sheets of baking parchment because I think it makes it easier to transfer to the tin, but you can simply roll it out on a floured surface if you prefer
Roll the pastry out until its about half a centimeter thick and transfer to the prepared tin. Make sure to press it gently into the edges
Spoon your cold meat filling into the pie case and spread evenly
Sprinkle the crumbled cheese on top of the steak filling
Roll out the remaining 1/3 of the pastry and top the pie, brush the edges with a little water and then press the edges of the pastry together to seal (you can crimp or press down with a fork)
Brush with egg yolk and add 7-8 little cuts on the lid to allow steam to escape
Bake in an oven preheated to 180 degrees (Celsius) for 45-50 minutes until deep golden brown
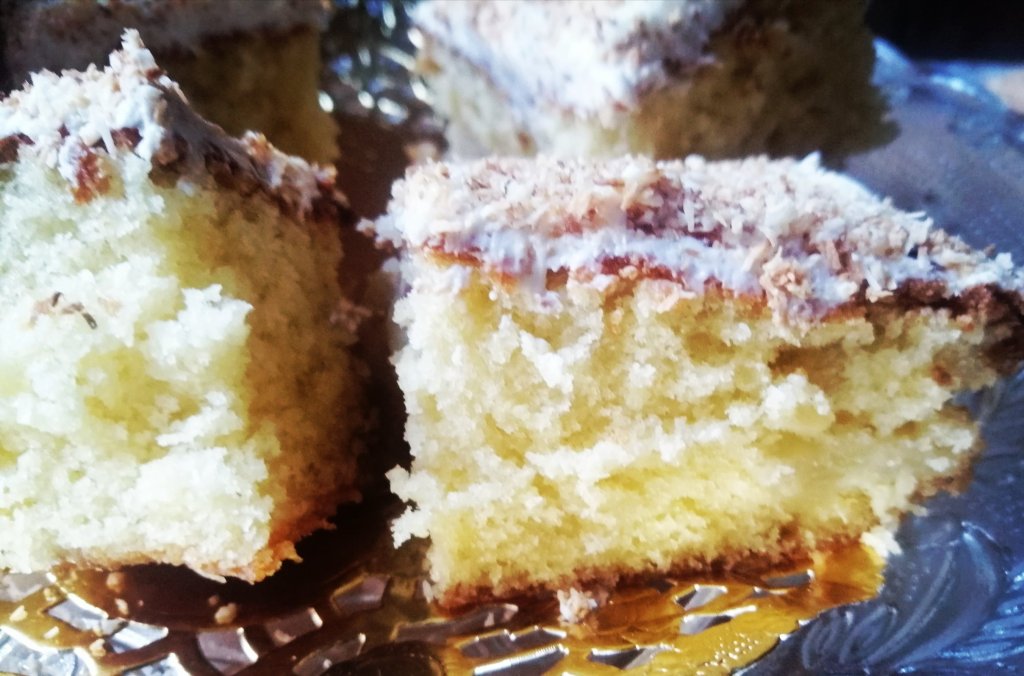
Pineapple and coconut are a marriage made in heaven, and though there is no booze in these, they are still yummy.
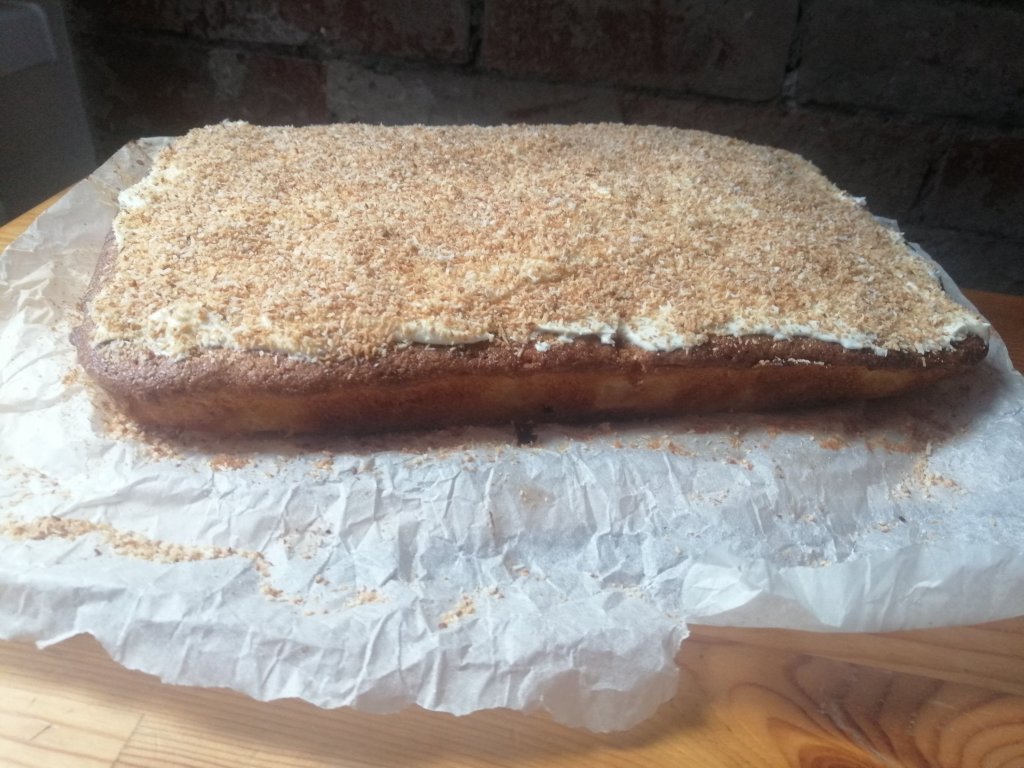
These are amazing for a special teatime treat or for dessert with ice cream. You can make the sponge 2-3 days in advance and wrap in cling film, then just add the topping before you’re read to serve. You can even freeze the sponge if you’re super organised (just remember to make sure the sponge is fully defrosted before applying the cream cheese frosting).
I’ve added some toasted coconut as a topping and take a few minutes to toast it, this adds a whole extra element.
Toasting the coconut will make all the difference
I used margerine for the sponge, Mary Berry uses this in her sponge recipes. Since nobody probably knows more about cakes than her, so I’ll go with her advice, but feel free to use butter if you prefer.
Makes 18 squares
Ingredients
For the sponge
Large tin of pineapple junks (drained weight 340 Grams), roughly chopped
350 Grams Caster Sugar
350 Grams Margerine
275 Grams Self Raising flour
100 Grams Dessicated coconut
5 Eggs
For the frosting
25 Grams Icing sugar (if you prefer a sweeter frosting you can use more)
200 Grams Cream cheese
25 Grams Dessicated coconut (toasted)
Method
If you have a stand mixer I would recommend using it, but an electric hand whisk is fine too.
Pre heat your oven to 180 degrees (Celsius), and line a 9 in x 12 in baking tin with baking parchment
In a bowl, add the margerine and sugar and whisk together until light and fluffy.
Whisk in one egg at a time, along with a tablespoon of flour. Whisk the remaining flour when they eggs have been added along with coconut (don’t panic if it looks curdled)
Fold in the roughly chopped pineapple, and transfer the mix to your prepared baking tin
Bake for 40-45 minutes
Allow to cool in the tin
For the toasted coconut topping, you can spread the coconut on sheet pan and bake for 5-10 minutes while the sponge is baking. I prefer to do it in a pan, as its easier to check that it’s not going to burn. Once toasted set to one side and allow to cool
Add the icing sugar to the cream cheese and mix well. When the sponge is completely cool spread with the cream cheese frosting and sprinkle with the toasted coconut