‘El Bulli’ Bean Soup with Picada

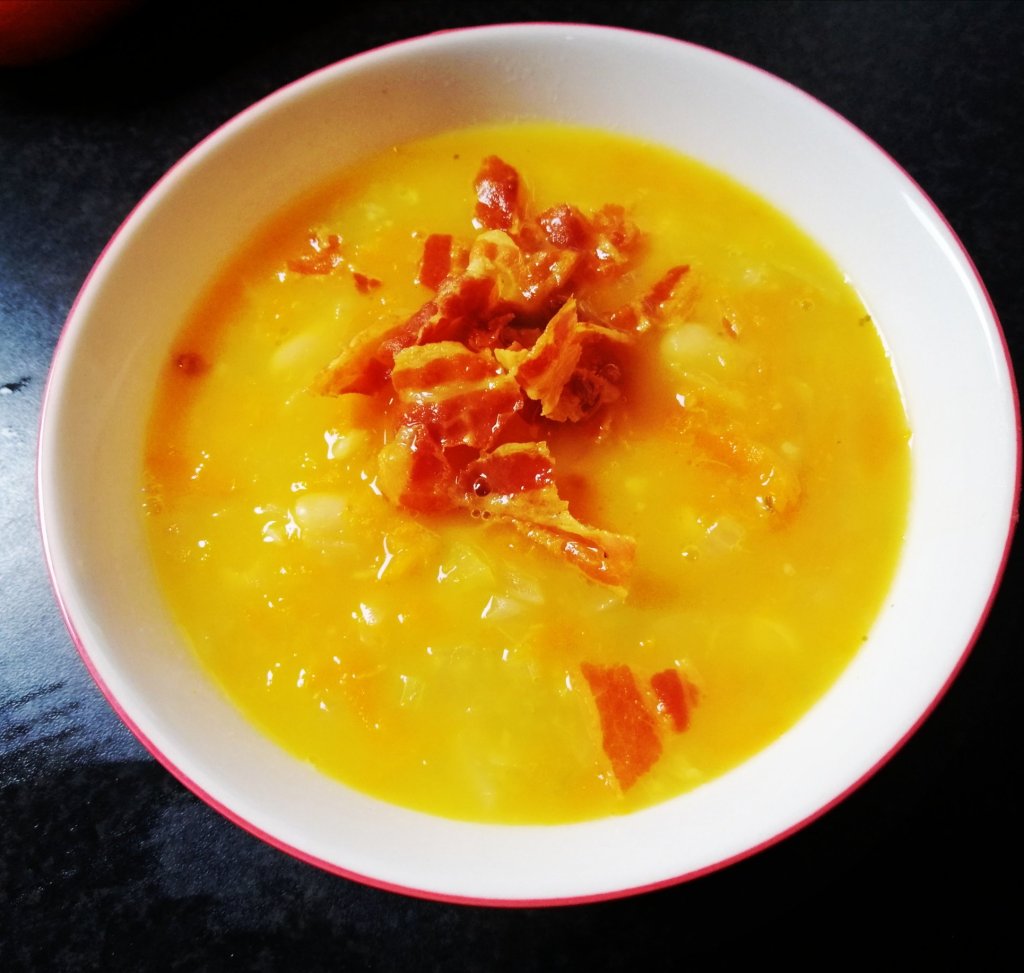
El Bulli was one of the most famous 3 Michelin star restaurants in the world.  I don’t claim this was what they served their customers, but apparently they would provide a 3 course meal for staff each day, and this is one of those dishes.

Anyone who’s ever worked in fancy restaurants will you the traditional staff meal can often be a bit ropey to say the least (I worked in a place once that only ever fed us cheap and nasty chicken nuggets).  A cook book based around El Bulli’s staff meals has actually been published called The Family Meal (dropping hints ahead of Christmas, just in case Santa is reading this)

It’s good to see El Bulli fed their staff well, and while it isn’t an extravagant dish, it’s delicious.  The thing that takes it to another level is the Picada (a Catalan version of pesto, made with hazelnuts and parsley).

Do yourself a favour and try to buy ready blanched hazelnuts, it will save a lot of time and effort.

Ingredients

For the soup

1 Onion (finely chopped)

1 Tbsp Oil

1 Clove garlic (finely chopped)

2 x 400 Gram Tins of cannellini beans

1 Litre Vegetable Stock (I used a 2 x stock cubes)

400 Mil Carton of Passata

1 Tsp Rosemary (Finely chopped)

1 Sprig of Thyme (or 1/2 Tsp of dried Thyme)

Salt and Pepper to taste

For the Picada

1 x Large punch of parsley or couple of handfuls (roughly chopped)

1-2 Cloves of garlic

75 Grams Hazelnuts (try to buy the pre-blanched one, as removing the skins is a pain in the a*se)

50-75 Mil Olive oil, (or more if you want the Picada to be looser)

1/2 Tsp Salt

Serves 4

Method

  • For the soup, heat the oil in a large pot, and add the onion and cook over a medium heat until it becomes translucent, add the garlic and cook for 1-2 minutes before adding the rest of the soup ingredients to the pot.  Simmer for over a low heat for 20 minutes.
  • While the soup is cooking you can make the picada.  If you haven’t been able to find ready blanched hazelnuts, heat the nuts in a frying pan until they smell nutty (I know this sounds weird but when you can smell the nut smell it means they are ready),  Transfer the toasted nuts onto the centre of a clean tea towel, bring the edges together and roll the nuts within the towel until the papery outer layer comes away
  • If you have more sense than I did and have bought hazelnuts without skins, add these to a food processer and pulse a couple of times until the nuts have broken up.  Add the rest of the picada ingredients to the food processer and blitz until you have a bright green paste.  I like mine quite chunky and rustic, but you can whizz it up until you get a super smooth paste if that’s your thing. 
  • Transfer the picada to a bowl and wipe the food processer, and you will be ready to transfer half the soup to the food processer and whizz until smooth before returning to the pot and stirring well.  This helps to thicken the soup
  • Add half the picada to the soup and stir well, before serving in large bowls.  Spoon a dollop of the picada in the centre of each bowl, serve crusty bread for a simple but delicious meal.

Cauliflower Cheese Soup

It’s comfort food season and this rich velvety smooth soup will make you feel all warm and cosy inside.

I like to top mine with some croutons made from stale baguette I had left over, and a little grated cheese. It’s also amazing topped with some crunchy bacon bits.

Ingredients

1 Cauliflower (broken into thumb sized florets)

1 Large potato (peeled and into 2-3 cm cubes)

1 Onion (finely chopped)

1 Tbsp Oil

350 Ml Milk

1 Litre Vegetable stock (I used 2 stock cubes)

100 Grams Mature cheddar or other strong cheese (grated)

Method

  • Heat the oil in a large pot and fry over a medium heat until the onion softens
  • Add the potatoes and cauliflower to the pot and cook for 5 minutes stirring occasionally
  • Add the milk and vegetable stock and heat until just before the soup comes to the boil. Turn the heat down and simmer for 15 minutes
  • Check that the potatoes and cauliflower are cooked (they should be soft enough to stick a fork in easily)
  • In a food blender or with an immersion blender whizz the soup until totally smooth. Add the grated cheese and give a final whizz to make sure it incorporated, cook for a further 5 minutes
  • Taste the soup to check the seasoning and add salt and pepper if you think it needs it. Sprinkle with your favourite topping

The Bear’s Omelette

If you have watched The Bear recently, its a fairly accurate representation of the highly stressed shouty nightmare that a professional kitchen can be.

I made this version shown in the TV show and am slightly addicted to it. A simple omelette with a Boursin cream cheese filling and a handful of crushed sour cream and chive crisps over the top is amazing.

You can go down the chefie route and and sieve the eggs first to make the omelette super smooth, but if you can’t be bothered it won’t affect the taste. In the TV show the chef also piped the cheese onto the omelette, but really who has the time, just spread it , it will taste the same.

Give this a try, and I guarantee you’ll make it again.

Serves 1

Ingredients

3 eggs

Large knob of butter

50 Grams Boursin garlic and chive cream cheese

Salt and pepper

Handful of crushed sour cream and chive potato crisps/chips

Method

  • Whisk the eggs together (you can put them through a sieve if you want a really smooth omelette but it isn’t essential)
  • Heat the butter in a pan over a medium/high heat
  • When the butter has started to foam slightly (don’t let it brown), add the eggs.
  • Roll the eggs around the pan and with a spatula move the cooked parts towards the centre of the pan so that runny bits run out to the edges and cooks. It doesn’t have to be perfect it just has to be cooked
  • Spread the Boursin on one half of the omelette and fold over. Cook for another minute to allow the Boursin to warm through
  • Top with the crushed crisps (you can also used chopped chives or herbs of you have them) and devour immediately

Rose and Raspberry Meringues

Barbie fever has taken over the world. I was more of a tomboy and never really got into Barbie, but it did give the chance to make something cute and pretty.

These may look “rustic”, but if you can be bothered with the faff of a piping bag, you can make the meringue nests a little more uniform, and the cream in top look fancier. They can be kept undecorated in an airtight container for 3-4 days. If you’re entertaining this is useful so that you can make these on advance and assemble at the last minute.

I used the tiniest amount of rose water in the cream (less is definitely more with this stuff), but if it’s not your thing it’s fine to leave it out. Just to be whimsical I used some pink food colouring in the meringue and some dried rose petals just be fancy, but these will still taste great with out the girly touches.

Makes 6-8 meringue nests

150 Grams Sugar

3 Egg whites

Pink food colouring (optional, ideally use a gel food colouring, I added a tiny bit but can add according to how strong you want the colour to be)

For topping

300 ml Double or whipping cream

50 Grams Icing sugar

1/4 Tsp Rose water (optional)

200 Grams Raspberries

1 Tbsp Dried rose petals (optional)

Method

  • Preheat your oven to 110 degree (Celsius)
  • Line a baking sheet with baking parchment, and draw 6cm circles as a guide for your meringue nests . I have a silicon baking sheet with circles already drawn on which is really handy
  • Using a stand mixer or electric whisk, whip your egg whites into soft peaks
  • Continue whisking (if you’re using food colouring add it now) and gradually add the sugar to the egg whites until the meringue is stiff and glossy
  • Using the circles on your baking sheet as a guide, spoon or pipe the meringue into the circles
  • Bake for 1 hour 45 minutes and then switch the oven off and leave the meringues on the oven while it cools down
  • When the meringues are completely cold, whip the cream, icing sugar and rose water together until it forms stiff peaks
  • Spoon or pipe on top of the meringues and then top with fresh raspberries and sprinkle with rose petals for a little bit of fanciness

Asian Noodle Salad

Trying to get away from winter’s stodgy comfort food, doesn’t mean giving up on flavour.

This salad is jam packed with flavour and texture and takes 10-15 minutes to knock up. It’s also gluten free and vegan and makes a great lunch box filler if you’re fed up with sandwiches.

Ingredients

500 Grams Dried rice noodles

1/4 Red cabbage (finely sliced)

3 Scallions/spring onions (finely sliced)

2 Small carrots (grated)

1 Red pepper (finely sliced)

2 Tbsp Coriander (finely chopped)

2 Tbsp Mint (finely chopped)

Dressing

2-3 Tbsp Peanut butter

1 Tbsp Sesame oil

1 Tbsp Soy sauce

1 Tbsp Grated ginger

1 Tsp Maple syrup or Honey if you’re not vegan

1 Tsp Chilli flakes

1 Tbsp White wine vinegar or lemon juice

Topping (option)

2 Tbsp Pumpkin seeds

100 Grams Cashew nuts/peanuts (toasted)

Method

  • Toast the nuts in a hot frying pan and set to one side and allow to cool.
  • Cook the rice noodles according to the instructions on the packet. Drain the noodles and add to a bowl of ice water to stop them over cooking.
  • Add all the dressing ingredients to a bowl and mix well. You might need to add some hot water to loosen up the dressing if its too thick.
  • Drain the cold noodles and add to a large bowl. Stir in the vegetables and dressing and mix well.
  • Top with the pumpkin seeds and nuts if using.

Pavlova

It’s Mother’s day and though she isn’t with us any more, I made my Mum’s signature dish, Pavlova. She wasn’t a fantastic cook, but she made a mean Pavlova. I didn’t ever get her recipe. So if you have a loved one who makes something you adore, remember to spend the time with them and get them to teach you how to make it. Food is one of the best ways to keep a little bit of that person with you.

Meringue has always been my culinary nemisis. I’ve struggled to make a decent one for years and I think I’ve cracked it thanks to the sainted Mary Berry (this is her recipe) .

I’ve used the traditional strawberries, but you can use any fruit you prefer.

This is a real crowd plesser, and is also a delicious gluten free dessert. Don’t panic if the meringue cracks, the topping will hide this, and the marshmallowy centre is a nice contrast to the crunchy exterior.

You can make the meringue the day before (keep in an airtight box) and decorate just before serving.

Ingredients

Serves 8

For the meringue

6 Egg whites

350 Grams Sugar

1 Tsp cornflour

1 Tbsp Vinegar

Topping

250 ml Whipping or double cream

Berries or other fruit to decorate

Method

  1. Pre heat your oven to 150 degrees (Celsius)
  2. Add your egg whites to the bowl of your mixer and at a high speed until it reaches firm peaks
  3. Continue mix and add the sugar a spoonful at a time, then add the cornflour and vinegar (which should be mixed together before adding to the meringue mix
  4. Draw a circle on a sheet of parchment paper and put a small dab of meringue on the corners of a baking sheet before laying the parchment on top (this helps keep it in place)
  5. Spoon your meringue on the circle you drew on the parchment (I like to keep meringue a quite tall, but you can go for a slightly flatter wider one if you prefer)
  6. Place in the oven, and lower the heat to 140 degrees, bake for 1 hour, then the oven off and open the oven door slightly. Leave the meringue in the oven until it is entirely cold
  7. Just before you are due serve, top with whipped cream and strawberries

3 Ingredient Vegan Brownies (Gluten Free)

Vegans and those with gluten intolerances often draw the short straw when it comes to desserts. These lovely little Brownies are really chocolatety and don’t make you feel like you’re missing a thing.

A friend told me about these after she saw the recipe online, so apologies if I’m not giving credit to whoever came up with recipe, but she couldn’t remember the site.

With only 3 ingredients these are great to knock up from stuff you have in the cupboards. Because I hate food waste, I always freeze over ripe bananas if I’m not going to eat them. Freeze them whole with their skin on, and they’re perfect for using in recipes like this or banana bread

Ingredients

3 Ripe bananas (mashed)

120 Grams Peanut butter

50 Grams Cocoa powder

Method

  • Preheat your oven to 180 degrees (Celsius)
  • In a large bowl, mash the banana, then add the cocoa powder and peanut butter and mix until thoroughly combined
  • Line a 6 in x 6 in tin with baking parchment.
  • Transfer the Brownie mix to the lined tin and spread evenly.
  • Bake for 25 minutes, and allow to cool in the tin

Porridge Bread

My friend Mags has been raving about this recipe for ages. We both have a serious bread addiction and this recipe is from a slimming club site. So when she shared the recipe I had to make it. If you’ve ever had Irish wheaten bread this is similar in taste.

Ready to bake

It takes two minutes to knock together, can be enjoyed by those who have issues with gluten and is pretty cheap to make. If you want something to keep kids busy this also something to do with them on a rainy afternoon and the will be super pleased with themselves.

It’s not the lightest fluffiest bread, but it is packed full of fibre and perfect served with cheese and chutney or buttered along side soup. I topped mine with some pumpkin seeds for a bit of crunch, but you can also sprinkle with porridge oats.

Ingredients

500ml Yoghurt

200 Grams Porridge oats

1 Tsp Salt

1 Tsp Bicarbonate of Soda (baking soda)

1 Egg

Method

  • Preheat your oven to 180 degrees (Celsius). Grease a load tin, you can also line it with baking parchment if want to (but I just greased the tin really well and it was fine)
  • Mix the yoghurt, salt and baking soda together, before stirring in the porridge oats
  • In a separate bowl, crack the egg and whisk with a fork until light and fluffy. Stir into the porridge mix and stir until we’ll combined
  • Transfer the mix into the loaf tin and bake for 50 minutes. Test with a tooth pick, when it comes out clean it’s ready.
  • Cool in the tin for 30 minutes

Michael’s Easy Cannelini Bean Soup

My brother made this soup for me and I loved it.  He only gave me the recipe on condition of a name check, so thanks Michael.

This is proper comfort food, and while the recipe is Vegan friendly it’s a really hearty stick to your ribs meal in a bowl.

I’m not vegetarian, so I topped the soup with some bacon I had left.  But in fairness it’s equally delicious with out it.

Serves 2-3

Ingredients

400 Gram Tin of cannelini beans

2 Stalks of celery (fine chopped)

2 Carrots (grated)

1 Onion (finely chopped)

1 Vegetable stock cube (or tablespoon of buillion powder)

2 Cloves of garlic (crushed or very finely chopped)

1 Tbsp Oil

500 ml Boiling water

Method

  1. Add the oil to a deep sauce pan and heat over a medium heat
  2. Add the onion and fry gently for 5 minutes until the onion softens but doesn’t colour
  3. Then add the carrot and celery and cook gently for an other 10 minutes
  4. Stir in the garlic and beans (including half the water they came in), crumble in the stock cube, add the boiling water and stir well.  Check the seasoning and add salt and pepper if you feel it needs it
  5. Simmer for 10-15 minutes until the the vegetables are soft and then serve with crusty bread

Jollof Rice and Chicken

There are countless versions of Jollof Rice and Chicken across Africa and the Caribbean. The are many reasons why it’s so popular, it’s quick and easy to make, it’s a one pot dish that can feed a family cheaply, and most importantly it’s really delicious.

I mean, tender chicken and really well flavoured rice with vegetables, where could you go wrong. This is also a great dish for using up odd bits of vegetables you have in the fridge

Serves 4

Ingredients

4 Large chicken thighs or 8 small ones (I use the ones with the bone in, as I think it keeps the chicken tender)

1 Tbsp Oil

2 Red peppers (cut into 1-2cm pieces)

1 Onion (cut into 1-2cm pieces)

1Tbsp Tomato puree

400 Gram Tin of chopped tomatoes

1 Red chilli pepper (finely chopped) or 1 tsp chilli powder

1 Tsp Smoked paprika

3 x Cloves of garlic (finely chopped)

Thumb sized piece of ginger (grated, I always keep ginger in the freezer. It stops it going to waste and it’s easier to grate)

250 ml Vegetable/chicken stock (I used a stock cube to make it)

325 Gram Long grain rice, dry weight (I use basmati, but other types are fine)

2 Tbsp Chopped coriander (optional)

Method

  1. Heat the oil in a large flat bottom pan. When hot, add the chicken thighs and seal on both sides
  2. Add the vegetables and tomato puree to the pan and cook for 5 minutes
  3. Add the remaining ingredients to the pan and cover with a lid. Bring to the boil and then reduce to a gentle simmer for 15-20 minutes, adding more water if the rice dries out before it’s cooked
  4. Check the chicken is cooked through and the rice is soft
  5. Sprinkle with chopped coriander and serve