I love the spring rolls I usually get from my local Chinese take away, but am conscious that they are deep fried and probably not great for my first waistline.

I wanted to make a slightly healthier version, so these are packed with vegetables and using filo pastry which can be baked rather than deep fried. This version is vegan, but you could also add cooked chicken or prawns if you wanted to add more protein. I used shop bought filo pastry which makes things quicker (anyone who makes their own probably needs to get out more), and is a great way to use up left over veggies.

The dipping sauce was a bit of store cupboard throw together, (my favourite dip is usually shop bought sweet chilli sauce). I have a friend who is much more experienced cooking Asian cuisine and she told me that all good dipping suaces should include sweet, sour, salt, and heat. I’m definately making this again. These are great as a starter or side dish, but I enjoy them as a snack along with a cold beer.
Ingredients
For the spring rolls
270 Gram Pack Filo pastry
1 Onion (finely sliced)
1 Carrot (cut into matchsticks)
1 Red Pepper (finely sliced)
2 Handfuls Cabbage or any greens you prefer (I used some left over cooked cabbage I had, but if using raw cabbage make sure it’s very finely sliced)
4-6 cm Knob of ginger (grated)
2 Cloves of garlic (grated or finely chopped)
1 Tsp Chinese 5 spice powder
2 Tbsp Oil
1 Tbsp Sesame seeds (optional)
For the dipping sauce
1 Tbsp Sesame oil
1 Tsp Chilli flakes/fresh chilli
1 Clove of garlic (grated or finely chopped)
1 Tsp Honey
1 Tsp Soy sauce
1 Tbsp Warm water
1 Tbsp Vinegar (if you have rice wine vinegar is probably best, I didn’t have this so used red wine vinegar and it was fine)

Method
- Heat a tablespoon of oil in a pan/wok, and add the vegetables, cook lightly for a few minutes and add the Chinese 5 spice powder, garlic and ginger, fry for another minute or two until the vegetables start to soften. Remove from the heat and allow to cool completely before trying to assemble the spring rolls
- Preheat your oven to 200 degrees. Open your packet of pastry, most packs recommend that you cover the pastry with a slightly damp tea towel if you are not able to work quickly. This prevents the pastry from drying out and becoming brittle and difficult to work with
- I cut sheets of around 8-10 cm long and 6-8 cm wide (you can make smaller rolls if you prefer). Lay a sheet on your work surface and brush or spray with oil (those low cal oil sprays now a available are really handy, but just brush lightly with oil if you don’t have this) and top with another sheet of pastry, and repeat until you have 3 layers of filo pastry
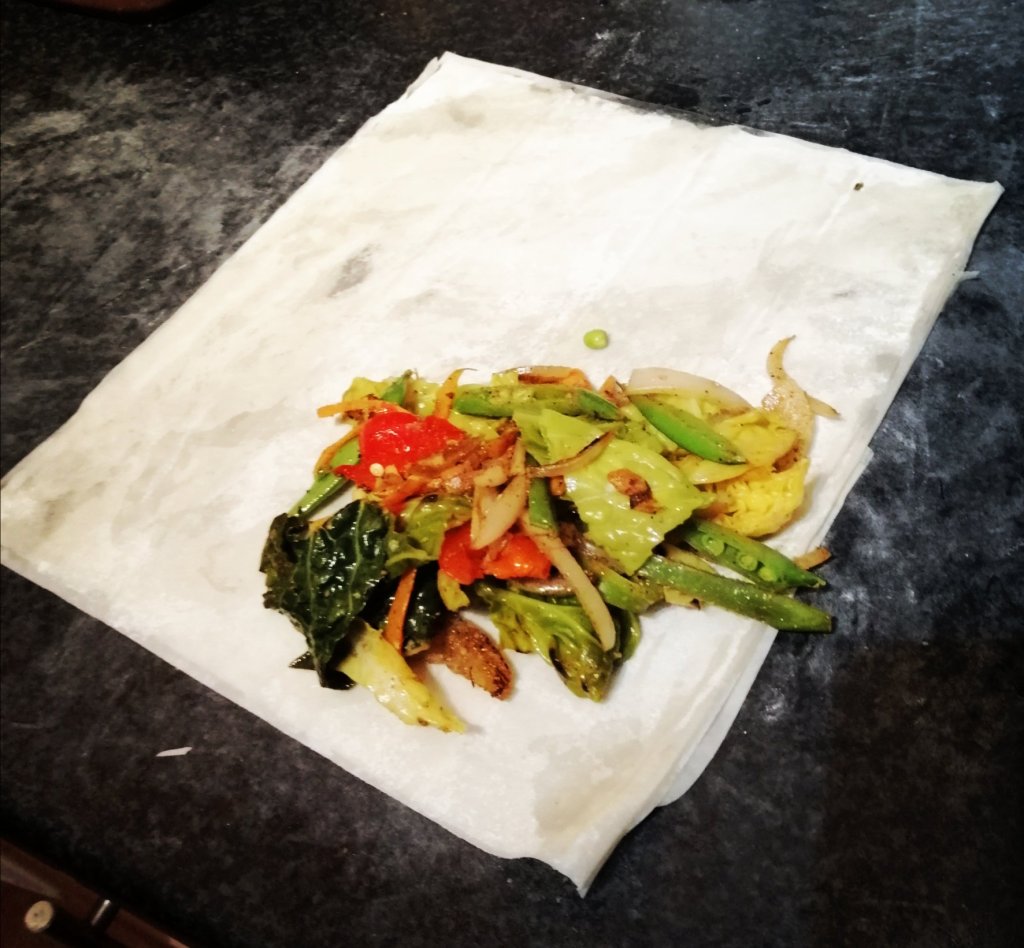
- With the pastry lengthways in front of you, lay a good heaped tablesoon of your vegetable filling and place near the right hand corner of the pastry. Tuck short corner of the pastry over the vegetables and tuck on the sides and roll (as shown in the photo)
- Brush/spray the rolls with oil and sprinkle with sesame seeds if you are using them and place on a baking tray. Place in your heated oven and bake for 15-20 minutes until crisp and golden
- The dipping sauce is strainght forward, simply combine all the ingredients in a bowl and stir before checking the taste (you mighy want more heat, sweetness etc). Put into separate serving bowls, Serve along side the spring rolls