Fesenjoon (Persian Chicken or Aubergine and Walnut Stew)

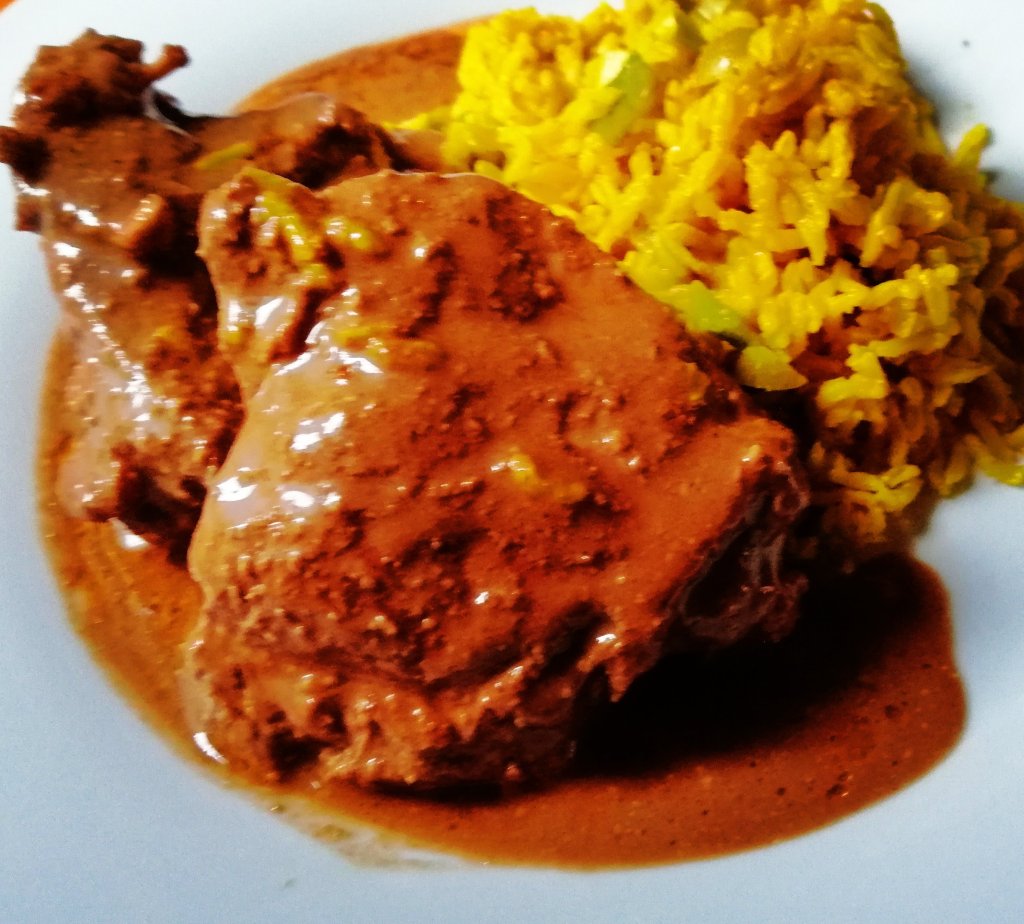
This dish was would have traditionally been made with duck (which I think would be too rich), and is now usually made with chicken. I have also made a vegan version with aubergines and I have to say I think it was my favourite.

This is quite a rich dish and the use of pomegranate molasses (available from most big supermarkets or Asian grocers) gives the stew a tangy sweet and sour flavour.

I call this a weekend recipe, meaning its something that requires low and slow cooking and you aren’t going to try and do for a quick weeknight dinner.

Serves 4

Ingredients

8 Chicken thighs (bone in, but skin removed), or 2 large aubergines (cut into bite sized chunks)

1 Tbsp. Tomato Puree

250 Grams Walnut pieces

1/2 Tsp Ground Cinnamon

2 Tsp Salt

1 Tsp Black pepper

125 Mil Pomegranate molasses

1 Tsp Sugar (or more to taste)

Pomegranate seeds to decorate (optional)

Method

  • Add the walnuts to a food processor and whiz until they become fine crumbs and start to stick together in a paste
  • Move the walnuts to a large pot with a lid, and add 1 litre of cold water to the walnuts. Bring to the boil for a couple of minutes, and then reduce the heat and cover with a lid simmer for 2 hours.
  • Stir in the pomegranate molasses, tomato purée, cinnamon, sugar, salt and pepper until well combined. Return the mixture to a simmer
  • Add the chicken thighs or aubergine chunks to the pot and cover with the lid again and simmer for a further hour. Remove the lid and simmer for another 10-15 minutes to allow the sauce to thicken.
  • Sprinkle with pomegranate seeds if using just before serving rice or flat breads

Porridge Bread

My friend Mags has been raving about this recipe for ages. We both have a serious bread addiction and this recipe is from a slimming club site. So when she shared the recipe I had to make it. If you’ve ever had Irish wheaten bread this is similar in taste.

Ready to bake

It takes two minutes to knock together, can be enjoyed by those who have issues with gluten and is pretty cheap to make. If you want something to keep kids busy this also something to do with them on a rainy afternoon and the will be super pleased with themselves.

It’s not the lightest fluffiest bread, but it is packed full of fibre and perfect served with cheese and chutney or buttered along side soup. I topped mine with some pumpkin seeds for a bit of crunch, but you can also sprinkle with porridge oats.

Ingredients

500ml Yoghurt

200 Grams Porridge oats

1 Tsp Salt

1 Tsp Bicarbonate of Soda (baking soda)

1 Egg

Method

  • Preheat your oven to 180 degrees (Celsius). Grease a load tin, you can also line it with baking parchment if want to (but I just greased the tin really well and it was fine)
  • Mix the yoghurt, salt and baking soda together, before stirring in the porridge oats
  • In a separate bowl, crack the egg and whisk with a fork until light and fluffy. Stir into the porridge mix and stir until we’ll combined
  • Transfer the mix into the loaf tin and bake for 50 minutes. Test with a tooth pick, when it comes out clean it’s ready.
  • Cool in the tin for 30 minutes

Homemade Rosemary Focaccia

Nothing smells better than freshly baked bread straight out of the oven. Making your own focaccia also costs about a third of the price of buying one from a fancy bakery or deli.

Like most people I don’t bake my own bread everyday. At the weekend when you have a little more time its nice to shake off the stresses of the week and kneading bread is a great way to work off any residual tension. Although this bread only needs 5 minutes kneading and you’re rewarded with amazingly tasty bread that can be sliced in half for sandwiches or is a delicious side dish served along side soups, stews, or pasta.

I’ve used a traditional salt and rosemary topping, but caramelised onion or olives are also brilliant alternatives. This also freezes really well.

Ready for the oven

Ingredients

500 Grams Strong white flour

7 Grams Dried yeast

1 Tsp Salt

300-400 Mil Luke warm water

4-5 Tbsp Olive oil

2-3 Sprigs Rosemary

Method

  • 1. Mix your yeast with 300ml of luke warm water and set to one side while you measure out the flour and add it to a large bowl
  • 2. Add a teaspoon of salt to one side of the (this will stop it coming into direct contact with the yeast and killing it). Make a well in the centre of the flour, add two tablespoons of olive oil and the water and yeast mix.
  • 3. Mix well, you may need to add more water, your dough should be quite soft and sticky, but not super wet
  • 4. Turn your dough onto a floured surface and knead for 5-10 minutes (or until the urge to punch someone has passed, if I haven’t mentioned it before I sometimes “rage bake”)
  • 5. Clean the bowl you were using, (I always give the bowl a quick wipe with a little oil to stop your dough sticking). Put your dough back in the bowl and cover with a tea towel and prove for one hour
  • 6. Grease an 8 x 12 inch tin with some olive oil and transfer the dough from the bowl to the tin. Stretch the dough out to fill the tin. Cover with a tea towel again and prove for 45 minutes
  • 7. Pre-heat your oven to 220 degree (Celsius). Remove the tea towel from your baking tin, and with your finger tips press little dimples into the dough
  • 8. Sprinkle 2 tablespoons of olive oil across the top of the dough. Pluck leaves of rosemary and poke them into the dough (it will just sit on top and then fall off if you don’t). Sprinkle a teaspoon is salt across the top of the dough (sea salt is best if you have it, but just use a little less ordinary salt if you don’t)
  • 9. Bake for 20 minutes, until golden brown. Allow to cool in the tin for 10-15 minutes

Chicken Crackling Butter

This may be the most totally filthy thing (in a good way) that I have ever made.

My sister saw this on a food programme and asked me to make it. She couldn’t remember which programme or I would give credit where its due.

I cook with chicken thighs alot, and when I’m feeling healthy I’ll remove and discard the skin. I’ve now started making chicken crackling (super crispy chicken skin crisps).

This butter makes a delicious topping on top of steak, or even melted onto pasta. Under no circumstances should you be left alone with it and a loaf of French bread, unless you want your loved ones to find you covered with crumbs, glistening with butter and filled with shame. Feck it, it’s totally worth it.

You can make larger batches and freeze the butter (if you don’t trust yourself)

Flatten out the chicken skin before placing another baking tray on top.

Ingredients

75 Grams Butter (room temperature, and cut into cubes)

Skin from 3-4 chicken thighs

Salt

Method

  1. Preheat your oven to 200 degrees (Celsius)
  2. Place the chicken thighs on a chopping board, and run the back of a large kitchen knife a long the skin to flatten it out.
  3. Place on a baking sheet, sprinkle lightly with salt and then place another baking tray on top to keep the skin flat
  4. Bake in the oven for 15-20 minutes or until the chicken skin is a deep golden brown. Set to one side and all to cool completely
  5. When cold, whizz the chicken skin in a food processor until it looks like sand, you can leave it a little coarser if you prefer
  6. Add the butter to the food processor and pulse until everything is well combined. Check the seasoning and more salt if you think it needs it
  7. Transfer to a sheet of cling film and shape into a sausage shape and wrap before freezing or refrigerating

Creamy Chicken and Mushroom Lasagne

Traditional lasagne is pretty epic, but it does no harm try new versions of things and this is pretty amazing. This was a giant lasagna, but you can reduce the recipe if you need to make a smaller one.

Ingredients

Serves 8

1Kg Chicken Breast (cut into 2-3cm chunks)

500 Grams Mushrooms (roughly chopped)

50 Grams Dried Mushrooms

200 Grams Spinach

750 Mil Milk

75 Grams Butter

75 Grams Plain flour

1 Tsp Salt

1 Tsp Black Pepper

2 Tbsp Oil

250 Grams Cheese (grated, I used a mix of mozzarella and Cheddar)

1 Tbsp Rosemary (chopped)

4-5 Cloves of garlic (crushed or finely chopped)

12 – 14 Lasagna dried sheets (the type that don’t need pre-cooked)

Method

  1. Before doing anything else, place the dried mushrooms into a bowl and cover with 350 mil of warm water
  2. Add 1 table spoon of oil to a large high sided pan and heat over a medium heat. Add the chopped chicken and colour on all sides before removing from the heat and setting to one side
  3. Add a second table spoon of oil to the pan and add the roughly chopped mushrooms, cook for around 10 minutes (don’t stir too often or they will start to release water)
  4. Drain the dried mushrooms (keep the water they were soaked into one side as it will go into your sauce later)
  5. Stir in the dried mushrooms and spinach to the pan with mushrooms (it will look like it won’t fit, but it quickly wilts down
  6. To make the sauce, melt the butter, and add the crushed garlic to let it infuse and flavour the butter. Add the flour and stir well to make a loose paste
  7. Over a medium heat, gradually whisk in the milk and a water the dried mushrooms were soaked in as this will be packed with flavour.
  8. As the sauce starts to thicken, stir in the rosemary and salt and pepper (you can adjust the seasoning to your own taste). Cook the sauce out for a further 10 minutes, stir regularly until the sauce no longer tastes floury. The sauce should not be especially thick, so add more milk if you think it needs it.
  9. Pre-heat you over to 180 degrees (Celsius)
  10. In a lasagna dish, ladle in enough sauce to cover the bottom of the dish add about a third of the chicken and mushroom mix before topping with lasgna sheets. Repeat this on two more layers, making sure you ladle in liberal amounts of the sauce over the lasagna sheets
  11. Top with grated cheese and bake for 45 minutes until deep golden brown Enjoy with salad and garlic bread

Potato, Cheese and Broccoli Pasties

It’s cold, wet and sh*tty outside. No wonder your body is craving carbs and needs comfort food.

You can add some patterns to fancy these up. But they’ll taste delicious regardless

I hate food waste. So when I have bits and pieces hanging around in the fridge I try to come up with a recipe to use them. Left over potatoes and broccoli from previous meals are delicious when well seasoned and combined with cheese. This recipe isn’t dainty or sophisticated, but it does taste really good.

Makes 4 good sized pasties

Ingredients

375 Gram pack of pre-rolled puff pastry

250 Grams Cooked potatoes

150 Grams Cooked broccoli

100 Grams Mature Cheddar (grated)

1 Egg

1/2 Tsp Garlic powder

Salt and pepper

Potato, broccoli and cheese filling

Method

  1. In a bowl break up the cooked potato and broccoli with a fork.
  2. Add the grated cheese, garlic powder and salt and pepper (the mix needs a good amount of seasoning, to don’t forget to taste the filling)
  3. Unroll your sheet of pastry and cut into four smaller sheets
  4. Add the filling to one half of each sheet
  5. Brush the edges of the pastry with beaten egg, and fold the pastry over, crimping the edges of the pastry with a fork.
  6. Lightly brush the top with beaten egg, and bake in an oven, pre – heated to 200 degrees. Bake for 20 minutes until golden brown
Brush lightly with beaten egg.

3 Ingredient, Condensed Milk and Fruit Squares

We’re currently getting battered by storms and I couldn’t face going out, so I had to work with what I had. 

I love this recipe as it takes minimal effort and can be made with ingredients you normally have in your cupboard.  I recommend everyone always has a tin of condensed milk in the cupboard.  It can be used for everything from making ice cream, sweets and baking.

These are perfect with a cup of tea or coffee on a miserable day (they also freeze well, just freeze before you decide if you’re going to sprinkle with icing sugar)

Ingredients

390ml Tin of condensed milk

160 Grams Self raising flour

350 Grams Dried fruit (you can use any fruit you like or a combination)

Icing sugar for dusting (optional)

Makes 15 squares

Method

  1. Preheat your oven to 180 degrees (Celsius), and line a 16cm x 24cm baking tin with baking paper
  2. Add the flour, fruit, and condensed milk to a bowl and mix well
  3. Transfer the batter to the baking tin and bake for 25-30 mins
  4. Cool in the tin for 30 minutes, and then add a dusting of icing sugar if you want to make it look pretty. Cut into squares and store in an air tight box for up to 2-3 days

Carnitas (Mexican Pulled Pork)

Everyone loves Mexican food, and while I make no claims that someone from Mexico would say this is just like their Mum would make, I think it tastes amazing. If you like pulled pork but never thought of trying it at home, you should give this a go. It really is simplicity itself, all you need is time, so perfect for the weekend when you kick back or get on with other things while the oven does all the work for you.

I love this in tacos but you can add it to burritos or sandwiches. While this does take some time, it’s a simple recipe and is ideal to feed a group of people cheaply. I used pork shoulder which is inexpensive and really benefits from being marinated and cooked long and slow.

Delicious in wraps too.

Ingredients

1 Kg Pork shoulder

100 ml Orange juice (I used the juice of 2 oranges)

1 Tbsp Tomato puree

1 Tsp Oregano

1 Tsp Chilli powder

2 Tsp Smoked paprika

1 Tsp Ground Cumin

1 Tsp Ground Coriander

1 Tsp Minced Garlic

Method

  1. Cut your pork into 4 chunks
  2. In a sealable freezer bag add all the other ingredients and squish together to make sure they are well mixed
  3. Add the pork to the bag and seal, rub the bag to make sure the marinade covers the pork and then put in the fridge. If you can marinade this for 24 hours this is ideal. If you don’t have that sort of time try to marinade for least an hour
  4. Pre-heat your oven to 160 degrees (Celsius). Put your pork and the marinade in an oven proof dish with a lid and place in the oven for 3.5 hours.
  5. Remove from the oven and shred the meat with two forks and mix in with the cooking juices for super tasty pulled pork

Slow Roast Cherry Tomatoes

Do you ever get a bit over zealous when shopping and have stuff hanging about the fridge that you forget about. I do this more often than I should. I recently found a tub of cherry tomatoes that I had forgotten about and were starting to go a bit soft. I decided to cook these long and slow and they tasted fantastic.

I used these as a side dish, but they would be fantastic stirred into some freshly cooked pasta, or served cold in salads or on some crusty bread with some soft cheese. These are every bit as tasty as sun-dried tomatoes. I made quite a small batch of these (because it was a small tub of tomatoes), but I’m definitely going to make bigger batches next time. These can live in your fridge for 3- 4 days in an air tight jar.

Ingredients

250 Grams Cherry tomatoes (halved)

1 Tbsp Olive oil

1/2 Tsp salt

2 Cloves of garlic (roughly chopped)

3-4 Sprigs of thyme or 1/2 Tsp dried thyme

Method

  1. Preheat your oven to 180 degrees
  2. Place all the ingredients on a baking sheet and mix well to ensure the tomatoes are coated in the oil. Bake for 20 minutes
  3. Reduce the heat to 140 degrees and cook for a further 30-40 minutes, until the tomatoes start to look wizened up and starting to char

ANZAC Biscuits

I love learning about new recipes from other people and hearing about their food traditions. One of my bosses Amanda, is Australian, and she mentioned these as being a real institution back in OZ. The recipe she shared was from BBC Good Food, and these are scrummy.

The name comes from Australian and New Zealand Army Corp, and legend has it people originally made these to send with care packages to soldiers during the first world war because the ingredients didn’t spoil easily. Other people claim they were never sent in care packages, but were sold at bake sales etc. to raise funds for returning veterans. They’re now baked to commemorate ANZAC day on 25 April each year.

How long you cook these for will depend on the type of biscuit you want (chewy or crisp). I’ve also seen recipes that include ground ginger, and I think this would make a cracking addition. One of my work mates tried drizzling chocolate over hers, which would also be scrummy (thanks for the suggestion Tina). Which ever version you try they will taste pretty amazing and are easy to make from ingredients you might already have. They will live quite happily in an airtight tin for 4-5 days.

Ingredients

100 Grams Plain Flour

100 Grams Butter

100 Grams Caster Sugar

85 Grams Porridge Oats

85 Grams Desiccated Coconut

1 Tbsp Golden Syrup

1 Tsp Bicarbonate of Soda

Method

  1. Heat your oven to 180 degrees, and line a cookie sheet with baking parchment
  2. Add the flour, sugar, oats and coconut to a bowl and mix well before making a well in the centre
  3. In a separate bowl, add the butter and golden syrup and melt in a microwave (I usually do 30 seconds at a time)
  4. In a cup add the bicarbonate of soda and stir in 2 tablespoons of boiling water, before stirring into the melted butter
  5. Stir the melted butter into the dry mix and stir until fully incorporated
  6. Scoop dessertspoonful’s of the mix onto the baking sheet, leaving gaps of 2-3 cm between each biscuit, as they will spread
  7. Cook in your preheated oven for 10 mins for a chewy biscuit, or 15 mins or longer if you want a more crispy biscuit