This is a great dish at anytime of day, I like it at weekends when you’ve slept a little bit later and maybe need a little bit of help with a hangover (basically brunch). Quick, satisfying and easy to make, its also ideal as mid week dinner.
If you’re vegetarian, you can swap out the chorizo for a teaspoon of smoked paprika for the same flavour.
Serves 2
Ingredients
50 Grams Chorizo (thinly sliced) or 1 Tbsp of smoked paprika
400 Grams Tin of butter beans (drained)
1 Small onion or 4-5 scallions/spring onions (finely sliced)
1 Red pepper
200 Grams Cherry tomatoes (chopped)
4 Eggs
Salt and pepper
Method
Heat a large frying pan with a lid, add the chorizo until it starts to release it’s oil, remove from the pan and set to one side
Add the vegetables to the pan and cook until soft. Add the butter beans to the pan and crush gently with the back of a spoon
Add the chorizo back to the pan and stir well.
Make four wells in the mix and crack an egg into each well
Cover the pan with a lid and turn off the heat. Allow to sit for 5 minutes until the egg whites are cooked
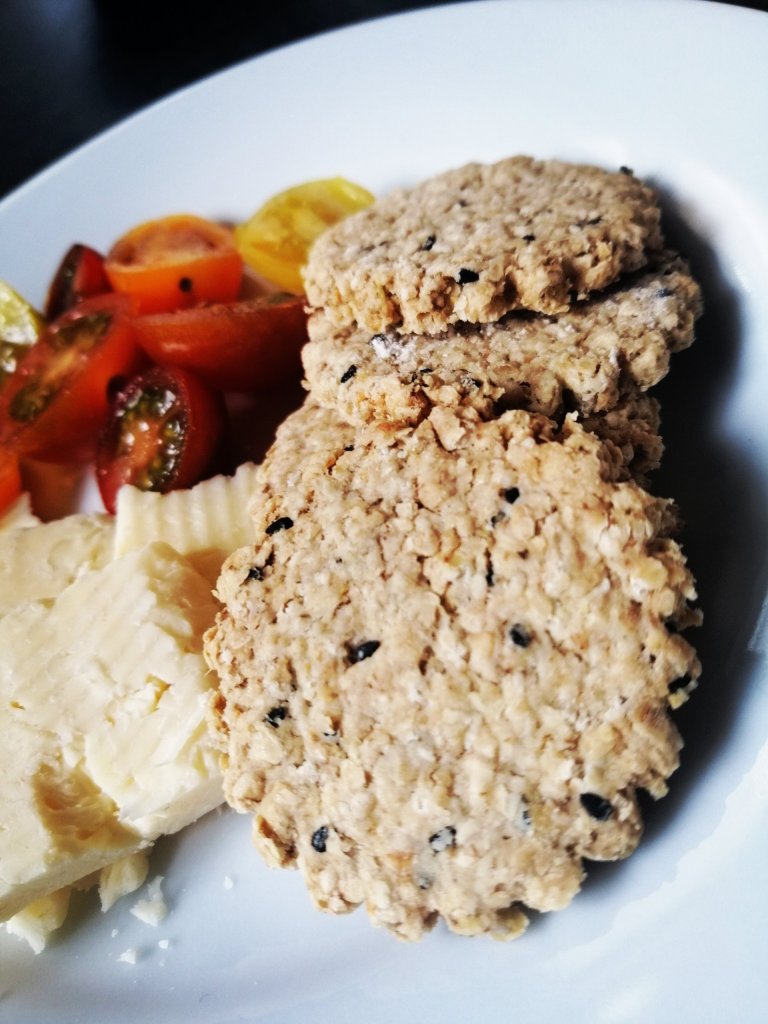
I love oat cakes and these are incredibly easy to make. I have flavoured these with onion seeds because I think they taste great with cheese. Cumin or fennel seeds also work really well if you fancy changing things up, or just leave plain if you prefer.
Ingredients
1/2 Tsp salt
150 Grams Porridge oats
1 Tsp Onion (Nigella) seeds
20 Grams Butter
125ml Boiling water
Plain flour for rolling out
Method
Add the porridge oats to a food processor and whiz until the oats are finer, then pour into a bowl with the onion seeds and salt
Add the butter to hot water stir until it has melted
Add the hot water and butter to the oats and mix well. Allow to stand for 5 minutes
Preheat you oven to 160 degrees and line a baking sheet with parchment
Flour your work surface and roll the oat mix out until it’s 0.5cm thick. Use a cookie cutter to cut out oat cakes to the desired size. Reform and roll out again to use up any remaining mix
Bake for 20-25 minutes and cool on a wire wrack. Keep in airtight box for 3-4 days
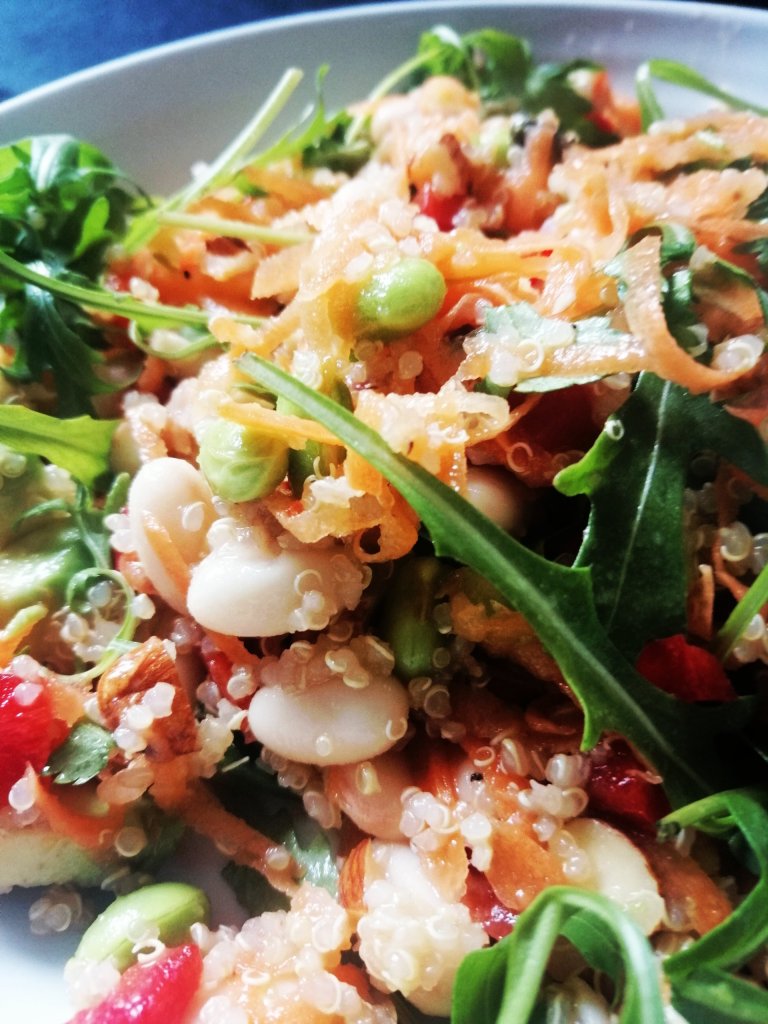
People still argue about if super foods actually exist. Regardless of this, everything in this salad is good for you, and tastes delicious.
It’s packed full of protein, flavour and different tastes and texture. I enjoy this with hummus, (so ideal for vegans and vegetarians). It’s also great in wraps with holoumi or as a side dish with grilled chicken or fish.
Ingredients
For the salad
50 Grams Endamame beans (I used frozen ones that I thawed)
100 Grams Quinoa (dried weight), cook as instructed on the packet
50 Grams Almonds (toasted and chopped)
2 handfuls Rocket/Arugula (or other peppery salad leaf)
1 large Carrot (grated)
1 Red pepper (cut in into 1cm chuncks)
400 Gram Tin of cannellini beans (use what ever type of beans you like, just drain them first)
2 Tbsp Pumpkin seeds
1 Large avocado (chopped)
Juice of one lime
For the dressing
2 Tbsp Olive oil
Zest and juice of 2 limes
2 Tbsp Corriander (chopped, you can use other herbs like mint or parsley if prefer)
Salt and pepper to taste
Method
Cook the quinoa as instructed on the packet and allow to cool
In a dry frying pan, toast the almonds and allow to cool before chopping (you don’t need to do this but it really does help improve the flavour)
Chop the avocado and cover with the juice of one of the limes to prevent it from discolouring
Add all the salad ingredients (except the rocket) to a bowl and mix well
Add the dressing and check the seasoning, mix in the rocket just before serving
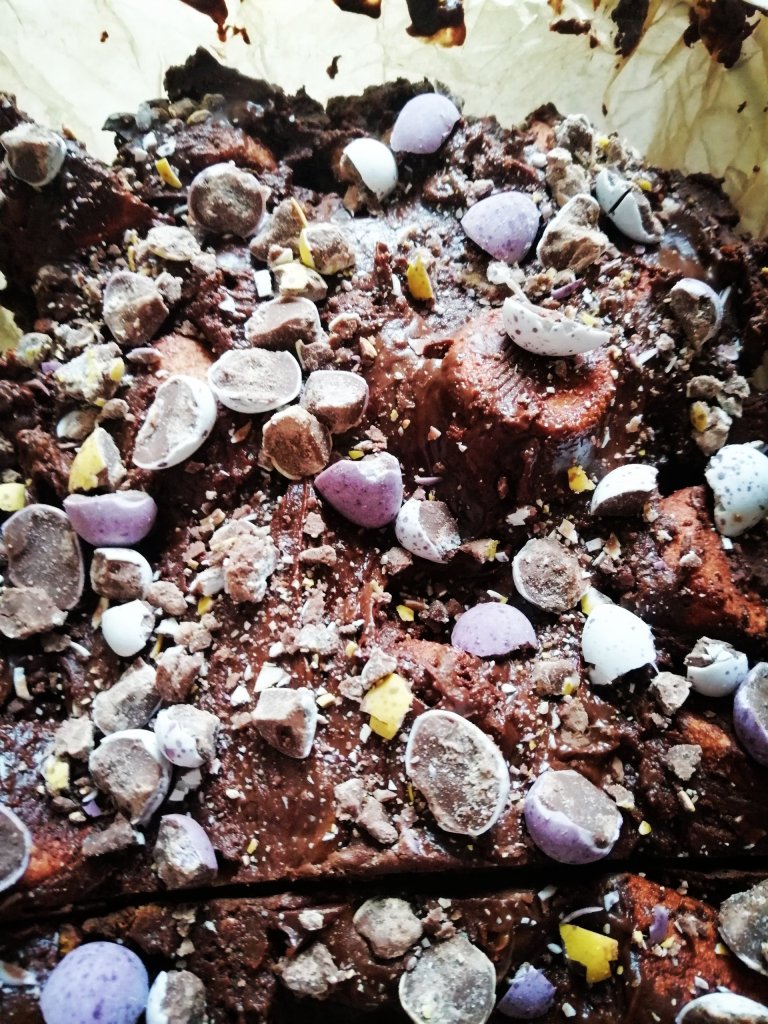
You can make an almost infinite variety of rocky road bars. The key thing is include lots of different textures.
I used mini eggs because they are basically my crack cocaine. My other more recent addiction is Bishoff biscuits. I’ve used these here, but you can use any type of crunchy biscuit or cookie you prefer.
Ingredients
400 Grams Chocolate (I used half milk and half dark chocolate, but use what you prefer)
125 Grams Bishoff biscuits
100 Grams Marshmallows
250 Grams Mini Eggs
3 Tbsp Golden Syrup
50 Grams Butter
Method
Break the chocolate in to chunks, and add to a microwave proof bowl along with the butter and golden syrup. Microwave for 30 seconds at a time until the butter and chocolate have melted
Place the biscuits in a freezer bag any bash with a rolling pin (if you don’t have one a tin can will do). The biscuits should be be broken into bits but not too small or all crumbs. Put the broken biscuits in a large bowl
Add half the mini eggs to the freezer bag and bash these too. Add to the broken biscuits and add the Marshmallows
Pour two thirds of the chocolate mix into the bowl and stir until combined. Line a 12cm X 18cm dish with baking paper and transfer the rock road mix into it. Spread evenly.
Cover the rocky road mix with the chocolate you held back. I use a wet palate knife to smooth the top (an ordinary knife is fine if you don’t have one, as rocky roads are bumpy)
Sprinkle the remaining half of the crushed mini eggs and refrigerate for a minimum 1-2 hours before cutting into slices
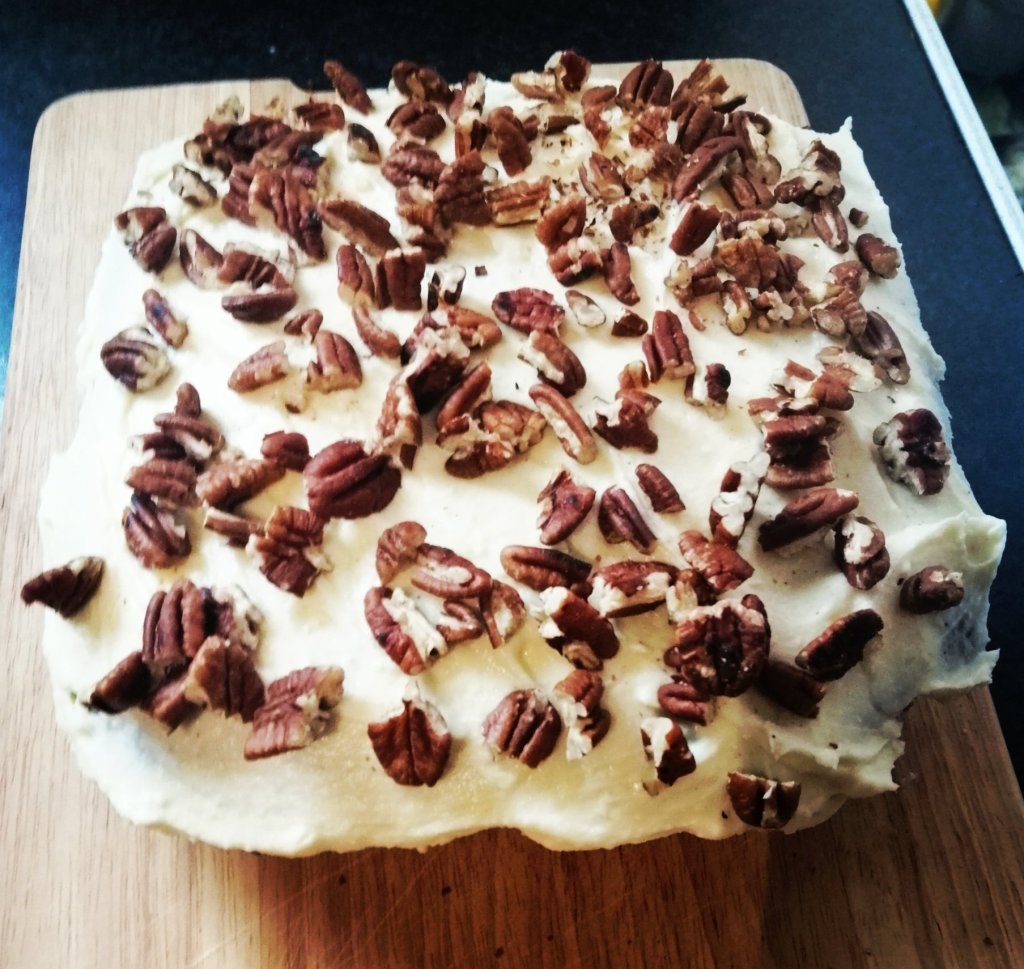
I’ve loved this cake ever since I tasted it in the States years ago. Not only does it have a cool name but your house will smell unbelievable.
This is also a good way to use up over ripe bananas if you can’t face banana bread (this is much nicer). Cinnamon can be swapped for ground ginger if you’re not a fan.
Ingredients
For the cake
130 Gram Tin of pineapple in natural juice (chop the pineapple finely, and keep the juice)
2 Ripe bananas (mashed)
280 Grams Caster sugar
210 Grams Self raising flour
2 Tsp Ground Cinnamon
60 ml Pineapple juice (from the tin of pineapple)
170 ml Oil
2 Eggs
For the frosting
60 Grams Butter
120 Grams Cream Cheese
180 Grams Icing sugar
75 Grams Pecan nuts (Chopped)
Grated zest of one lemon (optional)
Method
Preheat your oven to 180 degrees. Lightly grease a 20 cm (8 inch) cake tin and line with baking paper
Add the banana, chopped pineapple and sugar to a large bowl and mix until combined. Add the flour and cinnamon and mix well
Whisk the oil, eggs and pineapple juice together before adding to the banana mixture. Stir until properly combined
Transfer the cake mix to the baking tin and bake for 1 hour or until you can insert a skewer in the centre and it comes out clean. Allow to cool in the tin for another 15 minutes. Allow to cool completely before topping with icing
To make the icing, whisk the butter and cream cheese together (I use an electric whisk). Gradually add the icing sugar and orange zest.
Spread the icing evenly over the top of the cooled cake and sprinkle with pecans
I have to give a shout out to my friend Nuala for turning me into this, and I love it.
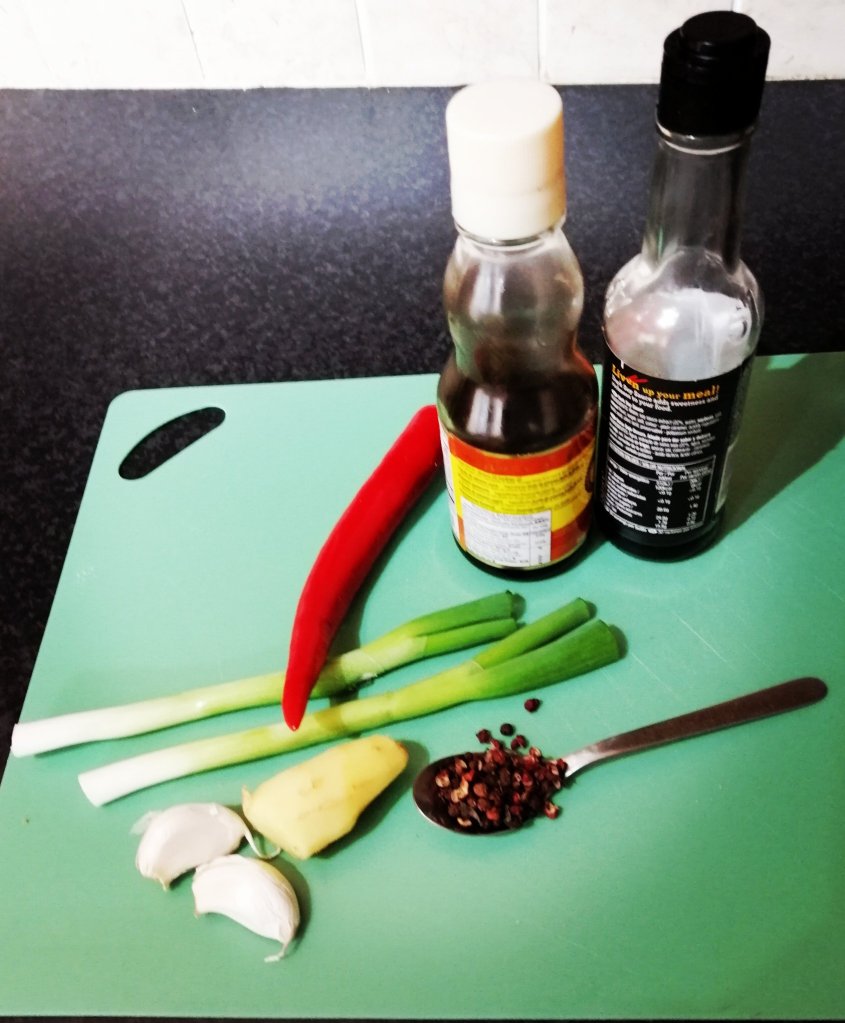
If you haven’t used Sichuan pepper before you can by it ready ground in most big supermarkets. You can also buy packets of the whole peppercorns, and are reddish black in colour. While there is some heat, they are also really aromatic and work nicely in lots of other recipes.
This makes a great mid week dinner and is ideal for anyone following a low carb diet. If you’re not then enjoy this with rice or noodles. I used frozen greens to save time.
Ingredients
250 Grams Minced pork
500 Grams Green beans blanched on boiling water
Thumb sized piece of ginger (grated)
2 Cloves of garlic (finely chopped)
2 Scallions/spring onions (finely chopped)
1 Red chilli pepper (finely chopped)
2 Tbsp Soy sauce
1 Tbsp Sesame oil
1 Tsp Ground Sichuan pepper
Method
Blanch the green beans in boiling water and drain
Fry the minced pork in a large frying pan or wok until no longer pink
Add the rest of the ingredients and cook for a further 5 minutes. If the mix starts to catch in the pan you can add a little water to stop this
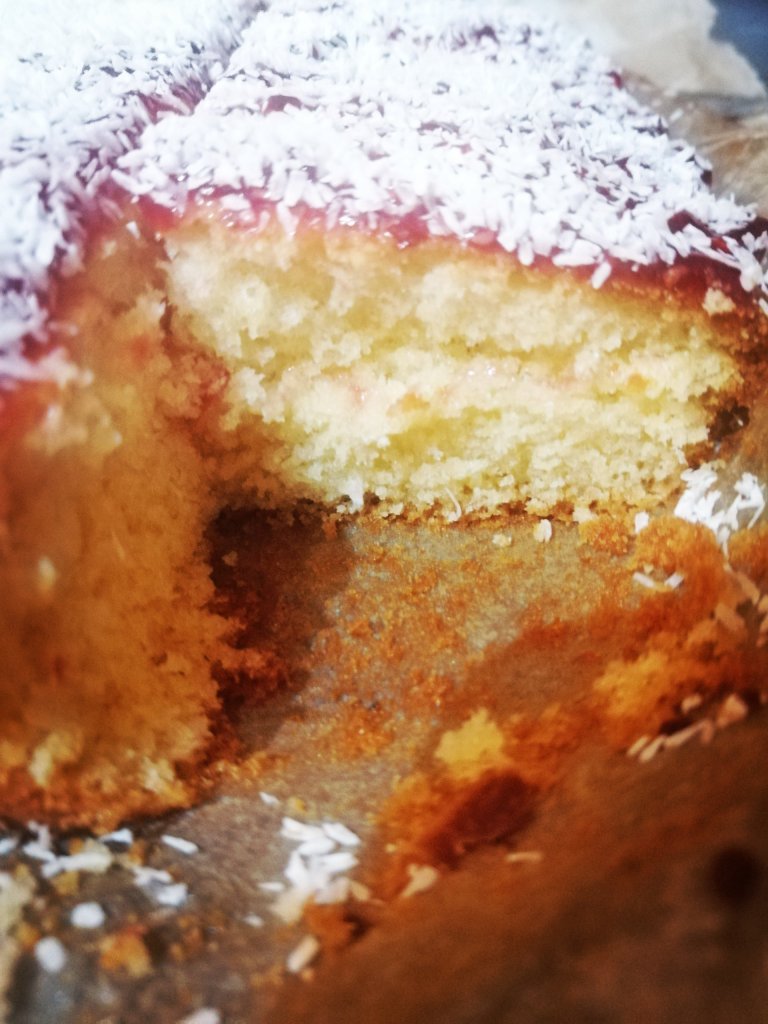
If you aren’t confident with desserts this is really easy. All the ingredients for the sponge are dumped in a bowl and whisked together before being baked. The topping is simply ready made jam and coconut.
The sponge also freezes really well, so if you’re super organised make a double batch of the mix. Bake two sponges, and when completely cool, wrap one one of the sponges in cling film and freeze, top with jam and coconut once thawed.
I’ve used margarine in this (Mary Berry claims it’s better for sponge cakes, and who am I to argue), it’s also cheaper. Feel free to use butter if you prefer
Serve with custard for the perfect comforting dessert.
Ingredients
For the sponge
225 Grams Self raising flour
225 Grams Sugar
225 Grams Margarine
4 Eggs
For the topping
200 Grams Jam
25 Grams Dessicated coconut
Method
Add all the ingredients for the sponge in a bowl. Mix with an electric whisk for 5 minutes until light and fluffy
Pre heat your oven to 180 degrees
Line a 30cm x 18cm square cake tin with baking parchment. Transfer the sponge mix into the tin and spread evenly with a spatula
Bake for 25 – 30 minutes, and allow to cool
Stir the jam and if it’s too thick to spread add a table spoon of hot water and mix well
Spread the jam evenly across the sponge and sprinkle with coconut
I don’t make soup that often (some soups are a little dull).
Anything with cheese in it gets my vote, and this is rich and satisfying.
Ideal for anyone following a low carb diet, this is also delicious with crusty bread. I made this with vegetable stock so it’s suitable for vegetarians but you can use chicken stock if you prefer.
You’ll need cream cheese and a stronger flavoured cheese. I used a mix of mature cheddar and parmigiana, blue cheese works really well too, but use what you have.
This rich creamy soup is even tastier topped with crunchy croutons, or crispy bacon (if you’re not vegetarian)
Ingredients
1 Large head of broccoli (roughly chopped)
1 Small onion, or 3-4 spring onions/scallions (chopped)
1 Tbsp Oil
750 ml Vegetable stock (I used a stock cube)
200 Grams Cream cheese
50 Grams Strong flavour cheese (grated)
Salt and pepper
Method
Heat the oil in a large pot, and add the onion. Fry over a medium heat until soft but don’t brown
Add the broccoli and vegetable stock. Cover with a lid and simmer for 10 minutes or until the broccoli is soft
Add the cream cheese and stir until it has melted. Using a blender or hand held blender, blitz until the the soup it is smooth (how smooth you make it is up to you)
Return the soup to the pot and add the stronger flavoured cheese. Heat for a further 5 minutes and stir well to make sure all the cheese has melted. Check the seasoning and add salt and pepper if needed
I hate food waste, but like everyone else I’m not perfect.
One of the things I always ended up throwing out was Greek yogurt. The small pots weren’t enough, and the larger containers meant I always had some left over.
A friend told me about this recipe and I love it. Most people are put off making bread bread because it can take time to prove, knead etc. This couldn’t be quicker or easier.
Equal amounts of flour and yoghurt, and like making scones these rolls benefit from not handling to much. This recipe makes 4 rolls, but you can double the recipe if you want more. You can brush the uncooked rolls with egg or melted butter if you want a glazed top, but I just sprinkled with flour.
Soft and fluffy rolls
I haven’t given exact weights. I literally just used a mug to ensure I was measuring equal amounts.
These also freeze really well.
Ingredients
1 Cup self raising flour 1 Cup of Greek yogurt (I used full fat yoghurt as this is what I had, it also gives a softer texture, but use what you have)
Method
Measure out the flour and yoghurt and add to a bowl.
Pre heat your oven to 180 degrees (or around 350 if you’re using Fahrenheit)
Stir with a wooden spoon until the dough is combined and turn onto a lightly floured surface
Divide the dough into 4 equal parts and roll into balls
Place on a baking sheet and bake for 25 minutes or until the bottoms sound hollow when tapped
Mardi gras didn’t really happen this year, but this time of year reminds me of New Orleans.
I was talking to a friend last week about places we had really enjoyed visiting and the food that reminded us of them and it sparked a memory of New Orleans.
About a million years ago when I was a student I worked in a US Summer camp and went travelling afterwards. I ended up in New Orleans and everyone recommended I try a visit to Cafe du Mond in the French Quarter. Their signature dish is a little plate of 3 beignets (little oblong donuts, doused in icing sugar) and a cafe au lait. The place is an institution and recalling it had me craving them. I had my very own Marcel Proust moment eating these, it was amazing (Rememberance of Things Past, is quite a dull book but is famous for a passage about how food triggers memories)
This is probably best made at the weekend due to the amount of time you need to prove the dough, but other than that the beignets are pretty simple to make.
I used evaporated milk because I think it makes a richer dough, but ordinary milk is fine if you don’t have it.
N.B. When deep frying, cook at a medium heat. They will brown very quickly because of the sugar in the dough, the first few I made had raw dough in the middle which was disgusting. I cooked the rest at a lower heat and they were fine.
Ingredients
430 Grams Flour, I used strong bread flour, but plain flour is fine
125 ml Evaporated milk (ordinary milk is also fine)
175 ml Warm water (about skin temperature, not too hot or you’ll kill the yeast)
1/2 Tsp Dried yeast
50 Grams Sugar
1/2 Tsp Salt
1 Egg (beaten)
30 Grams Butter (melted, and allowed to cool a little)
Icing sugar for dusting
Vegetable oil for frying
Method
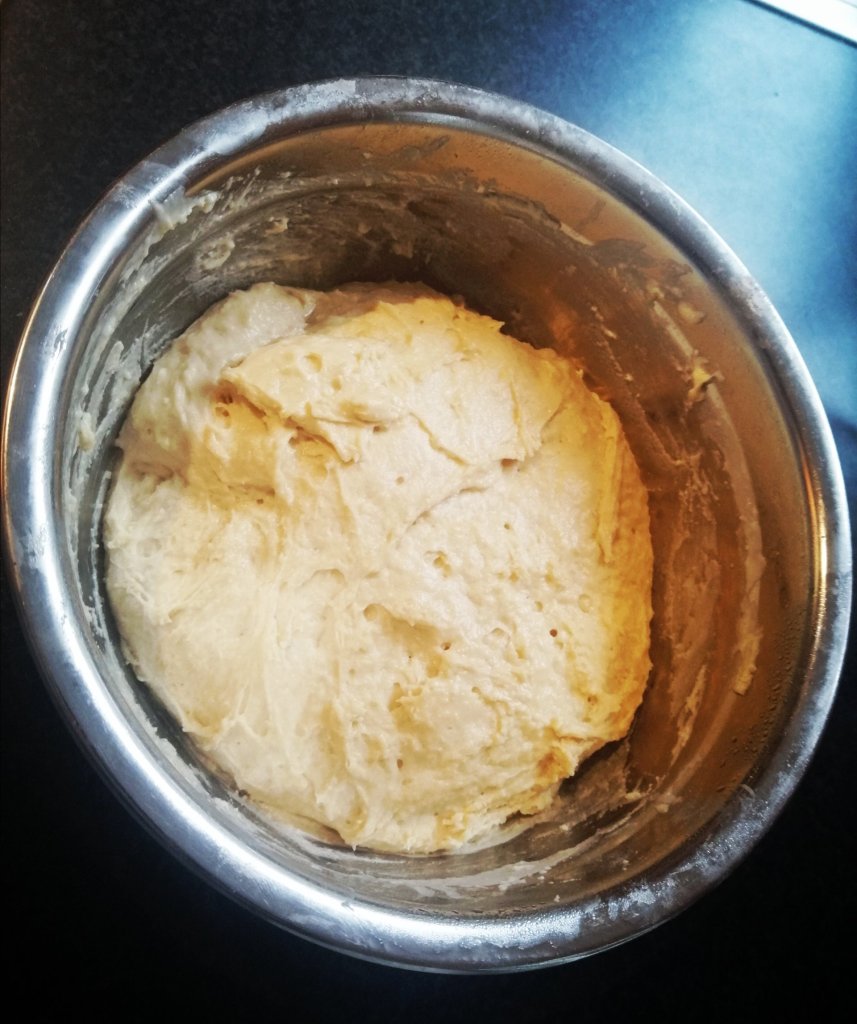
In a large bowl, add half the water, a teaspoon of sugar, and the yeast and stir, leave in a warm room (I use an airing cupboard because there are drafts) for 15 mins. The mix start to form a froth on top.
Mix in the rest of the water, sugar, salt, milk and the egg and mix well
Stir in half the flour, and then add the melted butter and remaining flour and mix well. The douch will be pretty sticky so transfer to a greased bowl and cover with cling film and keep in a fridge over night or at least 3 hours
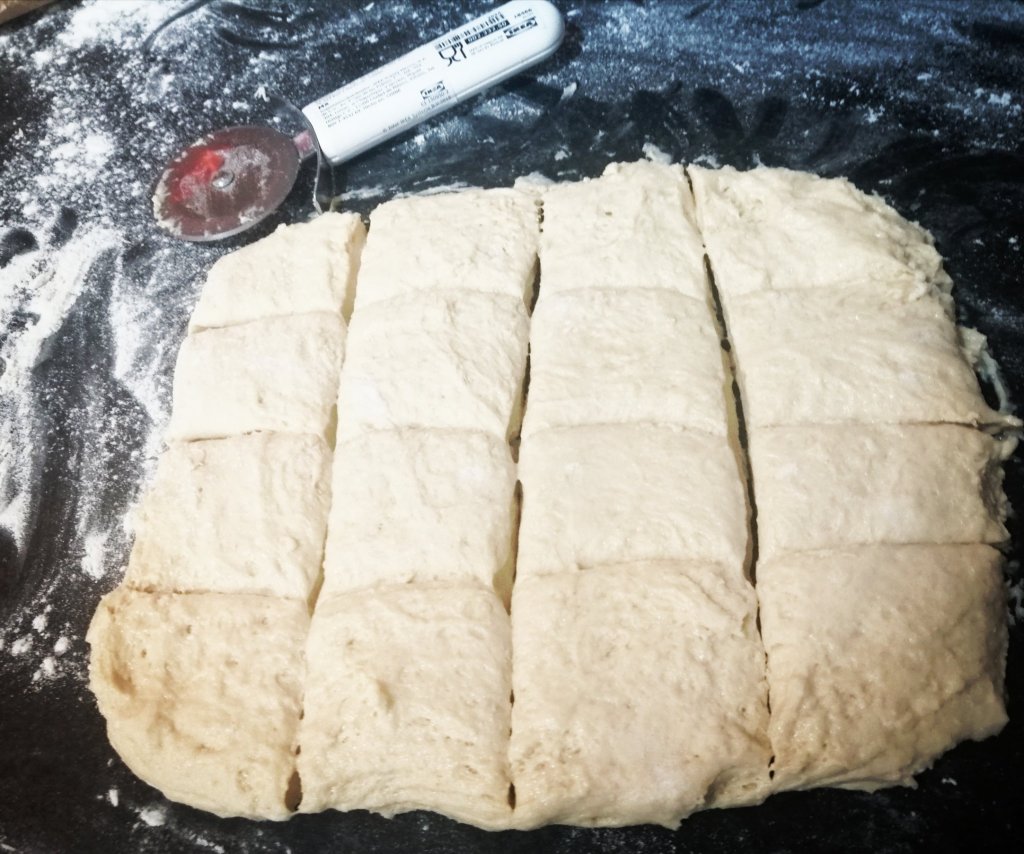
After dough has proved in the fridge its time to roll out. I’ve tried flouring the surface and rolling pin and found it stuck really badly. So the next batch I tried using a thin layer of oil on the surface and rolling and for me it worked better (I know some people prefer using a floured surface so work with what works for you
Roll the dough in to an oblong and trim the edges. I use a pizza cutter to cut the dough into 18 oblongs (you can use a knife, but I found this worked well
Heat your oil, until its warm enough that a cube of bread will sizzle when you drop it in. Cook the beignets in small batches, turning after a minute or two. You really need to pay attention to these as the colour very quickly. As I said early don’t let your oil get too hot or you’ll end up with raw dough in the middle
Drain the cooked beignets on kitchen paper as soon as you take them out of the oil and then sprinkle liberally with icing sugar for a proper taste of New Orelans